Suramya's Blog : Welcome to my crazy life…

September 6, 2023

Mastering curl using an interactive text guide

Filed under: Knowledgebase,Linux/Unix Related,My Thoughts — Suramya @ 10:09 PM

Curl is a program that has slowly percolated across the entire internet and in places where you wouldn’t believe. Folks have found it installed in inverters, it is running in outerspace etc. I mostly used to use wget earlier because my needs were quite simple and usually I just wanted to download a page or file from a website, then as I started working on more advanced use cases I found that curl was more powerful and versatile than wget, so I use curl more than wget now. (for the most part).

The curl command is extremely versatile and has over 250 commandline options, even seasoned users don’t know what all the tool can do so Daniel Stenberg who is the author of curl created a 3.5 hours long video on how to master curl. While the video is really useful and goes in depth, I personally don’t like to watch video tutorials. Instead I prefer to read text based tutorials as I read quite fast and can also search for specific stuff in a text tutorial which is not really possible in a video (at least not easily).

So, I was quite pleased to find that Anton Zhiyanov had taken the effort to create a text version of the video for future reference and as a cherry on top they even made the whole thing interactive so that you can try out the commands directly from the website and see how they would work.

Do check out the tutorial if you want to learn more about curl and how to use it more efficiently.

– Suramya

August 22, 2023

Getting my Pocket C.H.I.P. to finally work

Filed under: Knowledgebase,Linux/Unix Related,My Thoughts,Tech Related — Suramya @ 11:59 PM

Way back in 2016, I backed the Pocket C.H.I.P on Kickstarter opting to get 2 CHIP’s and one PocketChip. The C.H.I.P (or CHIP) was a single single-board computer costing $9 launched by Next Thing Co. It used open-source hardware running open-source software and was advertised as world’s first $9 computer as a direct competitor to the RaspberryPi . The device boasted the following configuration:

  • 1 GHz R8M/R8 (ARMv7)SoC processor
  • 512 MB DDR3 SDRAM
  • Built-in Wi-Fi 802.11b/g/n, Bluetooth 4.0
  • One USB host with type-A receptacle, one USB On-The-Go port
  • Composite video and stereo audio port via mini TRRS
  • Optional composite TRRS to RCA audio-video cable
  • Optional VGA adapter and HDMI adapter (I got both)
  • Up to 45 GPIO ports
  • Supports 1-Wire and I2C protocols, PWM output
  • Serial console and Ethernet via USB for quick headless operation
  • Power options include 5V via USB OTG, 5V via CHN pin, and by 3.7V battery
  • Onboard NAND storage, 4-8GB

The PocketChip was a handheld with a 4.3 inch 480×272 pixel resistive touchscreen, a clicky keyboard, GPIO headers on the top of the device, and GPIO soldering pads inside of the injection molded case powered by the CHIP processor. It looks clunky but is easier to connect to the device and setup using the PocketChip rather than doing it with just the CHIP.

Unfortunately the company shutdown in 2018 due to various issues. However, I was one of the lucky backers to receive the devices but once I received them I put them in a drawer and kind of forgot about them as life got busy and interesting. Over the years I did try to power on the device a couple of times but never really looked into getting it to work, so they just collected dust in my desk (literally).

Over the past weekend I decided to try getting it to work so I did some searching and with a lot of trial and error finally managed to get things to work and boot into a working OS. 🙂 The main issue was that I was expecting it to work like the RaspberryPi where the OS was installed on an SD card but in this case the OS had to be flashed on to the onboard flash chip which was a bit more complicated process than installing to a SD card. I followed the instructions at NextThingCo Pocket C.H.I.P. Flashing Guide amongst other pages to get things to work. Here I will document some of the other things I had to do to get it to work. Please note that this was on a Debian setup, things might be a bit different for other OS’s

Install the Prerequisites

First we need to install the tools required by running the following command as root:

apt-get install git android-tools-fastboot sunxi-tools u-boot-tools

Download the CHIP SDK

Download the CHIP-SDK.zip from one of the following links:

Download and extract the CHIP Tools

Download CHIP-tools.zip from one of the following sites:

Download CHIP OS Images

Download the CHIP OS image from one of the following links:

Extract flash-collection.zip

When I tried extracting the contents of the zip file I got from the first link, I got an error that the file is not a Zip file. After a lot of searching I found out that you can run the following command to extract the file instead:

jar xfv flash-collection.zip

Since that seems unnecessarily complicated. I have extracted and re-compressed the file and shared it at the second link. You can extract it using the standard zip tools.

Fix fastboot

The version of fastboot in the Debian repositories is newer than the one used in the setup scripts and if you try to flash with the version installed then fails with the following error message:

..
..
== Cached UBI located ==
Image Name:   flash server
Created:      Sun Aug 20 19:29:14 2023
Image Type:   ARM Linux Script (uncompressed)
Data Size:    1784 Bytes = 1.74 KiB = 0.00 MiB
Load Address: 00000000
Entry Point:  00000000
Contents:
   Image 0: 1776 Bytes = 1.73 KiB = 0.00 MiB
waiting for fel...OK
waiting for fastboot...fastboot: invalid option -- 'i'
.fastboot: invalid option -- 'i'

The easiest fix for this is to rollback to a previous version of the software that supports the -i parameter. You can try to search and download the older version from Debian’s repositories, but I found it easier to download the software from platform-tools_r26.0.0-linux.zip (as I was too tired to go search for it in the archives)

Once you download the file and extract the contents, follow these steps to rollback to the previous version of fastboot:

  • Backup the existing binary for fastboot
  • mv /usr/lib/android-sdk/platform-tools/fastboot /usr/lib/android-sdk/platform-tools/fastboot_old
  • Copy the extracted file from the zip file to the correct location
  • mv platform-tools/fastboot /usr/lib/android-sdk/platform-tools/fastboot

Put the CHIP in FEL mode

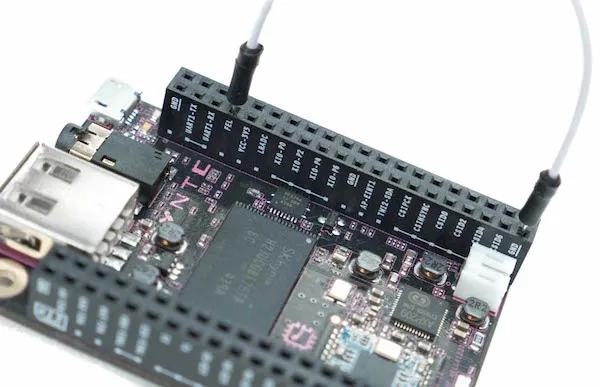
The FEL mode allows the software to flash the CHIP with a new firmware. This can be done by putting a jumper wire between GND and FEL. It will look something like the following:


Connecting a jumper wire between GND and FEL to enter FEL Mode

Once you have entered the FEL mode, connect the CHIP to the computer using the microUSB port on the CHIP, not the fullsize USB port.

Flashing the OS to CHIP

Once you have downloaded all the files and unziped them. Follow these steps to Flash the OS to CHIP.

  • Move the CHIP-tools directory to the CHIP-SDK directory
  • mv CHIP-tools CHIP-SDK/
  • Select the Image you want to install and move it into the CHIP-SDK directory. There are 8 Images to choose from, I tested with the testing-server-b543 and testing-pocketchip-b667 images as I have 2 CHIPS to play with. 🙂
  • The original instructions on the site ask you to run the ./setup_ubuntu1404.sh script located in the CHIP-SDK directory but it failed most commands on my system. I think that you should be able to proceed without running it but haven’t tried it.
  • Switch to the CHIP-tools directory
  • cd CHIP-SDK/CHIP-tools
  • Run the firmware upgrade script, replacing Path/To/Chip/Image with the location where you extracted the Image you want to install
  • ./chip-update-firmware.sh -L ../../flash-collection/testing-server-b543/

    If you have done everything correctly and nothing is broken, you will get an output similar to the following:

    suramya@StarKnight:~/Media/Downloads/CHIP/CHIP-SDK/CHIP-tools$ ./chip-update-firmware.sh -L ../testing-pocketchip-b667/
    == Local directory '../testing-pocketchip-b667/' selected ==
    == preparing images ==
    == Local/cached probe files located ==
    == Staging for NAND probe ==
    Image Name:   detect NAND
    Created:      Sun Aug 20 20:24:50 2023
    Image Type:   ARM Linux Script (uncompressed)
    Data Size:    97 Bytes = 0.09 KiB = 0.00 MiB
    Load Address: 00000000
    Entry Point:  00000000
    Contents:
       Image 0: 89 Bytes = 0.09 KiB = 0.00 MiB
    waiting for fel...OK
    waiting for fel......OK
    NAND detected:
    nand_erasesize=400000
    nand_oobsize=680
    nand_writesize=4000
    == Cached UBI located ==
    Image Name:   flash server
    Created:      Sun Aug 20 20:24:58 2023
    Image Type:   ARM Linux Script (uncompressed)
    Data Size:    1784 Bytes = 1.74 KiB = 0.00 MiB
    Load Address: 00000000
    Entry Point:  00000000
    Contents:
       Image 0: 1776 Bytes = 1.73 KiB = 0.00 MiB
    waiting for fel...OK
    waiting for fastboot...................OK
    target reported max download size of 33554432 bytes
    sending sparse 'UBI' 1/23 (28672 KB)...
    OKAY [  2.016s]
    writing 'UBI' 1/23...
    OKAY [  2.069s]
    sending sparse 'UBI' 2/23 (28672 KB)...
    OKAY [  2.007s]
    writing 'UBI' 2/23...
    OKAY [  5.484s]
    ..
    ..
    
    sending sparse 'UBI' 22/23 (28672 KB)...
    OKAY [  1.916s]
    writing 'UBI' 22/23...
    OKAY [  9.079s]
    sending sparse 'UBI' 23/23 (16384 KB)...
    OKAY [  1.105s]
    writing 'UBI' 23/23...
    OKAY [  4.981s]
    finished. total time: 300.744s
    resuming boot...
    OKAY [  0.000s]
    finished. total time: 0.000s
    
    
    FLASH VERIFICATION COMPLETE.
    
    
       #  #  #
      #########
    ###       ###
      # {#}   #
    ###  '%######
      #       #
    ###       ###
      ########
       #  #  #
    
    
    CHIP is ready to roll!

    If you see the message that “FLASH VERIFICATION COMPLETE.” and that “CHIP is ready to roll!”, then the OS installation has completed successfully. Now you can disconnect the CHIP from the computer and remove the jumper cable.

    Booting into CHIP

    If you have the PocketCHIP, then you can just power up the device by pressing on the power button for a second (pressing it for 10 seconds shuts it down forcefully). If you just have the CHIP, you will need to connect it to a monitor and connect a keyboard as well. (I used the PocketCHIP to configure everything and then used it separately).

    The boot up process can take a minute or two, and assuming everything went well you should see the standard boot messages on the screen. Once you get to the login prompt you can log in using the username ‘chip’ (without the quotes) and ‘chip’ (without the quotes) as the password. The root account password is also ‘chip’ (without the quotes).

    Connecting to WiFi and configuring the CHIP

    The first thing that you should do now is connect the device to a WiFi network so that you can SSH into it for ease of configuration. The second thing should be to change the default passwords 🙂

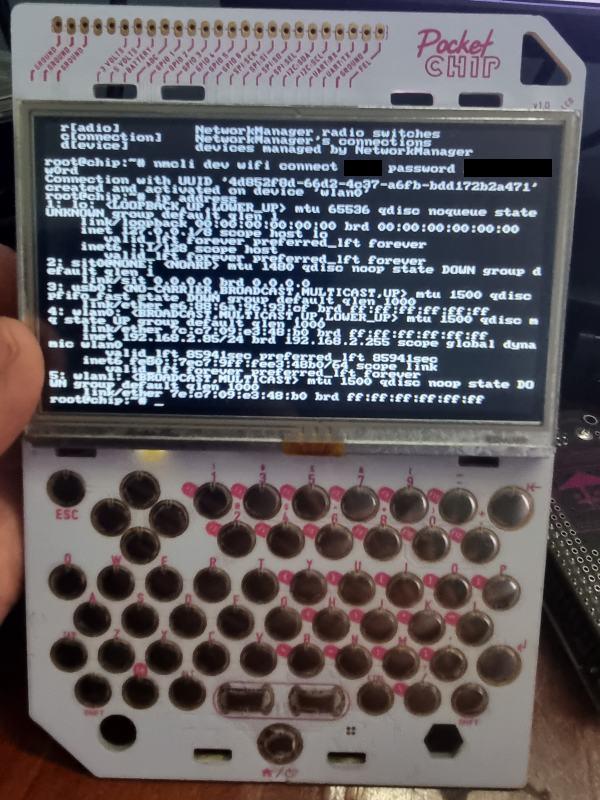
    The easiest way to configure WiFi is to use the nmcli tool. Run the following command as root to connect to the WiFi. More details on the command are available at How to Connect Wi-Fi from Linux Terminal Using Nmcli Command

    nmcli dev wifi connect <SSID of The Network to Connect With> password <password for the Wifi Network> 

    Once the device is connected to the WiFi, get your IP address using the following command:

    ip address

    Then you can SSH into the device from any system using the IP address.

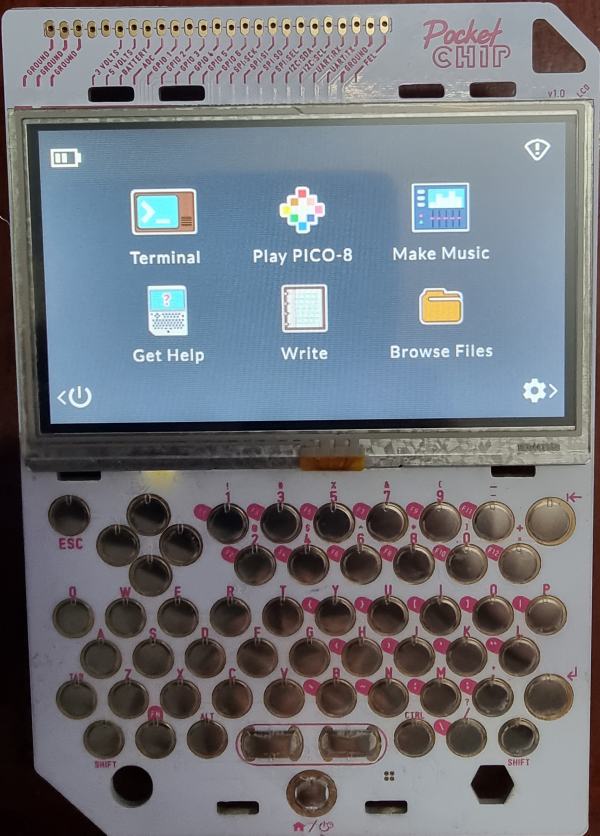
    CHIP is working!!!


    Running Debian 8 Testing


    Running the PocketCHIP customized version (Debian 8)

    Updating the OS to the latest version

    The system is running Debian 8 by default and you should upgrade it to the latest version. Unfortunately, I keep getting errors when I try to upgrade to the latest Debian version and haven’t yet fixed the problem. Basically, I think you need to update the /etc/apt/sources.list with the correct mirror details and then upgrade. Once I get some time to revisit the setup and resolve the issue I will post the fix on the blog as a followup post to this one.

    – Suramya

August 21, 2023

Workaround for paste not working in Whatsapp web on Firefox

Filed under: Computer Software,Knowledgebase — Suramya @ 10:40 PM

In the latest version of Firefox (116.0.3) something changed and due to this if you are using the Web version of Whatsapp you are no longer able to paste anything into the chat window. Ctrl-V, Right-Click -> Paste, nothing works. The issue exists on both Windows and Linux builds of Firefox. Did a search and found that others are facing the same issue and found a work around at Superuser.com: Firefox doesn’t allow to paste into WhatsApp web anymore?

In order to fix follow these steps:

  • Go to about:config
  • Search for ‘dom.event.clipboardevents.enabled’ (without the quotes)
  • Set the value to false by double clicking on the entry

The change takes effect immediately. This is not a permanent fix and once Firefox fixes the issue you should revert the change.

– Suramya

March 6, 2023

Resolving Citrix error: “No active policy is found in Secondary authentication cascade” when connecting via Android client

Filed under: Computer Tips,Knowledgebase — Suramya @ 8:37 PM

I was try to connect to Citrix using an android device and after authentication, I got the following error message: “No active policy is found in Secondary authentication cascade. Please contact your administrator.”

I tried doing a search for the error message but none of the solutions were applicable in my case. I was accessing the log in page using Firefox mobile and on a hunch I switched the view to “Desktop Site” by clicking on the three dots on the top right corner of the browser (See screenshot below). Once I did that and resubmitted the page, things automatically started working without any errors.


Enable Desktop Site in Firefox

My guess is that the mobile view doesn’t allow the server to run secondary validation checks because of the limitations in the mobile view. Switching to Desktop mode removes the limitations so things start automagically working again.

– Suramya

January 21, 2023

Fixing AssertionError: Font Arial,Bold can not represent ‘E’ when using Borb to modify PDF Files

Filed under: Computer Software,Knowledgebase,Tech Related — Suramya @ 12:47 AM

I have a bunch of PDF files that I need to modify to remove text from them. Initially I was using LibreDraw but that was a manual task so I thought that I should script it/Automate it. Little did I know that programmatically editing PDF’s is not that simple. I tried a bunch of libraries such as PyPDF4, pikepdf etc but the only one which worked was borb which is a library by Joris Schellekens. They have a great collection of examples and using that I got my first script that searched and replaced text in the PDF working.

However, when I tried to run the script against my pdf file the script fails with the following error:

Traceback (most recent call last):
  File "/home/suramya/Temp/BorbReplace.py", line 26, in 
    main()
  File "/home/suramya/Temp/BorbReplace.py", line 18, in main
    doc = SimpleFindReplace.sub("Manual", "", doc)
  File "/usr/local/lib/python3.10/dist-packages/borb/toolkit/text/simple_find_replace.py", line 80, in sub
    page.apply_redact_annotations()
  File "/usr/local/lib/python3.10/dist-packages/borb/pdf/page/page.py", line 271, in apply_redact_annotations
    .read(io.BytesIO(self["Contents"]["DecodedBytes"]), [])
  File "/usr/local/lib/python3.10/dist-packages/borb/pdf/canvas/canvas_stream_processor.py", line 290, in read
    raise e
  File "/usr/local/lib/python3.10/dist-packages/borb/pdf/canvas/canvas_stream_processor.py", line 284, in read
    operator.invoke(self, operands, event_listeners)
  File "/usr/local/lib/python3.10/dist-packages/borb/pdf/canvas/redacted_canvas_stream_processor.py", line 271, in invoke
    self._write_chunk_of_text(
  File "/usr/local/lib/python3.10/dist-packages/borb/pdf/canvas/redacted_canvas_stream_processor.py", line 203, in _write_chunk_of_text
    )._write_text_bytes()
  File "/usr/local/lib/python3.10/dist-packages/borb/pdf/canvas/layout/text/chunk_of_text.py", line 145, in _write_text_bytes
    return self._write_text_bytes_in_hex()
  File "/usr/local/lib/python3.10/dist-packages/borb/pdf/canvas/layout/text/chunk_of_text.py", line 160, in _write_text_bytes_in_hex
    assert cid is not None, "Font %s can not represent '%s'" % (
AssertionError: Font Arial,Bold can not represent 'E'

Process finished with exit code 1

I tried a couple of different files and the font name changes but the error remains

The script I was using is:

from borb.pdf import Document
from borb.pdf import PDF
from borb.toolkit import SimpleFindReplace

import typing

def main():

    # attempt to read a PDF
    doc: typing.Optional[Document] = None
    with open("/home/suramya/Downloads/t/MAA1.pdf", "rb") as pdf_file_handle:
        doc = PDF.loads(pdf_file_handle)

    # check whether we actually read a PDF
    assert doc is not None

    # find/replace
    doc = SimpleFindReplace.sub("PRIVATE", "XXXX", doc)

    # store
    with open("/home/suramya/Downloads/t/MAABLR_out.pdf", "wb") as pdf_file_handle:
        PDF.dumps(pdf_file_handle, doc)


if __name__ == "__main__":
    main()

I searched on the web and didn’t find any solutions so I reached out to the project owner and they responded with the following message “Not every font can represent every possible character in every language. you are trying to insert a piece of text that contains a character that Arial can not represent. Maybe some weird kind of “E” (since uppercase E should not be a problem).”. The problem was that I wasn’t trying to replace any strange characters, just a normal uppercase E.

To help trouble shoot, they asked me for a copy of the file. So I was masking the data in the PDF file to share it and the script suddenly started working. Turns out that there was an extra space after the word PRIVATE in the file and when I removed it things started working (even on the unmasked file). So it looks like the issue is caused when there is an encoding issue with the PDF file. Opening it in Libre Draw and exporting as a new PDF file seems to resolve the issue.

Now we are a step closer to the solution, I just need to figure out how to convert the file from the command line and I will be home free. Something to work on when I have had some sleep.

– Suramya

January 13, 2023

Fixing autopost to LinkedIn not working via Social Networks Auto-Poster

Filed under: Knowledgebase,Tech Related — Suramya @ 9:57 PM

A few days ago my authentication token that allowed Social Networks Auto-Poster to post my blog entries automatically expired (I can only authorize for a max of 2 months at a time). Usually the fix is quite simple, I just go to the account settings in the Plugin and then click on ‘Authorize Your LinkedIn Account (without Marketing API)’, after which I just have to authenticate using my LinkedIn password select Yes and then I am done. This time however, when I clicked on the Authorize connection button the system would redirect me to www.suramya.com/blog instead of the Plugin page which meant that the authentication process couldn’t complete. I spent a few hours trying to troubleshoot and for the life of me I couldn’t figure out the problem. I even tried installing another plugin but faced the same issue over there as well. In the end I decided to take a break and crash for the night as I was going nowhere.

Today I started looking at the problem again and was going to raise a support ticket with the plugin author to have them take a look at the issue and decided to check the FAQs just to ensure I didn’t miss anything obvious. The first entry in the FAQ talked about what to do if the plugin was redirecting to a “Blank Page” or an error page, according to the FAQ this could be caused by certain plugins and the fix was to disable the plugin, authorize and then re-enable them.

The last plugin I had installed was to Autopost my blog posts to Mastodon so I disabled the plugin and then tried authorizing the app again. To my utter delight the system immediately authorized the connection and I was able to make a test post successfully.

The moral of the story is that you should always check the documentation when something is not working rather than trying various things randomly.

Well this is all for now. Will post more later.

– Suramya

October 21, 2022

Disable Dark Theme in the Private Browsing mode in Firefox 106

Filed under: Computer Software,Computer Tips,Knowledgebase,Tech Related — Suramya @ 10:09 AM

A lot of people like Dark themes for their apps but I am not one of them. For me the Dark mode strains my eyes more so I usually disable it as soon as possible. In the latest Firefox update (v106), Firefox changed a bunch of defaults and one of the changes is that when you open a window in incognito mode it uses the Dark theme by default. As per the release notes this is a conscious decision:

We also added a modern look and feel with a new logo and updated it so Private Browsing mode now defaults to dark theme, making it easier to know when you are in Private Browsing mode.

The dark theme really annoys me so I started looking for ways to disable it. Unfortunately, it can’t be disabled without having to change my default Theme (which is to use the System Defaults) which I didn’t want to do and a quick internet search didn’t return any useful results. So I decided to check out the about:config section to see if there is a hidden setting and lo-behold it was there. A quick change disabled the theme for the Private browsing mode and things were back to normal.

The steps to disable the dark theme in incognito mode are as follows:

  • Type about:config in the address bar and press Enter.
  • A warning page may appear. Click Accept the Risk and Continue to go to the about:config page.
  • Search for “theme” in the Search preference name box at the top of the page and you will see an entry for “browser.theme.dark-private-windows”
  • Double click on “True” for the entry to change the value to false.
  • The entry should look like the following. Then you can close the tab and you are done.


To revert the change, just repeat the steps and set the value back to True.

– Suramya

July 9, 2022

Some lesser known Useful Linux commands

Filed under: Computer Tips,Knowledgebase,Linux/Unix Related,Tech Related — Suramya @ 7:15 AM

In this post I am sharing some useful Linux commands originally posted by Traw on Twitter. As it is almost impossible to find stuff on Twitter (even if you favorite it) I am consolidating the entire thread here as a blog post for my reference:

lsmem:

lsmem lists the ranges of available memory with their online status. The listed memory blocks correspond to the memory block representation in sysfs. The command also shows the memory block size, the device size, and the amount of memory in online and offline state. The output looks like:

suramya@StarKnight:~$ lsmem
RANGE                                  SIZE  STATE REMOVABLE  BLOCK
0x0000000000000000-0x00000000cfffffff  3.3G online       yes   0-25
0x0000000100000000-0x000000052fffffff 16.8G online       yes 32-165

Memory block size:       128M
Total online memory:      20G
Total offline memory:      0B

lsusb

lsusb lists all the USB buses in the system and the associated devices connected to them. A good way to figure out what USB devices are connected and what the vendor ID and the product ID associated with them. The output looks like:

suramya@StarKnight:~$ lsusb
Bus 006 Device 001: ID 1d6b:0003 Linux Foundation 3.0 root hub
Bus 005 Device 032: ID 03f0:3b17 HP, Inc LaserJet M1005 MFP
Bus 005 Device 029: ID 8564:4000 Transcend Information, Inc. microSD/SD/CF UHS-II Card Reader [RDF8, RDF9]
Bus 005 Device 001: ID 1d6b:0002 Linux Foundation 2.0 root hub
Bus 004 Device 001: ID 1d6b:0003 Linux Foundation 3.0 root hub
Bus 003 Device 002: ID 0b05:18f3 ASUSTek Computer, Inc. AURA LED Controller
Bus 003 Device 001: ID 1d6b:0002 Linux Foundation 2.0 root hub
Bus 002 Device 001: ID 1d6b:0003 Linux Foundation 3.0 root hub
Bus 001 Device 005: ID 8087:0029 Intel Corp. AX200 Bluetooth
Bus 001 Device 004: ID 05e3:0610 Genesys Logic, Inc. Hub
Bus 001 Device 003: ID 413c:2113 Dell Computer Corp. KB216 Wired Keyboard
Bus 001 Device 002: ID 0951:16bc Kingston Technology HyperX Pulsefire FPS Gaming Mouse
Bus 001 Device 001: ID 1d6b:0002 Linux Foundation 2.0 root hub

lsb_release

The lsb_release command displays LSB (Linux Standard Base) information about your specific Linux distribution, including version number, release codename, and distributor ID. The output looks like:

suramya@StarKnight:~$ lsb_release -a
No LSB modules are available.
Distributor ID: Debian
Description:    Debian GNU/Linux bookworm/sid
Release:        testing/unstable
Codename:       n/a

lsfd

lsfd is a replacement for lsof and lists the file descriptors On Linux systems, it is tailored to the Linux kernel and supports Linux-specific features such as namespaces etc. The output looks like:

suramya@StarKnight:~$ lsfd |more
COMMAND            PID    USER  ASSOC MODE TYPE              SOURCE MNTID      INODE NAME
syncthing         1134 suramya    exe  ---  REG                sda5     0     265927 /usr/bin/syncthing
syncthing         1134 suramya    cwd  ---  DIR                sda5     0          2 /
syncthing         1134 suramya    rtd  ---  DIR                sda5     0          2 /
syncthing         1134 suramya cgroup  ---  REG                 0:4     0 4026531835 cgroup:[4026531835]
syncthing         1134 suramya    ipc  ---  REG                 0:4     0 4026531839 ipc:[4026531839]
syncthing         1134 suramya    mnt  ---  REG                 0:4     0 4026533012 mnt:[4026533012]
syncthing         1134 suramya    net  ---  REG                 0:4     0 4026531840 net:[4026531840]
syncthing         1134 suramya    pid  ---  REG                 0:4     0 4026531836 pid:[4026531836]
syncthing         1134 suramya  pid4c  ---  REG                 0:4     0 4026531836 pid:[4026531836]
syncthing         1134 suramya   time  ---  REG                 0:4     0 4026531834 time:[4026531834]
syncthing         1134 suramya time4c  ---  REG                 0:4     0 4026531834 time:[4026531834]
syncthing         1134 suramya   user  ---  REG                 0:4     0 4026531837 user:[4026531837]
syncthing         1134 suramya    uts  ---  REG                 0:4     0 4026531838 uts:[4026531838]
syncthing         1134 suramya    mem  r-x  REG                sda5     0     265927 /usr/bin/syncthing
syncthing         1134 suramya    mem  r--  REG                sda5     0     265927 /usr/bin/syncthing
syncthing         1134 suramya    mem  rw-  REG                sda5     0     265927 /usr/bin/syncthing

lsof

The command lsof stands for List Of Open Files. This command displays a list of files that have been opened. Essentially, it provides information to determine which files are opened by which process. The output looks like:

root@StarKnight:/tmp# lsof |more
COMMAND      PID    TID TASKCMD               USER   FD      TYPE             DEVICE    SIZE/OFF       NODE NAME
systemd        1                              root  cwd       DIR                8,5        4096          2 /
systemd        1                              root  rtd       DIR                8,5        4096          2 /
systemd        1                              root  txt       REG                8,5     1841792     277271 /usr/lib/systemd/systemd
systemd        1                              root  mem       REG                8,5      161864     280226 /usr/lib/x86_64-linux-gnu/libgpg-error.so.0.33.0
systemd        1                              root  mem       REG                8,5     3081088     264360 /usr/lib/x86_64-linux-gnu/libcrypto.so.1.1
systemd        1                              root  mem       REG                8,5       26984     273912 /usr/lib/x86_64-linux-gnu/libcap-ng.so.0.0.0
systemd        1                              root  mem       REG                8,5      633512     270536 /usr/lib/x86_64-linux-gnu/libpcre2-8.so.0.11.0
systemd        1                              root  mem       REG                8,5     1321424     264366 /usr/lib/x86_64-linux-gnu/libm-2.33.so
systemd        1                              root  mem       REG                8,5      158400     279628 /usr/lib/x86_64-linux-gnu/liblzma.so.5.2.5
systemd        1                              root  mem       REG                8,5      751840     263041 /usr/lib/x86_64-linux-gnu/libzstd.so.1.5.2
systemd        1                              root  mem       REG                8,5      137568     269425 /usr/lib/x86_64-linux-gnu/liblz4.so.1.9.3
systemd        1                              root  mem       REG                8,5       35280     262500 /usr/lib/x86_64-linux-gnu/libip4tc.so.2.0.0
systemd        1                              root  mem       REG                8,5     1332480     262198 /usr/lib/x86_64-linux-gnu/libgcrypt.so.20.4.1
systemd        1                              root  mem       REG                8,5       18768     264301 /usr/lib/x86_64-linux-gnu/libdl-2.33.so
systemd        1                              root  mem       REG                8,5      202680     264320 /usr/lib/x86_64-linux-gnu/libcrypt.so.1.1.0
systemd        1                              root  mem       REG                8,5       38864     267169 /usr/lib/x86_64-linux-gnu/libcap.so.2.44

lscpu

lscpu gathers CPU architecture information from sysfs, /proc/cpuinfo, and any architecture-specific libraries that are applicable (e.g. librtas on Powerpc). The command output can be optimized for parsing or human readability. This can include the number of CPU’s, threads, cores, etc. The output looks like:

suramya@StarKnight:~$ lscpu
Architecture:            x86_64
  CPU op-mode(s):        32-bit, 64-bit
  Address sizes:         43 bits physical, 48 bits virtual
  Byte Order:            Little Endian
CPU(s):                  16
  On-line CPU(s) list:   0-15
Vendor ID:               AuthenticAMD
  Model name:            AMD Ryzen 7 3800X 8-Core Processor
    CPU family:          23
    Model:               113
    Thread(s) per core:  2
    Core(s) per socket:  8
    Socket(s):           1
    Stepping:            0
    Frequency boost:     enabled
    CPU(s) scaling MHz:  52%
    CPU max MHz:         4558.8862
    CPU min MHz:         2200.0000
    BogoMIPS:            7786.11
    Flags:               fpu vme de pse tsc msr pae mce cx8 apic sep mtrr pge mca cmov pat pse36 clflush mmx fxsr sse sse2 ht syscall nx mmxext fxsr_opt pdpe1gb rdtscp lm constant_tsc rep_good nopl nonstop_tsc cpuid extd_apicid aperfmperf rapl pni pclmulqdq monitor ssse
                         3 fma cx16 sse4_1 sse4_2 movbe popcnt aes xsave avx f16c rdrand lahf_lm cmp_legacy svm extapic cr8_legacy abm sse4a misalignsse 3dnowprefetch osvw ibs skinit wdt tce topoext perfctr_core perfctr_nb bpext perfctr_llc mwaitx cpb cat_l3 cdp_l3 hw_p
                         state ssbd mba ibpb stibp vmmcall fsgsbase bmi1 avx2 smep bmi2 cqm rdt_a rdseed adx smap clflushopt clwb sha_ni xsaveopt xsavec xgetbv1 xsaves cqm_llc cqm_occup_llc cqm_mbm_total cqm_mbm_local clzero irperf xsaveerptr rdpru wbnoinvd arat npt lbr
                         v svm_lock nrip_save tsc_scale vmcb_clean flushbyasid decodeassists pausefilter pfthreshold avic v_vmsave_vmload vgif v_spec_ctrl umip rdpid overflow_recov succor smca sme sev sev_es
Virtualization features: 
  Virtualization:        AMD-V
Caches (sum of all):     
  L1d:                   256 KiB (8 instances)
  L1i:                   256 KiB (8 instances)
  L2:                    4 MiB (8 instances)
  L3:                    32 MiB (2 instances)
NUMA:                    
  NUMA node(s):          1
  NUMA node0 CPU(s):     0-15
Vulnerabilities:         
  Itlb multihit:         Not affected
  L1tf:                  Not affected
  Mds:                   Not affected
  Meltdown:              Not affected
  Spec store bypass:     Mitigation; Speculative Store Bypass disabled via prctl
  Spectre v1:            Mitigation; usercopy/swapgs barriers and __user pointer sanitization
  Spectre v2:            Mitigation; Retpolines, IBPB conditional, STIBP conditional, RSB filling
  Srbds:                 Not affected
  Tsx async abort:       Not affected

lslogins

lslogins displays information about known users in the system. It examines the wtmp and btmp logs, /etc/shadow (if necessary) along with /etc/passwd to get the desired data.

suramya@StarKnight:~$ lslogins
  UID USER              PROC PWD-LOCK PWD-DENY  LAST-LOGIN GECOS
    0 root               306                   Apr06/15:36 root

lspci

lspci is a command on Unix-like operating systems that prints detailed information about all PCI buses and devices in the system. It is based on a common portable library libpci which offers access to the PCI configuration space on a variety of operating systems. The output looks like:

suramya@StarKnight:~$ lspci
00:00.0 Host bridge: Advanced Micro Devices, Inc. [AMD] Starship/Matisse Root Complex
00:00.2 IOMMU: Advanced Micro Devices, Inc. [AMD] Starship/Matisse IOMMU
00:01.0 Host bridge: Advanced Micro Devices, Inc. [AMD] Starship/Matisse PCIe Dummy Host Bridge
00:01.2 PCI bridge: Advanced Micro Devices, Inc. [AMD] Starship/Matisse GPP Bridge
00:02.0 Host bridge: Advanced Micro Devices, Inc. [AMD] Starship/Matisse PCIe Dummy Host Bridge
00:03.0 Host bridge: Advanced Micro Devices, Inc. [AMD] Starship/Matisse PCIe Dummy Host Bridge
00:03.2 PCI bridge: Advanced Micro Devices, Inc. [AMD] Starship/Matisse GPP Bridge
00:04.0 Host bridge: Advanced Micro Devices, Inc. [AMD] Starship/Matisse PCIe Dummy Host Bridge
...
0b:00.4 Audio device: Advanced Micro Devices, Inc. [AMD] Starship/Matisse HD Audio Controller

lsipc

lsipc shows information on the System V inter-process communication facilities for which the calling process has read access. The output looks like:

suramya@StarKnight:~$ lsipc
RESOURCE DESCRIPTION                                              LIMIT USED  USE%
MSGMNI   Number of message queues                                 32000    0 0.00%
MSGMAX   Max size of message (bytes)                                 8K    -     -
MSGMNB   Default max size of queue (bytes)                          16K    -     -
SHMMNI   Shared memory segments                                    4096    4 0.10%
SHMALL   Shared memory pages                       18446744073692774399 1728 0.00%
SHMMAX   Max size of shared memory segment (bytes)                  16E    -     -
SHMMIN   Min size of shared memory segment (bytes)                   1B    -     -
SEMMNI   Number of semaphore identifiers                          32000    0 0.00%
SEMMNS   Total number of semaphores                          1024000000    0 0.00%
SEMMSL   Max semaphores per semaphore set.                        32000    -     -
SEMOPM   Max number of operations per semop(2)                      500    -     -
SEMVMX   Semaphore max value                                      32767    -     -

lslocks

lslocks lists information about all the currently held file locks in a Linux system. It also lists OFD (Open File Description) locks which are not associated with any process (PID is -1). OFD locks are associated with the open file description on which they are acquired. The output looks like:

suramya@StarKnight:~$ lslocks |more
COMMAND            PID  TYPE  SIZE MODE  M      START        END PATH
pipewire          1483 FLOCK       WRITE 0          0          0 /run/user/1000/pipewire-0.lock
firefox-bin      18608 POSIX       WRITE 0          0          0 /mnt/data/Configs/.mozilla/firefox/6hzbxva3.default/.parentlock
firefox-bin      18608 POSIX       READ  0          0          0 /tmp/MozillaUpdateLock-CBDE0CC28E6567B7
plasmashell       1742 POSIX   88K READ  0 1073741826 1073742335 /home/suramya/.local/share/kactivitymanagerd/resources/database
plasmashell       1742 POSIX   32K READ  0        128        128 /home/suramya/.local/share/kactivitymanagerd/resources/database-shm
systemsettings    2116 POSIX   88K READ  0 1073741826 1073742335 /home/suramya/.local/share/kactivitymanagerd/resources/database
systemsettings    2116 POSIX   32K READ  0        128        128 /home/suramya/.local/share/kactivitymanagerd/resources/database-shm
cron               900 FLOCK       WRITE 0          0          0 /run...
kactivitymanage   1754 POSIX   88K READ  0 1073741826 1073742335 /home/suramya/.local/share/kactivitymanagerd/resources/database
kactivitymanage   1754 POSIX   32K READ  0        128        128 /home/suramya/.local/share/kactivitymanagerd/resources/database-shm
firefox-bin      18608 POSIX   75M WRITE 0 1073741826 1073742335 /mnt/data/Configs/.mozilla/firefox/6hzbxva3.default/places.sqlite
firefox-bin      18608 POSIX 74.3M WRITE 0 1073741826 1073742335 /mnt/data/Configs/.mozilla/firefox/6hzbxva3.default/favicons.sqlite
kactivitymanage   1754 POSIX   32K READ  0        124        124 /home/suramya/.local/share/kactivitymanagerd/resources/database-shm

lsmod

lsmod shows the current status of loaded modules in the Linux Kernel. It nicely formats the contents of the /proc/modules , showing what kernel modules are currently loaded. The output looks like:

suramya@StarKnight:~$ lsmod
Module                  Size  Used by
loop                   32768  0
dm_crypt               61440  0
dm_mod                172032  1 dm_crypt
mptcp_diag             16384  0
tcp_diag               16384  0
udp_diag               16384  0
raw_diag               16384  0
inet_diag              24576  4 tcp_diag,mptcp_diag,raw_diag,udp_diag
unix_diag              16384  0
af_packet_diag         16384  0
netlink_diag           16384  0
uinput                 20480  0
xfrm_user              49152  2
xfrm_algo              16384  1 xfrm_user
...
...
twofish_generic        20480  0
twofish_avx_x86_64     53248  0
twofish_x86_64_3way    32768  1 twofish_avx_x86_64

lsirq

lsirq is a utility to display kernel interrupt information. The output looks like:

IRQ     TOTAL NAME
LOC 438495596 Local timer interrupts
RES 395250211 Rescheduling interrupts
CAL 244198954 Function call interrupts
TLB  50704087 TLB shootdowns
 43  36669756 IR-PCI-MSI 2621443-edge enp5s0-tx-0
 44  33219249 IR-PCI-MSI 2621444-edge enp5s0-tx-1
 42  29631348 IR-PCI-MSI 2621442-edge enp5s0-rx-1
 41  24214613 IR-PCI-MSI 2621441-edge enp5s0-rx-0
 63   5830480 IR-PCI-MSI 3670016-edge ahci[0000:07:00.0]
 45   4564010 IR-PCI-MSI 3147776-edge xhci_hcd
105   4129317 IR-PCI-MSI 4718592-edge nvidia
 64   3354988 IR-PCI-MSI 4194304-edge ahci0
 69   1788338 IR-PCI-MSI 4194309-edge ahci5
 65    157846 IR-PCI-MSI 4194305-edge ahci1
104     27444 IR-PCI-MSI 5775360-edge snd_hda_intel:card1
..
..

lsns

The lsns command lists information about all currently accessible namespaces or a given namespace. The namespace identifier is an inode number. The output looks like:

suramya@StarKnight:~$ lsns
        NS TYPE   NPROCS    PID USER    COMMAND
4026531834 time       87   1134 suramya /usr/bin/syncthing serve --no-browser --no-restart --logflags=0
4026531835 cgroup     87   1134 suramya /usr/bin/syncthing serve --no-browser --no-restart --logflags=0
4026531836 pid        87   1134 suramya /usr/bin/syncthing serve --no-browser --no-restart --logflags=0
4026531837 user       75   1134 suramya /usr/bin/syncthing serve --no-browser --no-restart --logflags=0
4026531838 uts        87   1134 suramya /usr/bin/syncthing serve --no-browser --no-restart --logflags=0
4026531839 ipc        76   1134 suramya /usr/bin/syncthing serve --no-browser --no-restart --logflags=0
4026531840 net        76   1134 suramya /usr/bin/syncthing serve --no-browser --no-restart --logflags=0
4026531841 mnt        85   1454 suramya /lib/systemd/systemd --user
4026532954 user        1 267290 suramya /usr/local/firefox/firefox-bin -contentproc -parentBuildID 20220705093820 -prefsLen 44808 -prefMapSize 237085 -appDir /usr/local/firefox/browser 267229 true socket
4026532955 ipc         1 267290 suramya /usr/local/firefox/firefox-bin -contentproc -parentBuildID 20220705093820 -prefsLen 44808 -prefMapSize 237085 -appDir /usr/local/firefox/browser 267229 true socket
...
...

lsattr

lsattr lists the file attributes on a second extended file system. The chattr command modifies the attributes of files, and lsattr lists (displays) them. File attributes are flags which affect how the file is stored and accessed by the filesystem. They are metadata stored in the file’s associated inode. The output looks like:

suramya@StarKnight:~$ lsattr
--------------e------- ./node_modules
--------------e------- ./Temp
--------------e------- ./Screenshot_20220704_122444.png
--------------e------- ./go
--------------e------- ./LinkedIn

lsblk

lsblk is used to display details about block devices and these block devices(Except ram disk) are basically those files that represent devices connected to the pc. It queries /sys virtual file system and udev db to obtain information that it displays. And it basically displays output in a tree-like structure. This command comes pre-installed with the util-Linux package. The output looks like:

suramya@StarKnight:~$ lsblk
NAME   MAJ:MIN RM   SIZE RO TYPE MOUNTPOINTS
sda      8:0    0 111.8G  0 disk 
├─sda1   8:1    0   3.7G  0 part [SWAP]
├─sda2   8:2    0     1K  0 part 
├─sda5   8:5    0  18.6G  0 part /
└─sda6   8:6    0  89.4G  0 part /mnt/data
sdb      8:16   0   2.7T  0 disk 
└─sdb1   8:17   0   2.7T  0 part /mnt/Backup
sdc      8:32   0 223.6G  0 disk 
└─sdc1   8:33   0 223.6G  0 part /mnt/storage
sdd      8:48   0  12.7T  0 disk 
└─sdd1   8:49   0  12.7T  0 part /mnt/repository

There are a lot more useful Linux commands and no blog post can possibily list all of them. But some of these were new to me so I thought I should share.

– Suramya
March 7, 2021

Syncing data between my machines and phones using syncthing

I have talked about how my Backup strategy has evolved over the years. I am quite happy with the setup I explained in my previous post except for one minor point. I still had to manually sync the data from my laptop, Jani’s laptop and my phone to my desktop manually. Once it is there on the desktop the various backup processes make sure that it is backed up and secure. The issue is that I still had to manually sync the data between the devices.

For my laptop, I used Unison to manually check for changes and then sync them over which works great but I had to ensure that the sync happened in the correct direction. For Jani’s laptop I mounted my drive on her computer over ssh using these steps and then running robocopy to copy the files over. This worked intermittently well. For some reason the system would refuse to overwrite changed files randomly with permission denied errors even when the permission was set to 777. The only way to fix was to delete all the files on my computer and then do a fresh sync. This worked, but was not userfriendly and required me to manually kick off a backup which I did infrequently. My phone on the other hand was backed up manually to my computer using sftp. This was very crumbersome and I really disliked having to do it.

I have in the past looked into various technologies that allow multiple devices to sync data with each other. Unfortunately, all of them required an external connection with a copy of the data being stored in the cloud. Since that was a show-stopper for me, I never got around to setting up my systems to automatically sync with each other. Then a few weeks ago, I came across this great article on how to create A Simple, Delay-Tolerant, Offline-Capable Mesh Network with Syncthing (+ optional NNCP). In the article John talked about Syncthing, which allowed him to create a local serverless, peer-to-peer, open source alternative to Dropbox that allowed his machines sync directly with each other without a server. In other words a perfect fit for what I wanted and needed to do. So I spent a little bit of time researching syncthing and then decided to take the plunge and setup my laptop and desktop to sync with each other. Before starting the setup I backed up all my data so that in case something went wrong I still had a backup. Thankfully nothing did, but it is always good to have a backup.

Syncthing’s installation is pretty simple for all major operating systems, except for iPhones which are not supported. In Debian, installation just required the following steps

  • Run the following commands to add the “stable” channel to your APT sources:
  • echo "deb https://apt.syncthing.net/ syncthing stable" | sudo tee /etc/apt/sources.list.d/syncthing.list
    curl -s https://syncthing.net/release-key.txt | sudo apt-key add -
  • Once you have added it, run the following command to install syncthing
  • sudo apt-get update
    sudo apt-get install syncthing

    Once the software is installed execute the syncthing binary. On my computer it is installed in /usr/bin/syncthing. Once the software starts, it will start the web interface automatically. There is also a Desktop application, but I prefer the web-ui. Instructions on how to configure the folders and nodes are available at the Getting Started Guide over on the project website so I am not going to repeat them here. Basically, you need to define the nodes and connect them to each other, if the devices are not added on both sites then the folders will not sync.

    The software has a cool feature of discovery, which makes it easy to add devices on a given node. As soon as you connect to the same network they detect each other and give you the option of connecting both. After the devices are connected, you configure the folder you want to sync and select the devices you want it synced with. The best part is as soon as you configure one node, the other nodes will get a message stating that Node 1 is attempting to share a folder with them. Clicking on accept, allows you to configure the folder path etc on the node and that’s it. The system will detect the files which need to get synced over and will copy them quickly. You can configure the sync to be bi-directional or one way. Most of the folders in my setup are set as that, the only exception are Jani’s files which is a one-way sync because I know that I am not going to modify the files on the server.

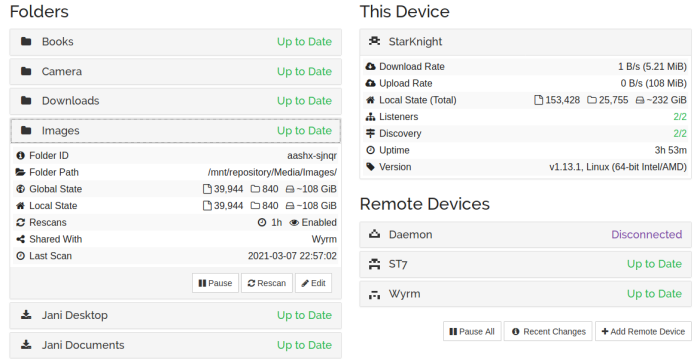
    Below is what the setup looks on my desktop, as you can see I am syncing data from 3 different computers/phones to it and the sync’s are really fast. I have copied files over to the folder on one computer and within minutes (depending on the size) they were replicated on the other computers/phone.


    My Syncthing setup

    I have the android client running on my phone as well, and it instantly syncs any new photos etc from my phone to the desktop. All I need to do is connect to the same LAN network (can be over wired or wireless) and the devices connect and sync automagically. There is an option to do so even over the WAN using relay server but since I didn’t want that I disabled it in the setup.

    Now all my data is synced to the desktop machine without me having to worry about anything or manually copying files around. Check it out if you want to sync your devices without using an external server.

    – Suramya

February 20, 2021

Fixing boinc (code=exited, status=108) error

Filed under: Computer Tips,Knowledgebase,Linux/Unix Related,Tech Related — Suramya @ 2:01 AM

Earlier today I noticed that my CPU was not as active as usual and the boinc (World Community Grid) processes were no longer active on my computer. This has happened in the past when the client crashed so I restarted the client using the following command as usual:

/etc/init.d/boinc-client restart

Unfortunately, that didn’t resolve the problem and I thought that it could be because of the recent OS update that I did to my Debian system. In the past there have been rare cases when libraries were updated that some programs act strangely till the computer is rebooted, so I restarted the machine expecting to see the process start up without issues. Sadly, that didn’t happen so I had to debug the problem and I tried all sorts of things to resolve.

First, I tried starting the program manually as the root user and that worked. So I knew it was something to do with the startup script. Then I searched for and removed all the lock files in the boinc and the boinc-client directory. That should have resolved the problem but it didn’t and then I tried running the status command which gave the following output:

root@StarKnight:/var/lib/boinc-client# /etc/init.d/boinc-client status
boinc-client.service – Berkeley Open Infrastructure Network Computing Client
Loaded: loaded (/lib/systemd/system/boinc-client.service; enabled; vendor preset: enabled)
Active: failed (Result: exit-code) since Sat 2021-02-20 01:26:50 IST; 9s ago
Docs: man:boinc(1)
Process: 7420 ExecStart=/usr/bin/boinc (code=exited, status=108)
Process: 7455 ExecStopPost=/bin/rm -f lockfile (code=exited, status=0/SUCCESS)
Main PID: 7420 (code=exited, status=108)
CPU: 19ms

Feb 20 01:26:40 StarKnight systemd[1]: Started Berkeley Open Infrastructure Network Computing Client.
Feb 20 01:26:50 StarKnight boinc[7420]: 20-Feb-2021 01:26:50 Another instance of BOINC is running.
Feb 20 01:26:50 StarKnight systemd[1]: boinc-client.service: Main process exited, code=exited, status=108/n/a
Feb 20 01:26:50 StarKnight systemd[1]: boinc-client.service: Failed with result ‘exit-code’.

This meant that the system thought that another instance of the software was running but that wasn’t the case as I verified it using ps. A search for the status=108 code on the internet returned a few results but nothing that resolved my problem. One user who faced this issue resolved it by uninstalling everything and installing back but that wasn’t a step I wanted to take without trying everything else first so I kept researching. Then I saw a post where a user was facing the same issue after they had moved the data directory to another partition and symlinked it to the original location. I had done the same thing a few weeks ago so I moved the directory back to it’s original location but that didn’t resolve anything either.

Then I thought about checking the file ownerships of the directory and they were owned by my user (suramya) and a post on the internet said that they should be owned by root. I checked on my laptop as I have the same setup there and found that the directories were owned by the ‘boinc‘ on the laptop. Then I remembered changing the ownership of all files in one of my drive partitions last night to suramya. What I didn’t realize at that time was that the boinc-client directory was also located on that partition (after I had moved it there to recover space on my root partition).

I immediately changed the ownership of both directories back to boinc:boinc using the following command

chown boinc:boinc /var/lib/boinc* -R

Then I restarted the daemon and that fixed the problem. I then moved the directory back to it’s original location (on the other partition), symlinked it to the original location and the software still worked after I restarted the process.

I am documenting this in case others hit the same issue.

– Suramya

Older Posts »

Powered by WordPress