Suramya's Blog : Welcome to my crazy life…

March 7, 2021

Syncing data between my machines and phones using syncthing

I have talked about how my Backup strategy has evolved over the years. I am quite happy with the setup I explained in my previous post except for one minor point. I still had to manually sync the data from my laptop, Jani’s laptop and my phone to my desktop manually. Once it is there on the desktop the various backup processes make sure that it is backed up and secure. The issue is that I still had to manually sync the data between the devices.

For my laptop, I used Unison to manually check for changes and then sync them over which works great but I had to ensure that the sync happened in the correct direction. For Jani’s laptop I mounted my drive on her computer over ssh using these steps and then running robocopy to copy the files over. This worked intermittently well. For some reason the system would refuse to overwrite changed files randomly with permission denied errors even when the permission was set to 777. The only way to fix was to delete all the files on my computer and then do a fresh sync. This worked, but was not userfriendly and required me to manually kick off a backup which I did infrequently. My phone on the other hand was backed up manually to my computer using sftp. This was very crumbersome and I really disliked having to do it.

I have in the past looked into various technologies that allow multiple devices to sync data with each other. Unfortunately, all of them required an external connection with a copy of the data being stored in the cloud. Since that was a show-stopper for me, I never got around to setting up my systems to automatically sync with each other. Then a few weeks ago, I came across this great article on how to create A Simple, Delay-Tolerant, Offline-Capable Mesh Network with Syncthing (+ optional NNCP). In the article John talked about Syncthing, which allowed him to create a local serverless, peer-to-peer, open source alternative to Dropbox that allowed his machines sync directly with each other without a server. In other words a perfect fit for what I wanted and needed to do. So I spent a little bit of time researching syncthing and then decided to take the plunge and setup my laptop and desktop to sync with each other. Before starting the setup I backed up all my data so that in case something went wrong I still had a backup. Thankfully nothing did, but it is always good to have a backup.

Syncthing’s installation is pretty simple for all major operating systems, except for iPhones which are not supported. In Debian, installation just required the following steps

  • Run the following commands to add the “stable” channel to your APT sources:
  • echo "deb https://apt.syncthing.net/ syncthing stable" | sudo tee /etc/apt/sources.list.d/syncthing.list
    curl -s https://syncthing.net/release-key.txt | sudo apt-key add -
  • Once you have added it, run the following command to install syncthing
  • sudo apt-get update
    sudo apt-get install syncthing

    Once the software is installed execute the syncthing binary. On my computer it is installed in /usr/bin/syncthing. Once the software starts, it will start the web interface automatically. There is also a Desktop application, but I prefer the web-ui. Instructions on how to configure the folders and nodes are available at the Getting Started Guide over on the project website so I am not going to repeat them here. Basically, you need to define the nodes and connect them to each other, if the devices are not added on both sites then the folders will not sync.

    The software has a cool feature of discovery, which makes it easy to add devices on a given node. As soon as you connect to the same network they detect each other and give you the option of connecting both. After the devices are connected, you configure the folder you want to sync and select the devices you want it synced with. The best part is as soon as you configure one node, the other nodes will get a message stating that Node 1 is attempting to share a folder with them. Clicking on accept, allows you to configure the folder path etc on the node and that’s it. The system will detect the files which need to get synced over and will copy them quickly. You can configure the sync to be bi-directional or one way. Most of the folders in my setup are set as that, the only exception are Jani’s files which is a one-way sync because I know that I am not going to modify the files on the server.

    Below is what the setup looks on my desktop, as you can see I am syncing data from 3 different computers/phones to it and the sync’s are really fast. I have copied files over to the folder on one computer and within minutes (depending on the size) they were replicated on the other computers/phone.
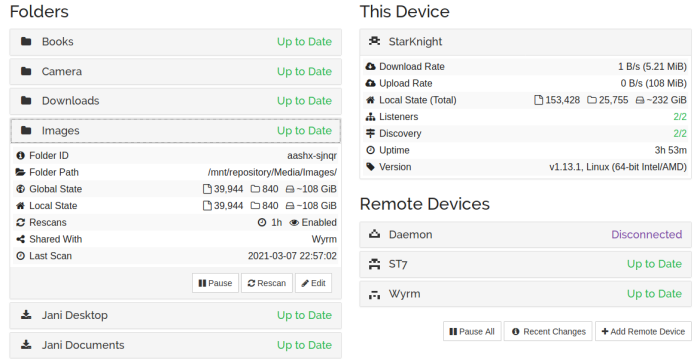

    My Syncthing setup

    I have the android client running on my phone as well, and it instantly syncs any new photos etc from my phone to the desktop. All I need to do is connect to the same LAN network (can be over wired or wireless) and the devices connect and sync automagically. There is an option to do so even over the WAN using relay server but since I didn’t want that I disabled it in the setup.

    Now all my data is synced to the desktop machine without me having to worry about anything or manually copying files around. Check it out if you want to sync your devices without using an external server.

    – Suramya

September 3, 2018

Software hack to keep my speaker powered on

Filed under: Computer Hardware,Linux/Unix Related,Tech Related,Tutorials — Suramya @ 6:37 PM

A little while ago I bought a new klipsch speaker as my previous one was starting to die and I love it except for a minor irritation. The speaker has builtin power saving tech that powers it off if its not used for a certain period of time and that means that I have to physically power it on every time I wanted to listen to music which was annoying. As I would invariably be comfortably seated and start the music before remembering that I needed to power it on. Also, I could not start the music from my phone whenever I felt like as the speaker was powered off and I would have to walk to the room to power it on.

After living with the irritation for a while I finally decided to do something about it and whipped up a small script that checks if any music/audio is already playing on the system and if not it plays a 1 second mp3 of an ultrasonic beep. This forces the system to keep the speaker on and I love it as now I can start the music first thing in the morning while lazing in bed. 🙂

The script requires the mpg123 to be installed and you can install it on a Debian system by issuing the following command:

apt-get install mpg123

The Script itself is only 4 lines long:

#!/bin/bash

if ! grep RUNNING /proc/asound/card*/pcm*/sub*/status &> /dev/null ; then
    /usr/bin/mpg123 -q /home/suramya/bin/KeepSpeakerOn.mp3 &> /dev/null
fi

What it does is to check if any of the PCM soundcards have a status of RUNNING and if not it plays the mp3. I have a cron job scheduled to run the script every one min:

XDG_RUNTIME_DIR=/run/user/1000

* * * * * /home/suramya/bin/KeepSpeakerOn.sh 

One interesting issue I hit during the initial testing was that the mpg123 application kept segfaulting whenever I initiated it from the Cron but it would work fine if I ran the same command from the command prompt. The error I got in the logs was:

High Performance MPEG 1.0/2.0/2.5 Audio Player for Layers 1, 2 and 3
        version 1.25.10; written and copyright by Michael Hipp and others
        free software (LGPL) without any warranty but with best wishes
Cannot connect to server socket err = No such file or directory
Cannot connect to server request channel
jack server is not running or cannot be started
JackShmReadWritePtr::~JackShmReadWritePtr - Init not done for -1, skipping unlock
/home/suramya/bin/KeepSpeakerOn.sh: line 5: 10993 Segmentation fault      /usr/bin/mpg123 /home/suramya/bin/KeepSpeakerOn.mp3 -v

Spent a while trying to debug and finally figured out that the fix for this issue was to add XDG_RUNTIME_DIR=/run/user/<userid> to the cron where you can get the value of <userid> by running the following command and taking the value of uid:

id <username_the_cronjob_is_running_under> 

e.g.

suramya@StarKnight:~/bin$ id suramya
uid=1000(suramya) gid=1000(suramya) groups=1000(suramya),24(cdrom)....

Putting that line in the cron entry resolved the issue. Not sure why but it works so…

Well this is all for now. Will write more later.

– Suramya

September 27, 2016

How to install Tomato Firmware on Asus RT-N53 Router

Filed under: Computer Software,Knowledgebase,Tech Related,Tutorials — Suramya @ 11:43 PM

I know I am supposed to blog about the all the trips I took but wanted to get this down before I forget what I did to get the install working. I will post about the trips soon. I promise 🙂

Installing an alternate firmware on my router is something I have been meaning to do for a few years now but never really had the incentive to investigate in detail as the default firmware worked fine for the most part and I didn’t really miss any of the special features I would have gotten with the new firmware.

Yesterday my router decided to start acting funny, basically every time I started transferring large files from my phone to the desktop via sFTP over wifi the entire router would crash after about a min or so. This is something that hasn’t happened before and I have transferred gigs of data so I was stumped. Luckily I had a spare router lying around thanks to dad who forced me to carry it to Bangalore during my last visit. So I swapped the old router with the new one and got my work done. This gave me an opportunity as I had a spare router sitting on my desk and some time to kill so I decided to install a custom firmware on it to play with it.

I was initially planning on installing dd-wrt on it but their site was refusing to let me download the file for the RT-N53 model even though the wiki said that I should be able to install it. A quick web search suggested that folks have had a good experience with the Tomato by Shibby firmware so I downloaded and installed it by following these steps:

Download the firmware file

First we need to download the firmware file from the Tomato Download site.

  • Visit the Tomato download Section
  • Click on the latest Build folder. (I used build5x-138-MultiWAN)
  • Click on ‘Asus RT-Nxx’ folder
  • Download the ‘MAX’ zip file as that has all the functionality. (I used the tomato-K26-1.28.RT-N5x-MIPSR2-138-Max.zip file.)
  • Save the file locally
  • Extract the ZIP file. The file we are interested in is under the ‘image’ folder with a .trx extension

Restart the Router in Maintenance mode

  • Turn off power to router
  • Turn the power back on while holding down the reset button
  • Keep holding reset until the power light starts flashing which will mean router is in recovery mode

Set a Static IP on the Ethernet adapter of your computer

For some reason, you need to set the IP address of the computer you are using to a static IP of 192.168.1.2 with subnet 255.255.255.0 and gateway 192.168.1.1. If you skip this step then the firmware upload fails with an integrity check error.

Upload the new firmware

  • Connect the router to a computer using a LAN cable
  • Visit 192.168.1.1
  • Login as admin/admin
  • Click Advanced Setting from the navigation menu at the left side of your screen.
  • Under the Administration menu, click Firmware Upgrade.
  • In the New Firmware File field, click Browse to locate the new firmware file that you downloaded in the previous step
  • Click Upload. The uploading process takes about 5 minutes.
  • Then unplug the router, wait 30 seconds.
  • Hold down the WPS button while plugging it back in.
  • Wait 30 seconds and release the WPS button.

Now you should be using the new firmware.

  • Browse to 192.168.1.1
  • Login as admin/password (if that doesn’t work try admin/admin)
  • Click on the ‘reset nvram to defaults’ link in the page that comes up. (I had to do this before the system started working but apparently its not always required.)

Configure your new firmware

That’s it, you have a router with a working Tomato install. Go ahead and configure it as per your requirements. All functionality seems to be working for me except the 5GHz network which seems to have disappeared. I will play around with the settings a bit more to see if I can get it to work but as I hardly ever connected to the 5GHz network its not a big deal for me.

References

The following sites and posts helped me complete the install successfully. Without them I would have spent way longer getting things to work:

Well this is it for now. Will post more later.

– Suramya

May 6, 2015

How to Root a second generation Moto x running Lollipop

Filed under: Knowledgebase,Tech Related,Tutorials — Suramya @ 11:22 PM

I got my new phone today and as usual the first thing I did was root it before I started copying data over so that I don’t loose data when I unlock the boot loader. The process required a bit of work mainly because I was following instructions for KitKat while my phone was running Lollipop. That caused the phone to go into this funky state where the Play Store API’s went MIA and the entire thing stopped working to the point that I had to do a hard reset to get back to a stable state.

BTW, before you continue please note that this will delete all data on the phone so you need to ensure that you have a proper backup before proceeding. Without further ado, here are the steps I followed to get things to work using my Linux (Debian) desktop:

Unlock the Bootloder

The first thing you have to do is unlock the Boot loader on the phone:

  • Install the Android SDK by issuing the following command:
    apt-get install android-tools-adb android-tools-fastboot
  • Run the following command:
    fastboot oem get_unlock_data
  • Take the string returned, which would look something like this:
    (bootloader) 0A40040192024205#4C4D3556313230
    (bootloader) 30373731363031303332323239#BD00
    (bootloader) 8A672BA4746C2CE02328A2AC0C39F95
    (bootloader) 1A3E5#1F53280002000000000000000
    (bootloader) 0000000

    and concatenate the 5 lines of output into one continuous string without (bootloader) or ‘INFO’ or white spaces. Your string needs to look like this:
    0A40040192024205#4C4D355631323030373731363031303332323239#BD008A672BA4746C2CE02328A2AC0C39F951A3E5#1F532800020000000000000000000000

  • Visit the Motorola Website.
  • Paste the string you got in the previous step on the site, and then click on the ‘Can my Device be Unlocked?’ button and if your device is unlockable, a “REQUEST UNLOCK KEY” button will now appear at the bottom of the page.
  • Click on the “REQUEST UNLOCK KEY” Button.
  • You will now receive a mail with the unlock key at your registered email address
  • Start your device in fastboot mode by pushing and holding the power and volume down at the same time. Then release the power button followed by the volume down button. The device will now power up in fastboot mode.
  • Run the following command to unlock the bootloader:
    fastboot oem unlock 
  • If the code was correct then you will see a message confirming that your device was unlocked and the phone will reboot.

Enable Developer Options/USB Debugging

In order to proceed further we need to enable USB Debugging and in order to do that we need to enable Developer Options following these steps:

  • Pull down the notification drawer and tap on ‘Settings’
  • Scroll down to ‘About Phone’
  • Now scroll down to ‘Build Number’
  • Tap on ‘Build Number’ 7 times.
  • It’ll now say that you are a developer. Now press back, You should now see Developer Options above About Phone.

  • Click on ‘Developer Options’
  • Check the box next to ‘USB debugging’ and save

Root the Phone

First we need to download the correct image file for the model of your phone. I had to look up my model on Wikipedia because for some reason my phone decided not to share that information with me. Use the appropriate link for your model in the list below. I have a XT1092 but the XT1097 image worked fine for me.

After downloading the file, extract it. Run the following command:

adb reboot bootloader

This will restart the phone in the fastboot mode. Then boot using the image you downloaded in the previous step using this command:

fastboot boot /path/to/image/file/CF-Auto-Root-victara-victararetbr-xt1097.img

Once you run the command the Device will boot up, install su and quickly reboot (this is automatic, no user intervention is required). After the phone starts up, you need to install Chainfire’s SuperSU from the Play Store.

After that you are done and your phone is rooted. You can verify the same by installing a ‘Root Verifier’ application from the store.
Well this is all for now, will write more later.

– Suramya

December 14, 2014

Cleaning your Linux computer of cruft and duplicate data

When you use a computer and keep copying data forward everytime you upgrade or work with multiple systems it is easy to end up with multiple copies of the same file. I am very OCD about organizing my data and still I ended up with multiple copies of the same file in various locations. This could have happened because I was recovering data from a drive and needed a temp location to save the copy or forgot that I had saved the same file under another directory (because I changed my mind about how to classify the file). So this weekend I decided to clean up my system.

This was precipitated because after my last system reorg I didn’t have a working backup strategy and needed to get my backups working again. Basically I had moved 3 drives to another server and installed a new drive on my primary system to serve as the Backup drive. Unfortunately this required me to format all these drives because they were originally part of a RAID array and I was breaking it. Once I got the drives setup I didn’t get the chance to copy the backup data to the new drive and re-enable the cron job that took the daily backup snapshots. (Mostly because I was busy with other stuff). Today when I started copying data to the new Backup drive I remembered reading about software that allowed you to search for duplicate data so thought I should try it out before copying data around. It is a good thing I did because I found a lot of duplicates and ended up freeing more than 2 GB of space. (Most of it was due to duplicate copies of ISO images and photos).

I used the following software to clean my system:

Both of them delete files but are designed for different use cases. So let’s look at them in a bit more detail.

FSlint

FSlint is designed to remove lint from your system and that lint can be duplicate files, broken links, empty directories and other cruft that accumulates when a system is in constant use. Installing it is quite easy, on Debian you just need to run the following command as root

apt-get install fslint

Once the software is installed, you can either use the GUI interface or run it from the command line. I used the GUI version because it was easier to visualize the data when seen in a graphical form (Yes I did say that. I am not anti-GUI, I just like CLI more for most tasks). Using the software was as easy as selecting the path to search and then clicking on Find. After the scan completes you get a list of all duplicates along with the path and you can choose to ignore, delete all copies or delete all except one. You need to be a bit careful when you delete because some files might need to be in more than one location. One example for this situation is DLL files installed under Wine, I found multiple copies of the same DLL under different directories and I would have really messed up my install if I had blindly deleted all duplicates.

Flossmanuals.net has a nice FSlint manual that explains all the other options you can use. Check it out if you want to use some of the advanced features. Just ensure that you have a good backup before you start deleting files and don’t blame me when you mess up your system without a working backup.

BleachBit

BleachBit is designed for the privacy conscious user and allows you to get rid of Cache, cookies, Internet history, temporary files, logs etc in a quick and easy way. You also have the option to ensure that the data deleted is really gone by overwriting the file with random data. Obviously this takes time but if you need to ensure data deletion then it is very useful. Bleachbit works on both Windows and Linux and is quite easy to install and use (at least on Linux, I didn’t try it on Windows). The command to install it on Debian is:

apt-get install bleachbit

The usage also is very simple, you just run the software and tick the boxes relevant to the clutter that you want gone and BleachBit will delete it. It does give you a preview of the files it found so that you can decide if you actually want to delete the stuff it identifies before you delete it.

Well this is all for now. Will write more later.

Thanks to How to Sort and Remove Duplicate Photos in Linux for pointing me towards FSlint and Ten Linux freeware apps to feed your penguin for pointing me towards BleachBit.

– Suramya

March 8, 2013

Citrix on Raspberry Pi: Updated instructions and working download image

Filed under: Knowledgebase,Linux/Unix Related,Tech Related,Tutorials — Suramya @ 2:36 PM

A couple of folks have reached out to me via email/messages to tell me that the instructions I posted at the Raspberry Pi forums don’t work with the latest version of Rhaspbian. Basically the problem is that the latest version of the Citrix client is not compiled for the armhf architecture (Which is what the latest version of Rhaspbian OS is compiled for), so you need to download and install the armel version of the OS (‘Soft-float Debian “wheezy”’) from http://www.raspberrypi.org/downloads.

To make life simpler for people I have created a snapshot of my Pi install with Citrix installed and configured. You can download it from here. The image is 4GB so you will need to use a card of atleast that size when using this image. Follow these steps to install the image to an SD card in Linux:

  • Download the image file from the mirror (Approx 1GB compressed)
  • Unzip the file using the command
  • unzip Raspberry_Citrix.img.zip
  • Find out what the partition the SD card you are using has been assigned running the following command as root
  • fdisk -l

    Once you run the command, you will get an output that will show you all the disks attached to your system, look for the entry that corresponds to your card. In my case it looked like this:

     Disk /dev/sde: 3965 MB, 3965190144 bytes
    122 heads, 62 sectors/track, 1023 cylinders, total 7744512 sectors
    Units = sectors of 1 * 512 = 512 bytes
    Sector size (logical/physical): 512 bytes / 512 bytes
    I/O size (minimum/optimal): 512 bytes / 512 bytes
    Disk identifier: 0x00016187
    
       Device Boot      Start         End      Blocks   Id  System
    /dev/sde1            8192      122879       57344    c  W95 FAT32 (LBA)
    /dev/sde2          122880     7744511     3810816   83  Linux
    
  • So now we know that the card is at /dev/sde. All we have to do is write the image to the card and that is done using the following command. Make sure you replace the /dev/sde with the correct path otherwise you will end up destroying all data on the wrong drive.
  • dd if=Raspberry_Citrix.img of=/dev/sde bs=4096

    You will not see any output on the screen so don’t worry about it, just let it run and wait for the process to complete as it will take some time because of the amount of data being written. Once the process completes you can eject the card and if all went well you should be able to boot the Raspberry Pi from the card.

The login password for this image is root/password, please do change the password if you use the image. Let me know if you have any questions or have an issue using this image.

Update (3/28/2013): Adding instructions on how to write the image when using windows. (Please note that I haven’t tested the windows instructions as I don’t have a windows machine. Use at your own risk)

Once you download the zip file from the mirror, right-click on it and select extract (I think that’s what it says, but I don’t have a windows machine so can’t confirm). After the image is extracted you will have a file called Raspberry_citrix.img on your computer. Now follow these steps to write the image to an SD card (Instructions taken from eLinux)

  • Insert the SD card into your SD card reader and check what drive letter it was assigned. You can easily see the drive letter (for example G:) by looking in the left column of Windows Explorer. If the card is not new, you should format it and make sure there is only one partition (FAT32 is a good choice); otherwise Win32DiskImager can make corrupt your SD card!
  • Download the Win32DiskImager utility. The download links are on the right hand side of the page, you want the binary zip.
  • Extract the executable from the zip file and run the Win32DiskImager utility. You should run the utility as Administrator!
  • Select the Raspberry_citrix.img image file you extracted earlier
  • Select the drive letter of the SD card in the device box. Be careful to select the correct drive; if you get the wrong one you can destroy your data on the computer’s hard disk!
  • Click Write and wait for the write to complete.
  • Exit the imager and eject the SD card.

You should also go through the Basic setup guide for Raspberry Pi. Hope this helps.

– Suramya

March 3, 2012

Configuring Dual monitors in Debian

Filed under: Knowledgebase,Linux/Unix Related,Tech Related,Tutorials — Suramya @ 12:01 AM

[Update 8th Aug 2012: This is an older method of setting up the monitor kept for historic reasons. In the newer version of KDE the process is a lot simpler, please refer to this post for the updated steps – Suramya.

Recently I went ahead and bought two new Dell 20″ monitors for my home system as I had gotten used to working with two monitors at work and wanted the same experience at home as well. The problem started because initially I tried installing another graphics card and hooking up the second monitor to that card using VGA. For some reason maybe because I was to tired and wasn’t thinking clearly, I couldn’t get both the cards to work at the same time. I would get one or the other but not both. To make things even more fun, the monitors are 16:9 aspect ratio and when I used the Opensource driver the only resolution with that aspect ratio I would get was 1600×900 which was too small and the fonts looked kind of jagged at that resolution.

Since I was going to be out of town and was planning on switching to DVI cables anyways I left the system like that (after spending a bit of time experimenting) and left. Once I got back I ordered DVI cables and finally managed to get the dual monitor setup working after spending about an hour one the issue. Below is the sequence I followed to get stuff to work (documenting this so that if I ever have to do this again I have a record of what I did):

  • Removed the second video card to reduce complexity. Might add it back later if required, or if I want to hook my old monitor as a third display.
  • Connected both monitors to the onboard ATI Radeon HD 4250 card, one over DVI and the second using VGA
  • Removed the Proprietary ATI and nVidia drivers (both installed in my previous attempts to get this working). Instructions here
  • Restarted X
  • Installed Catalyst (a.k.a fglrx) a proprietary “blob” (closed source binary) driver, using the following command:
  • apt-get install fglrx-atieventsd fglrx-control  fglrx-driver fglrx-glx fglrx-modules-dkms glx-alternative-fglrx libfglrx libgl1-fglrx-glx libxvbaw

Once the driver was installed I restarted X once again and got both monitors working, but the second monitor’s display was a clone of the first one which is not what I wanted so I had to do some more digging and finally managed to fix that using the following steps:

  • Open a terminal/Command Prompt
  • Disable access control so that clients can connect from any host by issuing the following command as a regular user
  • xhost +

    This is required so that we can start a GUI command from a root shell. If we don’t do this you will get an error similar to the following in the next step:

    No protocol specified
    No protocol specified
    amdcccle: cannot connect to X server :0
  • Run ‘Ati Catalyst Control Center’ as root
  • sudo amdcccle
  • Click on ‘Display Manager’ and configure your monitors (Resolution, location etc)
  • Click on ‘Display Options’ -> ‘Xinerama’ and enable ‘Xinerama’
  • There is a bug in the display manager that prevents it from saving any changes if the xorg.conf file exists, to fix:

  • Run the following command as root:
  • mv /etc/X11/xorg.conf /etc/X11/xorg.conf_original
  • Click ‘Apply’ in the Catalyst Control Center
  • Restart X

That’s it. Once I did all that, my dual monitor setup started working without issues. Well… mostly. For some reason my desktop effects have stopped working (Transparent/Translucent windows etc) but I am not going to worry about it for now. That’s a battle for another day, maybe over the weekend.

Please note, that setting up Dual monitors usually is not this complicated in Linux. When I hooked up my TV to this same system I didn’t have to make any changes to get it to work. In this case since I was fiddling around I had to fist fix the mess I made before I was able to get this to work properly.

For those of you who are interested, the final xorg.conf that the above steps created is listed below:

Section "ServerLayout"
        Identifier     "amdcccle Layout"
        Screen      0  "amdcccle-Screen[1]-0" 0 0
        Screen         "amdcccle-Screen[1]-1" 1440 0
EndSection

Section "ServerFlags"
        Option      "Xinerama" "on"
EndSection

Section "Monitor"
        Identifier   "0-CRT1"
        Option      "VendorName" "ATI Proprietary Driver"
        Option      "ModelName" "Generic Autodetecting Monitor"
        Option      "DPMS" "true"
        Option      "PreferredMode" "1440x900"
        Option      "TargetRefresh" "60"
        Option      "Position" "0 0"
        Option      "Rotate" "normal"
        Option      "Disable" "false"
EndSection

Section "Monitor"
        Identifier   "0-DFP1"
        Option      "VendorName" "ATI Proprietary Driver"
        Option      "ModelName" "Generic Autodetecting Monitor"
        Option      "DPMS" "true"
        Option      "PreferredMode" "1440x900"
        Option      "TargetRefresh" "60"
        Option      "Position" "0 0"
        Option      "Rotate" "normal"
        Option      "Disable" "false"
EndSection

Section "Device"
        Identifier  "amdcccle-Device[1]-0"
        Driver      "fglrx"
        Option      "Monitor-DFP1" "0-DFP1"
        BusID       "PCI:1:5:0"
EndSection

Section "Device"
        Identifier  "amdcccle-Device[1]-1"
        Driver      "fglrx"
        Option      "Monitor-CRT1" "0-CRT1"
        BusID       "PCI:1:5:0"
        Screen      1
EndSection

Section "Screen"
        Identifier "amdcccle-Screen[1]-0"
        Device     "amdcccle-Device[1]-0"
        DefaultDepth     24
        SubSection "Display"
                Viewport   0 0
                Depth     24
        EndSubSection
EndSection

Section "Screen"
        Identifier "amdcccle-Screen[1]-1"
        Device     "amdcccle-Device[1]-1"
        DefaultDepth     24
        SubSection "Display"
                Viewport   0 0
                Depth     24
        EndSubSection
EndSection

Hope all this made sense and helps someone. If not feel free to ask questions.

– Suramya

October 26, 2011

Connecting a WordPress blog to Facebook

Filed under: Computer Software,Linux/Unix Related,Tech Related,Tutorials — Suramya @ 5:01 PM

Over the past few months I have been trying to connect my blog to my Facebook account so that whenever a post is made on the blog it automatically gets posted on Facebook to varying degree’s of success. Most of the attempts would work for a while and then stop. I even tried using some of the existing plugins for WordPress but since they required a developer account (which needs a valid phone no or CC#) and for some reason I never get the validation code on my cell I was never able to get them to work.

Then I found an article on Linux Magazine on a Command Line interface for Facebook and decided to build on top of that to get the linkage working. Now this is a very hackey way and is not at all elegant or anything but it gets the work done which is what I wanted, so I am good. 🙂 All the work was done in about 2 hours including testing so that should tell you something on its own.

I had to install this on my local system since my webhost didn’t have all the per-requisites to get this to work. That and the fact that I can’t connect to my MySQL db’s from a machine outside of my hosting provider is why this convoluted method was created. The steps I followed to get this to work are as follows.

Install Facebook Commandline

To install Facebook Commandline, follow the instructions on their site.

Authenticate the Application to be able to talk to Facebook

For some reason there was a difference when I run the application from the commandline and when I run it from the web, in as to where the preferences file and the session details were saved, so all the steps have to be done either from the command line or via the web, you can’t interchange the two.

Creating a Web interface for the FBCMD

Since I wanted to be able to get data from WordPress and pass it on to FBCMD I created a new PHP page called run.php that basically pulls the data from WordPress and then passes it to FBCMD as command line parameters. I know that using passthru is probably not very secure and I should have modified the FBCMD file to accept parameters as a URL but didn’t want to spend that much time trying to get this to work. (Hey! I told you it was a quick and dirty ‘fix’).

The contents of this file are very simple:

error_reporting(E_ALL);
$handle = fopen('https://www.suramya.com/blog/LatestPost.php', 'r');
$current = fopen('/var/www/fbcmd/latest.dat', 'r');
$current_id = fgets($current, 4096);
fclose ($current);

if ($handle) 
{
 $ID = fgets($handle, 4096);
 $link = fgets($handle, 4096);
 $title = fgets($handle, 4096);
 $content = fgets($handle, 596);
 $content = chunk_split(htmlspecialchars(strip_tags($content)), 500) . "...";

 if($ID != $current_id)
 {
  // If we have a new post then call FBCMD to make a post
  $command = '/usr/bin/php /var/www/fbcmd/lib/fbcmd/fbcmd.php POST " " "' . chop($title) . '" "' . 
              chop($link) . '" "' . $content . '"';
  passthru ($command);
  // Write the new PostID to a file
  $current = fopen('/var/www/fbcmd/latest.dat', 'w');
  fputs($current, $ID);
  fclose($current);
 }
}

The file basically calls ‘LatestPost.php’ and gets the latest post details on the blog(see below for details), then it checks if the post made is newer than the last post processed and if so it proceeds to post to Facebook using FBCMD.

‘LatestPost.php’ file looks like this:

< ?php

define('WP_USE_THEMES', true);
require_once( dirname(__FILE__) . '/wp-load.php' );

$month = $_GET['month'];
$year = $_GET['year'];

$args = array( 'numberposts' => 1);
$myposts = get_posts( $args );

//print_r($myposts);

foreach( $myposts as $post ) : setup_postdata($post); 
echo $post->ID . "\n";
the_permalink();
echo "\n";
the_title();
echo "\n";
the_content();
endforeach; ?>

This file need to be put on the server in the WordPress Root directory and when called returns an output in the following format:

Post ID
Post Link
Post Title
Post Content

Once all this is done and the FBCMD has access to post to Facebook all we need is a cron job to run on a frequent basis to run the code. So I created a shell script that contains the following line and have it run every 15 mins.

/usr/bin/curl http://localhost/fbcmd/run.php > /tmp/FBPost.out

That’s it. So far it looks like its working great and if this post shows up on my FB wall then all is well. If not, then its back to the code to see what went wrong this time.

– Suramya

September 5, 2011

Getting RTL8111/8168B PCI Express Gigabit Ethernet controller to work in Debian 6

Filed under: Knowledgebase,Linux/Unix Related,Tech Related,Tutorials — Suramya @ 11:28 PM

Once I got Debian 6 installed on my server I needed to connect it to the internet to download updates etc, however my network card wasn’t being detected correctly so I had to perform the following steps to get it to work correctly:

  • Download the latest Linux drivers for the RTL8111 Chipset from the Realtek site on a computer that can connect to the Internet.
  • Copy the file over to your new system via USB or smoke signals
  • Login as root to the server
  • Identify the kernel version that you are running, using the following command:
  • uname -a

    It will give you a result like the following:

    Linux StarKnight 2.6.30-2-686 #1 SMP Sat Aug 27 16:41:03 UTC 2011 i686 GNU/Linux

    Now you need to install the kernel source code for this version on the server. First we need to find the package name of the kernel source code, we do that by running the following command:

    apt-cache search linux |grep header |grep 2.6 

    If you have a 2.4.x kernel, replace grep 2.6 with grep 2.4. Once you have the package name install it using the following command as root:

    apt-get install linux-headers-2.6.30-2-686

    Make sure you replace linux-headers-2.6.30-2-686 with the package name you got.

    Once we have the kernel source installed we can go ahead and install the driver using the following commands:

    tar -jxvf r8168-8.025.00.tar.bz
    cd r8168-8.025.00
    ./autorun.sh 
    

    This will compile the drive and install it. I didn’t get any errors when I ran it, but if you do get errors try searching for the error message on Google, it usually provides a solution.

    After I installed the driver I tried initializing my network but kept getting the following error message:

    StarKnight:~# ifdown eth0
    ifdown: interface eth0 not configured
    StarKnight:~# ifup eth0
    Ignoring unknown interface eth0=eth0.
    

    Fixing it was fairly simple though, all I had to do was edit the /etc/network/interfaces file and add the following lines to it (This assumes you are using DHCP):

    auto eth0
    iface eth0 inet dhcp
    

    Once you add the lines, you can try starting the network again using the command:

    ifup eth0

    If all went well, you will be assigned an IP address and will now be able to successfully browse the net.

    Hope this helped.

    – Suramya

    February 5, 2010

    Learn to use search effectively in Linux using grep

    Filed under: Linux/Unix Related,Tech Related,Tutorials — Suramya @ 11:59 PM

    grep is a really powerful tool that allows you to search for specific string/data within a given text. This text can be a list of files or the content of a given file, even a list of programs running. Basically it allows you to filter the required text from background noise.

    As you can imagine it is a very powerful tool but most people don’t really learn to use it well. Zahid Irfan wrote a very nice blog post on ‘Why grep almost never yields something productive‘ for new Linux users and has some great examples that explain grep usage quite well for all users both new and experienced

    Check it out.

    – Suramya

    Older Posts »

    Powered by WordPress