Way back in 2016, I backed the Pocket C.H.I.P on Kickstarter opting to get 2 CHIP’s and one PocketChip. The C.H.I.P (or CHIP) was a single single-board computer costing $9 launched by Next Thing Co. It used open-source hardware running open-source software and was advertised as world’s first $9 computer as a direct competitor to the RaspberryPi . The device boasted the following configuration:
- 1 GHz R8M/R8 (ARMv7)SoC processor
- 512 MB DDR3 SDRAM
- Built-in Wi-Fi 802.11b/g/n, Bluetooth 4.0
- One USB host with type-A receptacle, one USB On-The-Go port
- Composite video and stereo audio port via mini TRRS
- Optional composite TRRS to RCA audio-video cable
- Optional VGA adapter and HDMI adapter (I got both)
- Up to 45 GPIO ports
- Supports 1-Wire and I2C protocols, PWM output
- Serial console and Ethernet via USB for quick headless operation
- Power options include 5V via USB OTG, 5V via CHN pin, and by 3.7V battery
- Onboard NAND storage, 4-8GB
The PocketChip was a handheld with a 4.3 inch 480×272 pixel resistive touchscreen, a clicky keyboard, GPIO headers on the top of the device, and GPIO soldering pads inside of the injection molded case powered by the CHIP processor. It looks clunky but is easier to connect to the device and setup using the PocketChip rather than doing it with just the CHIP.
Unfortunately the company shutdown in 2018 due to various issues. However, I was one of the lucky backers to receive the devices but once I received them I put them in a drawer and kind of forgot about them as life got busy and interesting. Over the years I did try to power on the device a couple of times but never really looked into getting it to work, so they just collected dust in my desk (literally).
Over the past weekend I decided to try getting it to work so I did some searching and with a lot of trial and error finally managed to get things to work and boot into a working OS. 🙂 The main issue was that I was expecting it to work like the RaspberryPi where the OS was installed on an SD card but in this case the OS had to be flashed on to the onboard flash chip which was a bit more complicated process than installing to a SD card. I followed the instructions at NextThingCo Pocket C.H.I.P. Flashing Guide amongst other pages to get things to work. Here I will document some of the other things I had to do to get it to work. Please note that this was on a Debian setup, things might be a bit different for other OS’s
Install the Prerequisites
First we need to install the tools required by running the following command as root:
apt-get install git android-tools-fastboot sunxi-tools u-boot-tools
Download the CHIP SDK
Download the CHIP-SDK.zip from one of the following links:
Download and extract the CHIP Tools
Download CHIP-tools.zip from one of the following sites:
Download CHIP OS Images
Download the CHIP OS image from one of the following links:
- archive.org: flash-collection.zip (.zip contains all CHIP image variants)
- mirror.suramya.com: flash-collection.zip
Extract flash-collection.zip
When I tried extracting the contents of the zip file I got from the first link, I got an error that the file is not a Zip file. After a lot of searching I found out that you can run the following command to extract the file instead:
jar xfv flash-collection.zip
Since that seems unnecessarily complicated. I have extracted and re-compressed the file and shared it at the second link. You can extract it using the standard zip tools.
Fix fastboot
The version of fastboot in the Debian repositories is newer than the one used in the setup scripts and if you try to flash with the version installed then fails with the following error message:
..
..
== Cached UBI located ==
Image Name:   flash server
Created:      Sun Aug 20 19:29:14 2023
Image Type:   ARM Linux Script (uncompressed)
Data Size:    1784 Bytes = 1.74 KiB = 0.00 MiB
Load Address: 00000000
Entry Point:  00000000
Contents:
   Image 0: 1776 Bytes = 1.73 KiB = 0.00 MiB
waiting for fel...OK
waiting for fastboot...fastboot: invalid option -- 'i'
.fastboot: invalid option -- 'i'
.fastboot: invalid option -- 'i'
.fastboot: invalid option -- 'i'
.fastboot: invalid option -- 'i'
.fastboot: invalid option -- 'i'
.fastboot: invalid option -- 'i'
.fastboot: invalid option -- 'i'
The easiest fix for this is to rollback to a previous version of the software that supports the -i parameter. You can try to search and download the older version from Debian’s repositories, but I found it easier to download the software from platform-tools_r26.0.0-linux.zip (as I was too tired to go search for it in the archives)
Once you download the file and extract the contents, follow these steps to rollback to the previous version of fastboot:
- Backup the existing binary for fastboot
mv /usr/lib/android-sdk/platform-tools/fastboot /usr/lib/android-sdk/platform-tools/fastboot_old
mv platform-tools/fastboot /usr/lib/android-sdk/platform-tools/fastboot
Put the CHIP in FEL mode
The FEL mode allows the software to flash the CHIP with a new firmware. This can be done by putting a jumper wire between GND and FEL. It will look something like the following:
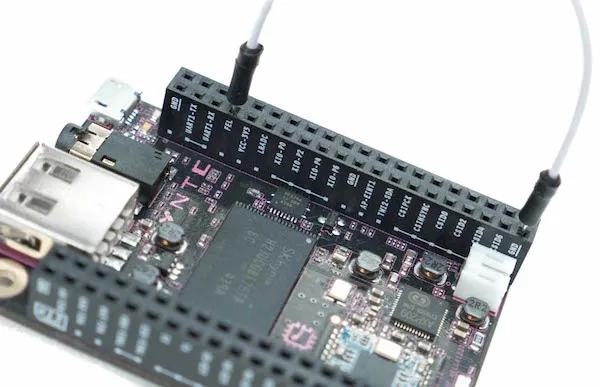
Connecting a jumper wire between GND and FEL to enter FEL Mode
Once you have entered the FEL mode, connect the CHIP to the computer using the microUSB port on the CHIP, not the fullsize USB port.
Flashing the OS to CHIP
Once you have downloaded all the files and unziped them. Follow these steps to Flash the OS to CHIP.
- Move the CHIP-tools directory to the CHIP-SDK directory
mv CHIP-tools CHIP-SDK/
cd CHIP-SDK/CHIP-tools
./chip-update-firmware.sh -L ../../flash-collection/testing-server-b543/
If you have done everything correctly and nothing is broken, you will get an output similar to the following:
suramya@StarKnight:~/Media/Downloads/CHIP/CHIP-SDK/CHIP-tools$ ./chip-update-firmware.sh -L ../testing-pocketchip-b667/
== Local directory '../testing-pocketchip-b667/' selected ==
== preparing images ==
== Local/cached probe files located ==
== Staging for NAND probe ==
Image Name:   detect NAND
Created:      Sun Aug 20 20:24:50 2023
Image Type:   ARM Linux Script (uncompressed)
Data Size:    97 Bytes = 0.09 KiB = 0.00 MiB
Load Address: 00000000
Entry Point:  00000000
Contents:
   Image 0: 89 Bytes = 0.09 KiB = 0.00 MiB
waiting for fel...OK
waiting for fel......OK
NAND detected:
nand_erasesize=400000
nand_oobsize=680
nand_writesize=4000
== Cached UBI located ==
Image Name:   flash server
Created:      Sun Aug 20 20:24:58 2023
Image Type:   ARM Linux Script (uncompressed)
Data Size:    1784 Bytes = 1.74 KiB = 0.00 MiB
Load Address: 00000000
Entry Point:  00000000
Contents:
   Image 0: 1776 Bytes = 1.73 KiB = 0.00 MiB
waiting for fel...OK
waiting for fastboot...................OK
target reported max download size of 33554432 bytes
sending sparse 'UBI' 1/23 (28672 KB)...
OKAY [  2.016s]
writing 'UBI' 1/23...
OKAY [  2.069s]
sending sparse 'UBI' 2/23 (28672 KB)...
OKAY [  2.007s]
writing 'UBI' 2/23...
OKAY [  5.484s]
..
..

sending sparse 'UBI' 22/23 (28672 KB)...
OKAY [  1.916s]
writing 'UBI' 22/23...
OKAY [  9.079s]
sending sparse 'UBI' 23/23 (16384 KB)...
OKAY [  1.105s]
writing 'UBI' 23/23...
OKAY [  4.981s]
finished. total time: 300.744s
resuming boot...
OKAY [  0.000s]
finished. total time: 0.000s


FLASH VERIFICATION COMPLETE.


   #  #  #
  #########
###       ###
  # {#}   #
###  '%######
  #       #
###       ###
  ########
   #  #  #


CHIP is ready to roll!
If you see the message that “FLASH VERIFICATION COMPLETE.” and that “CHIP is ready to roll!”, then the OS installation has completed successfully. Now you can disconnect the CHIP from the computer and remove the jumper cable.
Booting into CHIP
If you have the PocketCHIP, then you can just power up the device by pressing on the power button for a second (pressing it for 10 seconds shuts it down forcefully). If you just have the CHIP, you will need to connect it to a monitor and connect a keyboard as well. (I used the PocketCHIP to configure everything and then used it separately).
The boot up process can take a minute or two, and assuming everything went well you should see the standard boot messages on the screen. Once you get to the login prompt you can log in using the username ‘chip’ (without the quotes) and ‘chip’ (without the quotes) as the password. The root account password is also ‘chip’ (without the quotes).
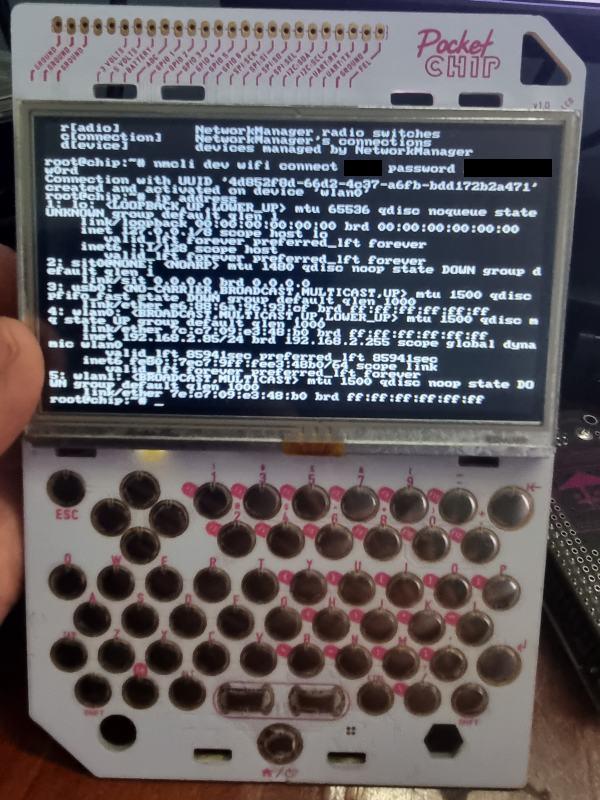
Connecting to WiFi and configuring the CHIP
The first thing that you should do now is connect the device to a WiFi network so that you can SSH into it for ease of configuration. The second thing should be to change the default passwords 🙂
The easiest way to configure WiFi is to use the nmcli tool. Run the following command as root to connect to the WiFi. More details on the command are available at How to Connect Wi-Fi from Linux Terminal Using Nmcli Command
nmcli dev wifi connect <SSID of The Network to Connect With> password <password for the Wifi Network>
Once the device is connected to the WiFi, get your IP address using the following command:
ip address
Then you can SSH into the device from any system using the IP address.
CHIP is working!!!
Running Debian 8 Testing
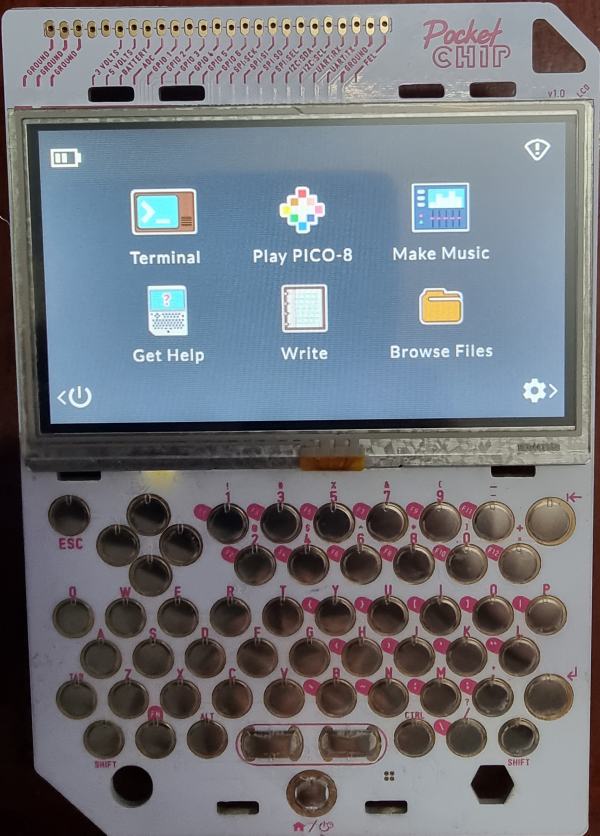
Running the PocketCHIP customized version (Debian 8)
Updating the OS to the latest version
The system is running Debian 8 by default and you should upgrade it to the latest version. Unfortunately, I keep getting errors when I try to upgrade to the latest Debian version and haven’t yet fixed the problem. Basically, I think you need to update the /etc/apt/sources.list with the correct mirror details and then upgrade. Once I get some time to revisit the setup and resolve the issue I will post the fix on the blog as a followup post to this one.
– Suramya
Thanks! Was hoping to get my old one running again!! Will try to update it to maybe a rasbian flavor. 😉 All the best!
Dave
Comment by Dave — May 24, 2024 @ 9:01 PM
All the best! Do share your experience if you manage to get Raspbian running on the system.
– Suramya
Comment by Suramya — May 25, 2024 @ 5:21 AM
Hi, I appreciate this post, as I picked up an old PocketCHIP and was able to get it running again with this information. Has there been any progress upgrading/replacing the OS? I’d love to have it be a general purpose *nix box if I can clean the proprietary stuff off.
Comment by Kelly — March 17, 2025 @ 9:58 PM
Hey Kelly,
Glad you found this useful. I haven’t really looked at this for a while now so am not aware of any further work done on this.
However, the setup instructions I gave do setup Debian 8 on the system so its mostly proprietary free 🙂 If you are talking about creating OS images or using a different Image flasher then that sounds like an interesting project to work on.
Unfortunately I doubt I will be able to work on that anytime soon as I have other projects I want to complete first.
– Suramya
Comment by Suramya — March 18, 2025 @ 2:05 PM
Hey Suramya,
I know it’s possible to run a fresh main stream Debian 13 incl. a recent 6.12.x kernel on the PocketCHIP. Because I did it.
The part I didn’t got working was the LCD screen. I think is can be the back light.
What I can remember the LCD blanked just before the login….
Now the PocketCHIP is on my TDB list. When autumn leaves I will pick it maybe up again.
/M
Comment by MaBa — April 25, 2025 @ 11:47 PM
Hi Suramya,
Thanks for working this out and posting it, my long dormant C.H.I.P appears to be working 🙂
Neal
Comment by neal — August 16, 2025 @ 2:56 PM
@MaBa, do let me know if you get it to work.
@Neal: Glad to hear that the instructions helped you 🙂
– Suramya
Comment by Suramya — August 16, 2025 @ 9:05 PM
Hi Suramya
I just found your site after find the pocket chip in the draw,
Was working last time it went away, I have charged the unit and the battery pack has charge, 3.7v but when I try to turn on there are no lights coming on the unit. any pointers if this was what happened at all the start of your article and what could get me past a seemingly dead unit? Thanks in advance
Comment by Nick — September 30, 2025 @ 8:50 PM
Hi Nick,
One option is to try putting it into FEL mode (Instructions in post above), connect to the computer and then try re-flashing the device. Apparently the NAND memory degrades over time so this could potentially fix the problem.
Another option is to try replacing the battery because it might be having issues.
Hope that helps.
– Suramya
Comment by Suramya — October 3, 2025 @ 12:49 AM
When running the flash script, it errors out that it can not locate sunxi-nand-image-builder in Debian 12/Bookworm. Even after pulling/building sunxi-tools from github or guix install. From the git, after ‘make misc’, ‘make install’ and ‘make install-all’ you just need to copy the sunxi-nand-image-builder executable file manually to /usr/bin and /usr/local/bin and the script will run and flash will complete.
Comment by Casey Jones — December 26, 2025 @ 4:16 AM
@Casey, Thanks for sharing this fix.
– Suramya
Comment by Suramya — December 26, 2025 @ 9:14 PM