Suramya's Blog : Welcome to my crazy life…

May 17, 2021

IBM’s Project CodeNet: Teaching AI to code

Filed under: Computer Software,Emerging Tech,My Thoughts,Tech Related — Suramya @ 11:58 PM

IBM recently launched a new program called Project CodeNet that is an opensource dataset that will be used to train AI to better understand code. The idea is to automate more of the engineering process by applying Artificial Intelligence to the problem. This is not the first project to do this and it won’t be the last. For some reason AI has become the cure all for all ‘ills’ in any part of life. It doesn’t matter if it is required or not but if there is a problem someone out there is trying to apply AI and Machine Learning to the problem.

This is not to say that Artificial Intelligence is not something that needs to be explored and developed. It has its uses but it doesn’t need to be applied everywhere. In one of my previous companies we interacted with a lot of companies who would pitch their products to us. In our last outing to a conference over 90% of the idea’s pitched had AI and/or Machine Learning involved. It got to the point where we started telling the companies that we knew what AI/ML was and ask them to just explain how they were using it in their product.

Coming back to Project CodeNet, it consists of over 14M code samples and over 500M lines of code in 55 different programming languages. The data set is high quality and curated. It contains samples from Open programming competitions with not just the code, it also contains the problem statements, sample input and output files along with details like code size, memory footprint and CPU run time. Having this curated dataset will allow developers to benchmark their software against a standard dataset and improve it over a period of time.

Potential use cases to come from the project include code search and cloud detection, automatic code correction, regression studies and prediction.

Press release: Kickstarting AI for Code: Introducing IBM’s Project CodeNet

– Suramya

May 14, 2021

NTFS has a massive performance hit on Linux compared to ext4

Filed under: Computer Software,Linux/Unix Related,My Thoughts,Tech Related — Suramya @ 12:47 PM

NTFS has long been a nemesis of Linux. I remember in the 2000’s getting NTFS working on linux required so much effort and config changes that I stopped using it on my systems as FAT32 was more than sufficient for my needs at that time. Initially the driver was very unstable and it was recommended that you only use it for Read operations rather than Read/Write as there was a high probability of data corruption. That has changed over the years and the driver is stable. However, there is a massive performance hit when using NTFS vs ext4 on a Linux machine and I saw this when I tried using a NTFS partition on my laptop instead of ext4.

I have a 1 TB drive on my laptop along with a SSD. I dual boot the laptop (need it for my classes) between Windows & Debian and wanted to have all my files available on both OS’s. When I last tried this, ext support on Windows was not that great (and I didn’t feel like searching for options) so I decided to format the drive to NTFS so that I would have access to the files on both OS. The formatting took ages and once the drive was ready I was able to copy my files from the desktop to the laptop. While the files were being copied I noticed very high CPU usage on the laptop and the UI was lagging randomly. Since I was busy with other stuff I let it be and ignored it.

Yesterday I was trying to move files around on the laptop so that the root partition had enough space to do an upgrade and I again noticed that file copy and most of the disk operations were taking way longer than I expected. For example there would be a second of delay when I tried listing the directory when it had a lot of files. So, I decided to test it out. My data on the Laptop is an exact copy of the files on the Desktop. I timed the commands on the desktop with the same command on the laptop and there was a significant difference.

My desktop is obviously a lot more powerful than the laptop so I decided to try an experiment where I would run a command on the NTFS drive, then format the drive to ext4 and run the same command. (after copying all the files back). When I did this I saw that there was a massive difference in the time it took to run the command. On ext4 the command took less than 1 second (0.107s) whereas it took almost 34 seconds (33.997s) on NTFS parition. The screenshot for both commands are below:


du -hs command on a ext4 partition


du -hs command on a NTFS partition

That’s a ridiculous amount of difference between the two. So I obviously have to switch back to ext4 which brought us back in a full circle – I still needed to be able to access my files from Windows as well as from Linux. Decided to go a search on the Internet for options and found out that Windows 10 now lets you mount Linux ext4 filesystems in WSL 2. I haven’t tried it yet but I will test over the next few days once I am done with some of my assignments. If there is something interesting I will blog about it in the near future.

As of now, I am back to using ext4 on the laptop and the OS performance is a lot better.

Well this all for now. Will post more later.

– Suramya

May 9, 2021

Teaching Cyber Security basics to kids

Filed under: Computer Security,My Thoughts,Tech Related — Suramya @ 8:04 PM

There is an ongoing effort over at Australia to teach cyber-security to five-year-old kids. I am sure that it will be no surprise to anyone who knows me that I think that this is a brilliant idea. Security is a mindset and the earlier we can teach kids about the pitfalls and dangers online, the safer they will be online.

Our generation grew up with the internet and still I see that most people are not that serious about security. I had a long argument/discussion with Jani on why she had to have a passcode for her phone and why she couldn’t use the same password for everything. Now she understands what I was talking about and uses a password manager with unique password for each account. But that is not the same with my parents, I still have not managed to convince them to use a password manager. 🙁

A little while ago I was talking to mom and she commented that my nephew Vir doesn’t share his account passwords with anyone and when my mom is typing her password he looks away. I credit Vinit for teaching him this and am really happy about it. This is what you get when a kid is taught about security from the get go. Instead of learning it later as an add on. Another year or so and I will have him start using a password manager as well.

Habits learnt as a kid are really hard to unlearn and that is why I think it is really important that we get to kids as early as possible and teach them about cyber security. I mean we already teach them regular security and safety so why not cyber security and safety? Remember, they are spending a lot more time on the computer and the internet than we ever did and they need to be taught how to be careful online.

Well this is all for now. Will post more later.

– Suramya

April 30, 2021

Review and test of Fawkes: Software to protect your pictures from AI/Reverse searches.

Filed under: Computer Software,My Thoughts,Tech Related — Suramya @ 11:28 PM

Yesterday, I wrote about Fawkes & Photo Ninja which can be used to protect your photos from facial recognition models and reverse image searches. This is a very interesting field and I had mentioned about creating a service that does it for free instead of charging like what Photo Ninja is doing.

The first step to that is to check if the program (Fawkes) actually works the way it is supposed to, so I downloaded a pic from the internet (my profile pic on Twitter) and ran it through Fawkes. The program takes a while to run (~20 seconds per image) depending on the no of people in the photo. It detected the faces very reliably and modified the image. When using the default settings the output is saved as a PNG file but you can override it using a command line parameter. It requires you to provide the directory you want to run it against but if you don’t pass it the directory, it doesn’t give any errors. It took me a few mins to figure out what the issue was (yes, I know… My brain is tired). The command to run it in the current directory with debug (because I like seeing what the software is doing) is:

./protection --debug --directory .

I then took the resultant, file and searched for it via Google Images, Yandex and TinEye. None of them were able to find any results with the new image. So that part of the software works great. 🙂 Now coming to how the software modifies the image, I saw that it adds 2 rows of pixelisation to the image. First is near the hairline and cuts across the hair and forehead, and the second is near the chin and is about 5-10 pixels wide. It is clearly visible in larger photos, but when zoomed out it doesn’t look too jarring. Frankly it looks like the image got damaged and is kind of obvious when you look at it.

In my very basic tests it made the same change everytime so I have a feeling that we can train image recognition software to look for this modification and ignore it. It might be more powerful to put the modifications at random locations in the image (over the faces) that way it is harder to train the software to counter it. Plus if the visual noise section can be reduced it would be great. Maybe instead of a long blur that is noticeable we can try to do multiple small changes that change the pic without making it obvious that the image was modified.

Below are the two images, the original on the left and the modified version on the right.


Sample output of the Fawkes

I then looked at running this on my webserver, but due to the restrictions there I wasn’t able to get it to run. Although, to be honest I only tried for about 20-30 mins because I was tired. If I can’t get it to run on the server then the other option is that I run it on my home computer but I will need to look at that in more detail before I commit to making this site. I have a rough draft of the requirements and feature list but still looking at the options before I start working on it. It will be a good way to take my mind of what is going on in the world so that is good.

Well this is all for now. Will keep you posted on how this project goes.

– Suramya

April 8, 2021

Moving a Windows install to another drive on the same computer shouldn’t be this hard

Filed under: Computer Software,Linux/Unix Related,My Thoughts,Tech Related — Suramya @ 11:27 PM

I recently bought a new SSD drive for my Laptop because even after upgrading everything else (except the CPU) the system was still slow and looking at the process use I could see that it was waiting for disk read/write for the most part and that was causing the slowness. Once I got the new drive, I had to move the existing OS installs from the old disk to the new one. I have three operating systems (OS) on the disk: Windows, Debian and Kali. I need the windows OS for my classes (my proctored exams have to be taken on a windows machine) and others are for my tinkering and general use computing. The disk layout on the old drive was as follows:

root@Wyrm:~# fdisk -l
Disk /dev/sda: 931.51 GiB, 1000204886016 bytes, 1953525168 sectors
Disk model: ST1000LM024 HN-M
Units: sectors of 1 * 512 = 512 bytes
Sector size (logical/physical): 512 bytes / 4096 bytes
I/O size (minimum/optimal): 4096 bytes / 4096 bytes
Disklabel type: dos
Disk identifier: 0x0f04ad34

Device     Boot     Start       End   Sectors   Size Id Type
/dev/sda1  *         2048   1126399   1124352   549M  7 HPFS/NTFS/exFAT
/dev/sda2         1126400 102402047 101275648  48.3G  7 HPFS/NTFS/exFAT
/dev/sda3       102402048 135956479  33554432    16G 82 Linux swap / Solaris
/dev/sda4       135956480 468862127 332905648 158.7G  5 Extended
/dev/sda5       135958528 175017985  39059458  18.6G 83 Linux
/dev/sda6       175022080 237936641  62914562    30G 83 Linux
/dev/sda7       237940736 468862127 230921392   675G 83 Linux

I partitioned the new disk as a copy of the old drive, except for the data partition which was smaller as the disk was smaller. I used dd to clone each partition on to the corresponding new partition using the following command: (where sdb was the new drive).

dd if=/dev/sda1 of=/dev/sdb1 bs=2k

Once I copied the partitions over, all I had to do was refresh the GRUB boot loader config using the following command:

update-grub

After the config was updated, I was able to boot into Linux from both my Debian and Kali partitions on the new drive. However, that didn’t work for Windows. It gave be a screen-full of random characters like what you see when you try to open a binary file in a text editor and refused to boot. Thankfully I had not deleted the old windows partition so I was able to try a few more things, but *nothing* worked. Windows would just refuse to boot from the new drive. The only solution I found that could have potentially worked was a Paid software that supposedly allows you to clone your windows install on new disks/computers. Since I didn’t want to spend money on something I should have been able to do for free, I didn’t try it.

In the end after wasting a lot of time on this, I was tired of trying various things so just decided to reinstall windows on the new drive. It wasn’t a major loss because I didn’t have much data on Windows but I still dislike the fact that I had to do so just to put in a new drive. Imagine the hoops I would have had to jump if I wanted to move to a new computer. Actually I don’t have to imagine, I did jump thorough them when I moved my install from my old laptop to this one.

My linux install on the laptop is an exact clone of my desktop install. I used dd to create an image of my Linux install on the desktop and then wrote the image on the laptop. It worked perfectly fine at the first try. All I had to change was the hostname so that my DHCP server didn’t have a nervous breakdown but other than that everything worked without a single problem. Even the graphics drivers auto adjusted on the new machine. Imagine if we could do the same thing for a Windows install.

– Suramya

March 27, 2021

Outrun: Run a local command on a remote server

A lot of times we have to run a command that requires a lot of processing power and is extremely slow on your local computer. I have faced this issue in the past and at times wished there was a way to push these commands to a remote machine with a more powerful CPU to run the command. Now, thanks to the efforts of Alexander Overvoorde (Overv), Jakub Wilk and Xiretza this is now possible. They have created a tool called Outrun which lets you execute a local command using the processing power of another Linux machine without having to install the command on the remote machine.


Sample Execution of ffmpeg on a remote server

The software does have a few limitations, but on the whole it is very cool:

  • We need to have root access on the remote server (or sudo access) as the system needs to run chroot on the remote server
  • Both client and remote server need to be on the same architecture, so you can’t set up a session from an x86 machine to an ARM machine. Which is unfortunate because the first usecase I had for this tool was to run software from the RaspberryPI on my server as and when it needed more processing power.
  • File system performance remains a bottleneck

Check it out if you need to run commands with more CPU cycles than what is available on the local machine.

Thanks to Hacker News for the initial link.

– Suramya

March 25, 2021

Fools deleting company data after being fired and how to protect against this threat

Filed under: Computer Security,My Thoughts,Tech Related — Suramya @ 4:34 PM

Over the past few years I have seen multiple news articles and stories about idiots who were unhappy with their job or were fired and decided to take revenge by deleting data, accounts or destroying company property. The common factor in all the stories was the fact that the person was subsequently arrested and jailed. The most recent story I saw was this one, where a genius decided to delete 1200 Microsoft Office accounts after being fired and ended up in jail for his troubles.

Destroying company property when you leave is a good way to ensure you are never hired again by any company. I mean if I was interviewing a candidate and I found out that the candidate had deleted critical data when they left the company I would probably never hire them. End of the day if you have demonstrated that you are not mature enough to deal with a loss but rather delete data/information then you are not a fit to work in my team. I know a lot of people will come and say that people should be given a second chance and what not but this is a serious issue. There would be a major lack of trust in play here and with that the person’s efficiency would be horrible and multiple other folks would have to keep monitoring what this person was doing on the servers which is an overhead I wouldn’t need.

So, now looking at this from the company’s side. How do you prevent something like this from happening? The basic step is to ensure that the access rights of the person are terminated as soon as they are let go. Secondly, they should not be allowed to access their system after they are fired. In one of my previous companies, the physical security team would escort a person off-premises without allowing them to log on to their computer or anything. By the time the person was off premises their accounts were already de-activated. They should also be removed from any company related mailing lists, chat rooms, telephone trees etc immediately. Any commonly known account passwords should be changed immediately and if the person had admin access a check should be made for any unauthorized accounts with admin access and for any backdoor’s being installed.

In the case of a threat where the person hasn’t been fired yet you need to have systems in place to perform regular audits of all admin/root activity. There are a lot of other steps that can be taken and out of scope for this blog post. SANS has a great paper on Protecting Against Insider Attacks and RSA has a list of best practices that you can check out as well.

If you need help securing your network/system please reach out and we can discuss in more detail.

– Suramya

March 7, 2021

Syncing data between my machines and phones using syncthing

I have talked about how my Backup strategy has evolved over the years. I am quite happy with the setup I explained in my previous post except for one minor point. I still had to manually sync the data from my laptop, Jani’s laptop and my phone to my desktop manually. Once it is there on the desktop the various backup processes make sure that it is backed up and secure. The issue is that I still had to manually sync the data between the devices.

For my laptop, I used Unison to manually check for changes and then sync them over which works great but I had to ensure that the sync happened in the correct direction. For Jani’s laptop I mounted my drive on her computer over ssh using these steps and then running robocopy to copy the files over. This worked intermittently well. For some reason the system would refuse to overwrite changed files randomly with permission denied errors even when the permission was set to 777. The only way to fix was to delete all the files on my computer and then do a fresh sync. This worked, but was not userfriendly and required me to manually kick off a backup which I did infrequently. My phone on the other hand was backed up manually to my computer using sftp. This was very crumbersome and I really disliked having to do it.

I have in the past looked into various technologies that allow multiple devices to sync data with each other. Unfortunately, all of them required an external connection with a copy of the data being stored in the cloud. Since that was a show-stopper for me, I never got around to setting up my systems to automatically sync with each other. Then a few weeks ago, I came across this great article on how to create A Simple, Delay-Tolerant, Offline-Capable Mesh Network with Syncthing (+ optional NNCP). In the article John talked about Syncthing, which allowed him to create a local serverless, peer-to-peer, open source alternative to Dropbox that allowed his machines sync directly with each other without a server. In other words a perfect fit for what I wanted and needed to do. So I spent a little bit of time researching syncthing and then decided to take the plunge and setup my laptop and desktop to sync with each other. Before starting the setup I backed up all my data so that in case something went wrong I still had a backup. Thankfully nothing did, but it is always good to have a backup.

Syncthing’s installation is pretty simple for all major operating systems, except for iPhones which are not supported. In Debian, installation just required the following steps

  • Run the following commands to add the “stable” channel to your APT sources:
  • echo "deb https://apt.syncthing.net/ syncthing stable" | sudo tee /etc/apt/sources.list.d/syncthing.list
    curl -s https://syncthing.net/release-key.txt | sudo apt-key add -
  • Once you have added it, run the following command to install syncthing
  • sudo apt-get update
    sudo apt-get install syncthing

    Once the software is installed execute the syncthing binary. On my computer it is installed in /usr/bin/syncthing. Once the software starts, it will start the web interface automatically. There is also a Desktop application, but I prefer the web-ui. Instructions on how to configure the folders and nodes are available at the Getting Started Guide over on the project website so I am not going to repeat them here. Basically, you need to define the nodes and connect them to each other, if the devices are not added on both sites then the folders will not sync.

    The software has a cool feature of discovery, which makes it easy to add devices on a given node. As soon as you connect to the same network they detect each other and give you the option of connecting both. After the devices are connected, you configure the folder you want to sync and select the devices you want it synced with. The best part is as soon as you configure one node, the other nodes will get a message stating that Node 1 is attempting to share a folder with them. Clicking on accept, allows you to configure the folder path etc on the node and that’s it. The system will detect the files which need to get synced over and will copy them quickly. You can configure the sync to be bi-directional or one way. Most of the folders in my setup are set as that, the only exception are Jani’s files which is a one-way sync because I know that I am not going to modify the files on the server.

    Below is what the setup looks on my desktop, as you can see I am syncing data from 3 different computers/phones to it and the sync’s are really fast. I have copied files over to the folder on one computer and within minutes (depending on the size) they were replicated on the other computers/phone.
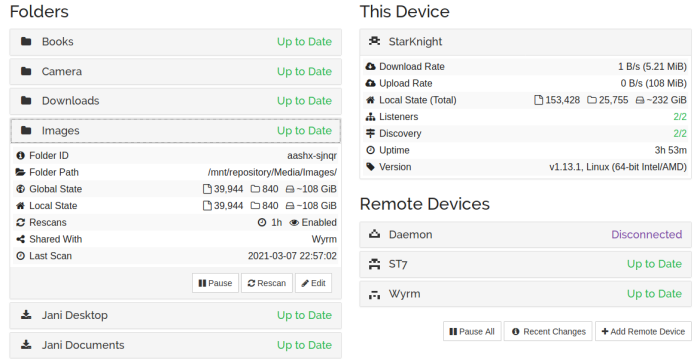

    My Syncthing setup

    I have the android client running on my phone as well, and it instantly syncs any new photos etc from my phone to the desktop. All I need to do is connect to the same LAN network (can be over wired or wireless) and the devices connect and sync automagically. There is an option to do so even over the WAN using relay server but since I didn’t want that I disabled it in the setup.

    Now all my data is synced to the desktop machine without me having to worry about anything or manually copying files around. Check it out if you want to sync your devices without using an external server.

    – Suramya

February 22, 2021

Should software be “classified” if it is used by government agencies?

Filed under: My Thoughts,Tech Related — Suramya @ 10:25 PM

Software should not be classified when used in government agencies except in some very rare exceptional cases. For example, software used to launch nuclear missiles and ensure they hit their targets might be an exception however, these should be an exception rather than the rule in my opinion. The reason I say that is because when a software is classified it means that a limited no of people are using it and that means only a limited no of developers are working on it as any given time. Plus, when something is classified it can not be security tested by external entities without having to sign multiple Non-Disclosure Agreements (NDA’s) and other similar hoops whereas regular software is used and tested by lots of people like corporate’s who test the solution before they implement it in their environment. This gives us multiple groups of people testing the software in various ways making it easier to identify security issues making it more secure.

Secondly, making classified versions of existing software doesn’t seem like a good use of resources to me. Why spend extra money creating a classified ‘Word’ when the commercial version (with some modification) would work perfectly well?

Coming to open source, I don’t think government should be prohibited from using Open Source. There are two ways government’s can be blocked from using opensource software. Firstly, the software license might prohibit government use. If this is the case, then the license no longer meets the requirement to be called open source since the Open Source Definition specifies that Open Source licenses may not discriminate against persons or groups. In-fact there was an attempt back in 2006 by GPU which is a Gnutella client to create a license that disallowed the use of their software by the military. It didn’t go anywhere because of strong opposition by the Open Source Initiative (OSI) to calling the license open source. Second, The government might not allow its use due to internal policy: This is primarily because they are worried about one or all of the following: Security, Cost, or licensing.

There is a misconception that opensource software is less secure than commercial software and even though majority of the servers worldwide run on opensource software (Linux, Apache etc) the detractors still persist. In every large company I have worked with so far, whenever I try promoting opensource software this point invariably comes up and I have to spend time explaining why this is not the case.

Another reason why companies might not allow OSS is because of the license the software might be under. If the software is licensed under the GPL they need to be extra careful when using it within their setup because the GPL is what is known as a viral license. It requires the source code of the entire “derived work” – i.e. the combination of GPL code and proprietary code – to be made available under the terms of the GPL publicly. Due to this most companies do not allow software licensed under the GPL to be used inside them. (Libraries licensed under GPL are fine because they don’t trigger the ‘viral’ clause). However, there are other licenses that do not have this clause and can be safely used.

Ultimately, I feel it is better if they use opensource software rather than pay ridiculous amounts of money as software licensing fees.

February 20, 2021

Fixing boinc (code=exited, status=108) error

Filed under: Computer Tips,Knowledgebase,Linux/Unix Related,Tech Related — Suramya @ 2:01 AM

Earlier today I noticed that my CPU was not as active as usual and the boinc (World Community Grid) processes were no longer active on my computer. This has happened in the past when the client crashed so I restarted the client using the following command as usual:

/etc/init.d/boinc-client restart

Unfortunately, that didn’t resolve the problem and I thought that it could be because of the recent OS update that I did to my Debian system. In the past there have been rare cases when libraries were updated that some programs act strangely till the computer is rebooted, so I restarted the machine expecting to see the process start up without issues. Sadly, that didn’t happen so I had to debug the problem and I tried all sorts of things to resolve.

First, I tried starting the program manually as the root user and that worked. So I knew it was something to do with the startup script. Then I searched for and removed all the lock files in the boinc and the boinc-client directory. That should have resolved the problem but it didn’t and then I tried running the status command which gave the following output:

root@StarKnight:/var/lib/boinc-client# /etc/init.d/boinc-client status
boinc-client.service – Berkeley Open Infrastructure Network Computing Client
Loaded: loaded (/lib/systemd/system/boinc-client.service; enabled; vendor preset: enabled)
Active: failed (Result: exit-code) since Sat 2021-02-20 01:26:50 IST; 9s ago
Docs: man:boinc(1)
Process: 7420 ExecStart=/usr/bin/boinc (code=exited, status=108)
Process: 7455 ExecStopPost=/bin/rm -f lockfile (code=exited, status=0/SUCCESS)
Main PID: 7420 (code=exited, status=108)
CPU: 19ms

Feb 20 01:26:40 StarKnight systemd[1]: Started Berkeley Open Infrastructure Network Computing Client.
Feb 20 01:26:50 StarKnight boinc[7420]: 20-Feb-2021 01:26:50 Another instance of BOINC is running.
Feb 20 01:26:50 StarKnight systemd[1]: boinc-client.service: Main process exited, code=exited, status=108/n/a
Feb 20 01:26:50 StarKnight systemd[1]: boinc-client.service: Failed with result ‘exit-code’.

This meant that the system thought that another instance of the software was running but that wasn’t the case as I verified it using ps. A search for the status=108 code on the internet returned a few results but nothing that resolved my problem. One user who faced this issue resolved it by uninstalling everything and installing back but that wasn’t a step I wanted to take without trying everything else first so I kept researching. Then I saw a post where a user was facing the same issue after they had moved the data directory to another partition and symlinked it to the original location. I had done the same thing a few weeks ago so I moved the directory back to it’s original location but that didn’t resolve anything either.

Then I thought about checking the file ownerships of the directory and they were owned by my user (suramya) and a post on the internet said that they should be owned by root. I checked on my laptop as I have the same setup there and found that the directories were owned by the ‘boinc‘ on the laptop. Then I remembered changing the ownership of all files in one of my drive partitions last night to suramya. What I didn’t realize at that time was that the boinc-client directory was also located on that partition (after I had moved it there to recover space on my root partition).

I immediately changed the ownership of both directories back to boinc:boinc using the following command

chown boinc:boinc /var/lib/boinc* -R

Then I restarted the daemon and that fixed the problem. I then moved the directory back to it’s original location (on the other partition), symlinked it to the original location and the software still worked after I restarted the process.

I am documenting this in case others hit the same issue.

– Suramya

« Newer PostsOlder Posts »

Powered by WordPress