Suramya's Blog : Welcome to my crazy life…

March 27, 2021

Outrun: Run a local command on a remote server

A lot of times we have to run a command that requires a lot of processing power and is extremely slow on your local computer. I have faced this issue in the past and at times wished there was a way to push these commands to a remote machine with a more powerful CPU to run the command. Now, thanks to the efforts of Alexander Overvoorde (Overv), Jakub Wilk and Xiretza this is now possible. They have created a tool called Outrun which lets you execute a local command using the processing power of another Linux machine without having to install the command on the remote machine.


Sample Execution of ffmpeg on a remote server

The software does have a few limitations, but on the whole it is very cool:

  • We need to have root access on the remote server (or sudo access) as the system needs to run chroot on the remote server
  • Both client and remote server need to be on the same architecture, so you can’t set up a session from an x86 machine to an ARM machine. Which is unfortunate because the first usecase I had for this tool was to run software from the RaspberryPI on my server as and when it needed more processing power.
  • File system performance remains a bottleneck

Check it out if you need to run commands with more CPU cycles than what is available on the local machine.

Thanks to Hacker News for the initial link.

– Suramya

March 7, 2021

Syncing data between my machines and phones using syncthing

I have talked about how my Backup strategy has evolved over the years. I am quite happy with the setup I explained in my previous post except for one minor point. I still had to manually sync the data from my laptop, Jani’s laptop and my phone to my desktop manually. Once it is there on the desktop the various backup processes make sure that it is backed up and secure. The issue is that I still had to manually sync the data between the devices.

For my laptop, I used Unison to manually check for changes and then sync them over which works great but I had to ensure that the sync happened in the correct direction. For Jani’s laptop I mounted my drive on her computer over ssh using these steps and then running robocopy to copy the files over. This worked intermittently well. For some reason the system would refuse to overwrite changed files randomly with permission denied errors even when the permission was set to 777. The only way to fix was to delete all the files on my computer and then do a fresh sync. This worked, but was not userfriendly and required me to manually kick off a backup which I did infrequently. My phone on the other hand was backed up manually to my computer using sftp. This was very crumbersome and I really disliked having to do it.

I have in the past looked into various technologies that allow multiple devices to sync data with each other. Unfortunately, all of them required an external connection with a copy of the data being stored in the cloud. Since that was a show-stopper for me, I never got around to setting up my systems to automatically sync with each other. Then a few weeks ago, I came across this great article on how to create A Simple, Delay-Tolerant, Offline-Capable Mesh Network with Syncthing (+ optional NNCP). In the article John talked about Syncthing, which allowed him to create a local serverless, peer-to-peer, open source alternative to Dropbox that allowed his machines sync directly with each other without a server. In other words a perfect fit for what I wanted and needed to do. So I spent a little bit of time researching syncthing and then decided to take the plunge and setup my laptop and desktop to sync with each other. Before starting the setup I backed up all my data so that in case something went wrong I still had a backup. Thankfully nothing did, but it is always good to have a backup.

Syncthing’s installation is pretty simple for all major operating systems, except for iPhones which are not supported. In Debian, installation just required the following steps

  • Run the following commands to add the “stable” channel to your APT sources:
  • echo "deb https://apt.syncthing.net/ syncthing stable" | sudo tee /etc/apt/sources.list.d/syncthing.list
    curl -s https://syncthing.net/release-key.txt | sudo apt-key add -
  • Once you have added it, run the following command to install syncthing
  • sudo apt-get update
    sudo apt-get install syncthing

    Once the software is installed execute the syncthing binary. On my computer it is installed in /usr/bin/syncthing. Once the software starts, it will start the web interface automatically. There is also a Desktop application, but I prefer the web-ui. Instructions on how to configure the folders and nodes are available at the Getting Started Guide over on the project website so I am not going to repeat them here. Basically, you need to define the nodes and connect them to each other, if the devices are not added on both sites then the folders will not sync.

    The software has a cool feature of discovery, which makes it easy to add devices on a given node. As soon as you connect to the same network they detect each other and give you the option of connecting both. After the devices are connected, you configure the folder you want to sync and select the devices you want it synced with. The best part is as soon as you configure one node, the other nodes will get a message stating that Node 1 is attempting to share a folder with them. Clicking on accept, allows you to configure the folder path etc on the node and that’s it. The system will detect the files which need to get synced over and will copy them quickly. You can configure the sync to be bi-directional or one way. Most of the folders in my setup are set as that, the only exception are Jani’s files which is a one-way sync because I know that I am not going to modify the files on the server.

    Below is what the setup looks on my desktop, as you can see I am syncing data from 3 different computers/phones to it and the sync’s are really fast. I have copied files over to the folder on one computer and within minutes (depending on the size) they were replicated on the other computers/phone.


    My Syncthing setup

    I have the android client running on my phone as well, and it instantly syncs any new photos etc from my phone to the desktop. All I need to do is connect to the same LAN network (can be over wired or wireless) and the devices connect and sync automagically. There is an option to do so even over the WAN using relay server but since I didn’t want that I disabled it in the setup.

    Now all my data is synced to the desktop machine without me having to worry about anything or manually copying files around. Check it out if you want to sync your devices without using an external server.

    – Suramya

February 20, 2021

Fixing boinc (code=exited, status=108) error

Filed under: Computer Tips,Knowledgebase,Linux/Unix Related,Tech Related — Suramya @ 2:01 AM

Earlier today I noticed that my CPU was not as active as usual and the boinc (World Community Grid) processes were no longer active on my computer. This has happened in the past when the client crashed so I restarted the client using the following command as usual:

/etc/init.d/boinc-client restart

Unfortunately, that didn’t resolve the problem and I thought that it could be because of the recent OS update that I did to my Debian system. In the past there have been rare cases when libraries were updated that some programs act strangely till the computer is rebooted, so I restarted the machine expecting to see the process start up without issues. Sadly, that didn’t happen so I had to debug the problem and I tried all sorts of things to resolve.

First, I tried starting the program manually as the root user and that worked. So I knew it was something to do with the startup script. Then I searched for and removed all the lock files in the boinc and the boinc-client directory. That should have resolved the problem but it didn’t and then I tried running the status command which gave the following output:

root@StarKnight:/var/lib/boinc-client# /etc/init.d/boinc-client status
boinc-client.service – Berkeley Open Infrastructure Network Computing Client
Loaded: loaded (/lib/systemd/system/boinc-client.service; enabled; vendor preset: enabled)
Active: failed (Result: exit-code) since Sat 2021-02-20 01:26:50 IST; 9s ago
Docs: man:boinc(1)
Process: 7420 ExecStart=/usr/bin/boinc (code=exited, status=108)
Process: 7455 ExecStopPost=/bin/rm -f lockfile (code=exited, status=0/SUCCESS)
Main PID: 7420 (code=exited, status=108)
CPU: 19ms

Feb 20 01:26:40 StarKnight systemd[1]: Started Berkeley Open Infrastructure Network Computing Client.
Feb 20 01:26:50 StarKnight boinc[7420]: 20-Feb-2021 01:26:50 Another instance of BOINC is running.
Feb 20 01:26:50 StarKnight systemd[1]: boinc-client.service: Main process exited, code=exited, status=108/n/a
Feb 20 01:26:50 StarKnight systemd[1]: boinc-client.service: Failed with result ‘exit-code’.

This meant that the system thought that another instance of the software was running but that wasn’t the case as I verified it using ps. A search for the status=108 code on the internet returned a few results but nothing that resolved my problem. One user who faced this issue resolved it by uninstalling everything and installing back but that wasn’t a step I wanted to take without trying everything else first so I kept researching. Then I saw a post where a user was facing the same issue after they had moved the data directory to another partition and symlinked it to the original location. I had done the same thing a few weeks ago so I moved the directory back to it’s original location but that didn’t resolve anything either.

Then I thought about checking the file ownerships of the directory and they were owned by my user (suramya) and a post on the internet said that they should be owned by root. I checked on my laptop as I have the same setup there and found that the directories were owned by the ‘boinc‘ on the laptop. Then I remembered changing the ownership of all files in one of my drive partitions last night to suramya. What I didn’t realize at that time was that the boinc-client directory was also located on that partition (after I had moved it there to recover space on my root partition).

I immediately changed the ownership of both directories back to boinc:boinc using the following command

chown boinc:boinc /var/lib/boinc* -R

Then I restarted the daemon and that fixed the problem. I then moved the directory back to it’s original location (on the other partition), symlinked it to the original location and the software still worked after I restarted the process.

I am documenting this in case others hit the same issue.

– Suramya

November 28, 2020

My Backup strategy and how it has evolved over the years

I am a firm believer in backing up my data, some people say that I am paranoid about backing up data and I do not dispute it. All my data is backed up on multiple drives and locations and still I feel that I need additional backup. This is because I read the news and there have been multiple cases where people lost their data because they hadn’t backed it up. Initially I wasn’t that serious about it but when I was in college and working at the helpdesk, a phd student came in crying because her entire PHD thesis was on a Zip Drive and it wasn’t working anymore. She didn’t have a backup and was basically screwed. We tried a bunch of stuff to recover the data but didn’t manage to recover anything. That made me realize that I needed a better backup procedure so started my journey in creating recoverable backups.

My first backup system was a partition on my drive called backup where I created a copy of all my important data (This is back in 2000/2001). Then I realized that if the drive died then I would loose access to the backup partition as well, and I started looking for alternatives. This is around the time when I had bought a CD Writer so all my important data was backed up to CD’s and I was confident that I could recover any lost data. Shortly afterwards I moved to DVD’s for easier storage. However, I didn’t realize till a lot later that CD’s & DVD’s start becoming unreadable quite easily. Thankfully I didn’t loose any data but it was a rude awakening to find that the disks I had expected to keep my data safe were starting to become unreadable within a few years.

I then did a bunch of research online and found that the best medium for storing data long term is still Hard Drives. I didn’t want to store anything online because I want my data to be in my control so any online backup system was out of the question. I added multiple drives to my desktop and started syncing the data from the desktop & laptop to the backup drive using rync. This ensured that the important data was in three locations at any given time: My Desktop, My Laptop and the Backup drive. (Plus a DVD copy that I made of all my data every year)

I continued with this backup strategy for a few years but then realized that I had no way to go back to a previous version of any given document, if I deleted a file or wanted to go back to an older version of a file I only had 24 hours before the changes were synced to the backup drive before it was unrecoverable. There was a case where I ended up having to dig through my DVD backups to find the original version of a file that I had changed. So I did a bit of research and found rdiff-backup. It allows a user to back up one directory to another and generates an incremental backup. So we can recover/restore files based on date range. The best part is that the software is highly efficient, once the initial backup is done it only transmits the changes to the files in subsequent runs. Now that I have been using it I can restore a snapshot of my data going back to 2012 quite easily.

I was quite happy with this setup for a while, but while reading an article on best backup practices I realized that I was still depending only on 1 location for the backup data (the rdiff-data snapshots) and the best practices stated that you should also store it in an external drive or offsite location to prevent viruses/ransomware from deleting backups. So I bought a 5TB external drive and created an encrypted partition on the same to store all my important data. But I was still unhappy because all of this was still stored at my home so if I had a fire or something I would still end up loosing the data even though my external drive was kept in a safe. I still didn’t want to store data online but that was still the best way to ensure I had offsite backup. I initially thought about setting a server at my parents place in Delhi and backup there but that didn’t work out for various reasons. Plus I didn’t want to have to call them and troubleshoot backup issues over the phone.

Around this time I was reading about encrypted partitions and came up with the idea of creating an encrypted container file to store my data and then backup the container file online. I followed the steps I outlined in my post How to encrypt your Hard-drive in Linux and created the encrypted container. Once I finished that I had to upload the container to my webhost since I had unlimited storage space as per my contract. Initially I wasn’t able to because they had restricted my account’s quota but a call to their customer support sorted it out after a bit of argument and explaining what I was doing. The next hurdle I faced was uploading the file to the server because of the ridiculously low upload speed I was getting from Airtel. I had a 40 mbps connection at the time but the upload speed was restricted to 1 mbps because of ‘reasons’. After arguing with their support for a while, I was complaining about it at work and one of the folks suggest I check out ACT Internet. I checked out their plans and was quite impressed with the offerings so I switched over to ACT and was able to upload the container file quickly and painlessly.

Once the container was uploaded, I had to tackle the next problem in the process which was on how to update the files in the container without having to upload the entire container to the host. I experimented with a few solutions and then came up with the following solution:

1. Mount the remote partition as a local mount using sshfs. I mounted the partition locally using the following command: (please replace with the correct hostname and username before using)

/usr/sbin/runuser -l suramya -c "sshfs -o allow_other @hostname.com:. /mnt/offsite/"

2. Once the remote partition was mounted locally, I was able to use the usual commands to mount the encrypted partition to another location using the following command:

/usr/sbin/cryptsetup luksOpen /mnt/offsite/container/Enc_vol1.img enc --key-file /root/UserKey.dat
mount /dev/mapper/enc /mnt/stash/

In an earlier iteration of the code I wasn’t using the keyfile so had to manually enter the password everytime I wanted to backup to the offsite location. This meant that the backup was done randomly as and when I remembered to run the command manually. A few days ago I finally configured it to run automatically after adding the keyfile as a decryption key. (Obviously the keyfile should be protected and not be accessible to others because it allows users to decrypt the data without entering a password.) Now the offsite backup runs once a week while the local backup runs daily and I still backup the Backup partition to the external drive as well manually as and when I remember to do so.

In all I was quite happy with my setup but then I was updating the encrypted container and a network issue made be believe that my remote container had become corrupted (it wasn’t but I thought it was). At the same time I was fooling around with Microsoft One Drive and saw that I had 1TB of storage available over there since I was a Office 365 subscriber. This gave me the idea of backing up the Container to OneDrive as well as my site hosting.

I first tried copying the entire container to the drive and hit a limit because the file was too large. So I thought I would split the file into 5GB parts and then sync them to OneDrive using rclone. After installing rclone. I configured it to connect to OneDrive by issuing the following command and following the onscreen prompts:

rclone config

I then created a folder on OnDrive called container to store the split files and then tried uploading a test file using the command:

rclone copy $file OneDrive:container

Where OneDrive is the name of my provider that I configured in the previous step. This was successful so I just needed to create a script that did the following:

1. Update the Container file with the latest backup
2. Split the Container file into 5GB pieces using the following command:

split --verbose -d -b5GB /mnt/repository/Container/Enc_vol1.img /mnt/repository/Container/Enc_vol_

3. Upload the pieces to Ondrive.

for file in `ls /mnt/repository/Container/Enc_vol_* |sort`; do  echo "$file";  /usr/bin/rclone copy $file OneDrive:container -v &> /tmp/oneDriveSync.log; done

This command uploads the pieces to the drive one at a time and is a bit slow because it maxes out the upload speed to ~2mbps. If you split the uploads and run the command in parallel then you get a lot faster speed. Keep in mind that if you are uploading more than 10 files at a time you will start getting errors about too many open connections and then you have to wait for a few hours before you can upload again. It took a while to upload the chunks but now my files are stored in yet another location and the system is configured to sync to Onedrive once a month.

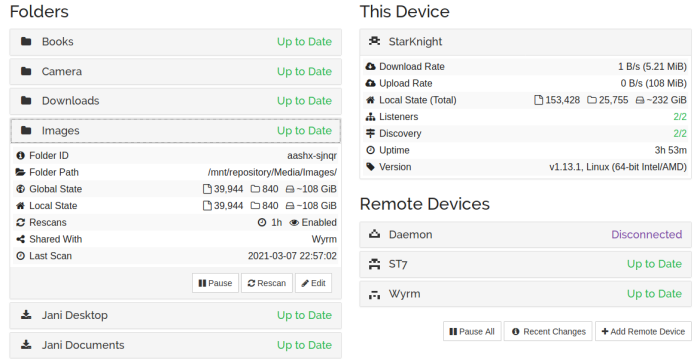
So, as of now my files are backed up as following:

  • /mnt/Backup: Local Drive. All changes are backed up daily using rdiff-backup
  • /mnt/offsite: Encrypted Container stored online. All changes are backed up weekly using rsync
  • OneDrive: Encrypted Container stored at Microsoft OneDrive. All changes are backed up monthly using rsync
  • External Drive: Encrypted backup stored in an External Hard-drive using rsync. Changes are backed up infrequently manually.
  • Laptop: All Important files are copied over to the laptop using Unison/rsync manually so that I can access my data while traveling

Finally, I am also considering backing up the snapshot data to BlueRay disks but it will take time so haven’t gotten around to it yet.

Since I have this elaborate backup procedure I wasn’t worried much when one of my disks died last week and was able to continue work without issues or worries about loosing data. I still think I can enhance the backups I take but for now I am good. If you are interested in my backup script an extract of the code is listed below:

function check_failure ()
{
	if [ $? == 0 ]; then
		logger "INFO: $1 Succeeded"
	else
		logger "FATAL: Execution of $1 failed"
		wall "FATAL: Execution of $1 failed"
		exit 1
	fi
}

###
# Syncing to internal Backup Drive
###

function local_backup ()
{
	export BACKUP_ROOT=/mnt/Backup/Snapshots
	export PARENT_ROOT=/mnt/repository

	logger "INFO: Starting System Backup"

	rdiff-backup -v 5 /mnt/data/Documents/ $BACKUP_ROOT/Documents/
	check_failure "Backing up Documents"

	rdiff-backup -v 5 /mnt/repository/Documents/Jani/ $BACKUP_ROOT/Jani_Documents/
	check_failure "Backing up Jani Documents"

	rdiff-backup -v 5 $PARENT_ROOT/Programs/ $BACKUP_ROOT/Programs/
	check_failure "Backing up Programs"

	..
	..

	logger "INFO: All Backups Completed Successfully."
}

### 
# Syncing to Off-Site Backup location
###

function offsite_backup
{
	export PARENT_ROOT=/mnt/repository

	# First we mount the remote directory to local
	logger "INFO: Mounting External Drive"
	/usr/sbin/runuser -l suramya -c "sshfs -o allow_other username@remotehost:. /mnt/offsite/"
	check_failure "Mounting External Drive"

	# Open the Encrypted Partition
	logger "INFO: Opening Encrypted Partition. Please provide password."
	/usr/sbin/cryptsetup luksOpen /mnt/offsite/container/Enc_vol1.img enc --key-file /root/keyfile1
	check_failure "Mounting Encrypted Partition Part 1"

	# Mount the device
	logger "INFO: Mounting the drive"
	mount /dev/mapper/enc /mnt/stash/
	check_failure "Mounting Encrypted Partition Part 2"

	logger "INFO: Starting System Backup"
	rsync -avz --delete  /mnt/data/Documents /mnt/stash/
	check_failure "Backing up Documents offsite"
	rsync -avz --delete /mnt/repository/Documents/Jani/ /mnt/stash/Jani_Documents/
	check_failure "Backing up Jani Documents offsite"
	..
	..
	..

	umount /mnt/stash/
	/usr/sbin/cryptsetup luksClose enc
	umount /mnt/offsite/

	logger "INFO: Offsite Backup Completed"
}

This is how I make sure my data is backed up. All of Jani’s data is also backed up to my system using robocopy as she is running Windows and then the data gets backed up by the scripts I explained above as usual. I also have scripts to backup my website/blog/databases but that’s done using a simple script. Let me know if you are interested and I will share them as well.

This is all for now. Let me know if you have any questions about the backup strategy or if you want to make fun of me. 🙂 This is all for now. Will write more later.

– Suramya

September 30, 2020

How to fix vlc’s Core dumping issue while playing some videos

Over the past 2 days I found that the VLC install on my computer was suddenly having issues playing some of the video files on my computer. Initially I thought that it was a problem with the video file, then I realized that this was also happening with videos that had be playing fine earlier. When I ran vlc from the command line to play the problem video it gave the following output on screen when it crashed:

[00005587b42751b0] dummy interface: using the dummy interface module…
[00007f00c4004980] egl_x11 gl error: cannot select OpenGL API
[00007f00c4004980] gl gl: Initialized libplacebo v2.72.0 (API v72)
[00007f00c402a310] postproc filter error: Unsupported input chroma (VAOP)
[00007f00bd986e50] chain filter error: Too high level of recursion (3)
[00007f00c4028d40] main filter error: Failed to create video converter
[00007f00bd986e50] chain filter error: Too high level of recursion (3)
[00007f00c4028d40] main filter error: Failed to create video converter
[00007f00bd986e50] chain filter error: Too high level of recursion (3)
[00007f00c4028d40] main filter error: Failed to create video converter
[00007f00bd986e50] chain filter error: Too high level of recursion (3)


[00007f00c44265c0] chain filter error: Too high level of recursion (3)
[00007f00c4414240] main filter error: Failed to create video converter
[00007f00bd9020d0] main filter error: Failed to create video converter
[00007f00cc047d70] main video output error: Failed to create video converter
[00007f00cc047d70] main video output error: Failed to compensate for the format changes, removing all filters
[00007f00c4004980] gl gl: Initialized libplacebo v2.72.0 (API v72)

A google search told me that a possible solution was to disable hardware acceleration in the Video settings but that didn’t fix my problem. So I took a look at the kernel.log file in /var/log and I got the following error when the program crashed:

Sep 30 21:11:44 StarKnight kernel: [173399.132554] vlc[91472]: segfault at 28000000204 ip 00007f2d8916c1d8 sp 00007f2d8aa69db0 error 4 in libpostproc.so.55.7.100[7f2d8915c000+1d000]
Sep 30 21:11:44 StarKnight kernel: [173399.132568] Code: 98 48 8d 44 07 20 0f 18 08 8b 44 24 08 4d 8d 0c 1a 4d 8d 04 2b 85 c0 0f 85 cb fd ff ff 4c 8b 6c 24 28 4b 8d 04 29 4b 8d 14 20 <41> 0f 6f 01 43 0f 6f 0c 29 41 0f 7f 00 43 0f 7f 0c 20 43 0f 6f 04

Spent about an hour searching for the solution using the details from the kernel.log but got nowhere. Finally I found a forum post where one of the solutions offered was to remove the vlc configuration files, since I didn’t have any other bright idea’s I renamed the vlc config folder by issuing the following command:

mv ~/.config/vlc ~/.config/vlc_09302020

Then I started vlc and just like that everything started working again. 🙂 Not sure what caused the settings to get borked in the first place but the issue is fixed now so all is well.

– Suramya

September 29, 2020

Mounting a Network drive over ssh in Windows using WinFsp & SSHFS-Win

I have computers running both Windows & Linux and at times I need to share files between them and I have been looking for a convenient way to access the files from my Linux machine from my Windows machine without having to run SAMBA on the Linux. This is because historically SAMBA has been a security nightmare and I don’t want to run extra services on the computer if I can avoid it. Earlier this week I finally found a way to mount my Linux directories on Windows as a network mount over SSH using WinFsp & SSHFS-Win and I have been running it for a couple of days so far without any issues. (So far)

Follow these steps to enable SSHFS-Win on your windows machine:

Install WinFsp (Windows File System Proxy)

WinFsp is a set of software components for Windows computers that allows the creation of user mode file systems similar to FUSE (Filesystem in Userspace) in the Unix/Linux world. You can download it from the project’s GIT repository. The Installation file is available by clicking on the download link under ‘Releases’ near the top right corner of the page. The latest version is WinFsp 2020.1 at the time of this writing.

You install the software by running the MSI file you downloaded and the default options worked for me without modification.

Install SSHFS For Windows

SSHFS-Win is a minimal port of SSHFS to Windows. It is available for download from the project’s Git repository. You can compile from source or download the installation file by clicking on the download link under ‘Releases’ near the top right corner of the page. The latest version is SSHFS-Win 2020 at the time of this writing.

Please note that you will need to have WinFsp installed already before you can install SSHFS-Win successfully.

Usage:

Once you have installed both the software you can start using them and map a network drive to a directory using Windows Explorer or the net use command. Instructions for use are as below (Taken from the project Documentation):

In Windows Explorer select This PC > Map Network Drive and enter the desired drive letter and SSHFS path using the following UNC syntax:

\\sshfs\REMUSER@HOST[\PATH]

The first time you map a particular SSHFS path you will be prompted for the SSH username and password which can be saved using the Windows Credential Manager so that you don’t get prompted for it again. In order to unmap the drive, right-click on the drive icon in Windows Explorer and select Disconnect.


Visual demo of how to Map a Network drive using SSHFS-Win

You can map a network drive from the command line as well using the net use command:

net use X: \\sshfs\suramya@StarKnight

You will then be prompted for the password and once you authenticate you can use the new drive as usual. You can unmap the drive as follows:

net use X: /delete

I find this quite useful and hope you do as well.

Thanks to MakerLab, Department of Computer Science, HKU for pointing me in the correct direction

– Suramya

September 27, 2020

Using ncdu to Check Disk Space Usage In Linux

One of the common tasks I face on my Linux system is to identify what files/directories are using the most space. The traditional way to find out is to go to the top level directory and run a ‘du -hs *’ (without the quotes) on the directory and then cd into each directory, rinse and repeat. The other option available is to right click on the folder in Dolphin or any other file manager and select Properties. With the same process as before when you go into each directory individually, right click and get the properties. This is very tedious and time consuming.

Instead you can use ncdu (NCurses Disk Usage) for looking at the storage space utilization on your computer as it has a lot of advantages. It is designed to find space hogs on a remote server where you don’t have an entire graphical setup available. It is fast, simple and very easy to use. I have been using it for a while now and absolutely love it.

To Install ncdu on a Debian system, you can issue the following command:

apt-get install ncdu

Once you have it installed, the usage it very simple. Simply open a command prompt and issue the following command:

ncdu

It will start in the current directory and index all the sub-directories under it. The initial scan can take a while depending on the size of the directories under the current directory. But its comparable to the time taken when running du -hs on the directory. Once the program completes its scan, you get a simple ncurses based interface that you can navigate using the keyboard.


ncdu display for my home directory

All directories & are listed with their sizes in human readable format sorted by size with the largest files & directories at the top (in the default view). You can go into a directory by selecting it and hitting enter. The sizes for the subdirectory are immediately shown without having to run additional commands. You can also delete directories & files from within ncdu by hitting the delete key which is a huge timesaver.

If you haven’t tried it out do check it out. You will love it.

– Suramya

September 3, 2018

Software hack to keep my speaker powered on

Filed under: Computer Hardware,Linux/Unix Related,Tech Related,Tutorials — Suramya @ 6:37 PM

A little while ago I bought a new klipsch speaker as my previous one was starting to die and I love it except for a minor irritation. The speaker has builtin power saving tech that powers it off if its not used for a certain period of time and that means that I have to physically power it on every time I wanted to listen to music which was annoying. As I would invariably be comfortably seated and start the music before remembering that I needed to power it on. Also, I could not start the music from my phone whenever I felt like as the speaker was powered off and I would have to walk to the room to power it on.

After living with the irritation for a while I finally decided to do something about it and whipped up a small script that checks if any music/audio is already playing on the system and if not it plays a 1 second mp3 of an ultrasonic beep. This forces the system to keep the speaker on and I love it as now I can start the music first thing in the morning while lazing in bed. 🙂

The script requires the mpg123 to be installed and you can install it on a Debian system by issuing the following command:

apt-get install mpg123

The Script itself is only 4 lines long:

#!/bin/bash

if ! grep RUNNING /proc/asound/card*/pcm*/sub*/status &> /dev/null ; then
    /usr/bin/mpg123 -q /home/suramya/bin/KeepSpeakerOn.mp3 &> /dev/null
fi

What it does is to check if any of the PCM soundcards have a status of RUNNING and if not it plays the mp3. I have a cron job scheduled to run the script every one min:

XDG_RUNTIME_DIR=/run/user/1000

* * * * * /home/suramya/bin/KeepSpeakerOn.sh 

One interesting issue I hit during the initial testing was that the mpg123 application kept segfaulting whenever I initiated it from the Cron but it would work fine if I ran the same command from the command prompt. The error I got in the logs was:

High Performance MPEG 1.0/2.0/2.5 Audio Player for Layers 1, 2 and 3
        version 1.25.10; written and copyright by Michael Hipp and others
        free software (LGPL) without any warranty but with best wishes
Cannot connect to server socket err = No such file or directory
Cannot connect to server request channel
jack server is not running or cannot be started
JackShmReadWritePtr::~JackShmReadWritePtr - Init not done for -1, skipping unlock
/home/suramya/bin/KeepSpeakerOn.sh: line 5: 10993 Segmentation fault      /usr/bin/mpg123 /home/suramya/bin/KeepSpeakerOn.mp3 -v

Spent a while trying to debug and finally figured out that the fix for this issue was to add XDG_RUNTIME_DIR=/run/user/<userid> to the cron where you can get the value of <userid> by running the following command and taking the value of uid:

id <username_the_cronjob_is_running_under> 

e.g.

suramya@StarKnight:~/bin$ id suramya
uid=1000(suramya) gid=1000(suramya) groups=1000(suramya),24(cdrom)....

Putting that line in the cron entry resolved the issue. Not sure why but it works so…

Well this is all for now. Will write more later.

– Suramya

August 24, 2018

Fixing the appstreamcli error when running apt-get update

Filed under: Computer Software,Knowledgebase,Linux/Unix Related,Tech Related — Suramya @ 12:05 AM

Over the past few days everytime I tried to update my Debian system using apt-get it would fail with the following error message:

(appstreamcli:5574): GLib-CRITICAL **: 20:49:46.436: g_variant_builder_end: assertion '!GVSB(builder)->uniform_item_types || 
GVSB(builder)->prev_item_type != NULL || g_variant_type_is_definite (GVSB(builder)->type)' failed

(appstreamcli:5574): GLib-CRITICAL **: 20:49:46.436: g_variant_new_variant: assertion 'value != NULL' failed

(appstreamcli:5574): GLib-ERROR **: 20:49:46.436: g_variant_new_parsed: 11-13:invalid GVariant format string
Trace/breakpoint trap
Reading package lists... Done
E: Problem executing scripts APT::Update::Post-Invoke-Success 'if /usr/bin/test -w /var/cache/app-info -a -e /usr/bin/appstreamcli; then appstreamcli refresh-cache > 
/dev/null; fi'
E: Sub-process returned an error code

Spent a couple of hours trying to figure out what was causing it and was able to identify that it was caused because of a bug in appstream as tunning the command manually also failed with the same error. When I tried to remove the package as recommended by a few sites it would have removed the entire KDE desktop from my machine which I didn’t want so I was at a loss as to how to fix the problem. So I put the update on hold till I had a bit more time to research the issue and identify the solution.

Today I got some free time and decided to try again and after a little bit of searching stumbled upon the following Bug Report (#906544) where David explained that the error was caused due to a bug in the upstream version of appstream and a little while later Matthias commented that the issue is fixed in the latest version of the software and it would flow down to the Debian repositories in a little bit. Normally I would have just done an apt-get update and then install to get the latest package but since the whole issue was that I couldn’t get the system to finish the update command I had to manually install the package.

To do that I went to the Debian site and opened the software package list for Debian Unstable (as that is what I am using) and searched for appstream. This gave me a link to the updated package (0.12.2-2) that fixed the bug (I had 0.12.2-1 installed). Once I downloaded the package (Make sure you download the correct package based on your system architecture) I manually installed it using the following command as root:

dpkg -i appstream_0.12.2-2_amd64.deb

This installed the package and I was then able to do an apt-get update successfully. I still get the GLib-CRITICAL warnings but that apparently can be ignored without issues.

Hope this helps people who hit the same issue (or reminds me of the solution if/when I hit the issue again).

– Suramya

February 7, 2018

Hacking the Brainwaves Cyber Security CTF Hackathon 2018

Earlier this year I took part in the Brainwaves Cyber Security Hackathon 2018 with Disha Agarwala and it was a great experience. We both learnt a lot from the hackathon and in this post I will talk about how we approached the problems and some of our learning’s from the session.

Questions we had to answer/solve in the Hackathon:

  • Find the Webserver’s version and the Operating system on the box
  • Find what processes are running on the server?
  • What fuzzy port is the SSH server running on?
  • Discover the site architecture and layout.
  • Describe the major vulnerability in the home page of the given website based on OWASP TOP 1. Portal Url: https://socgen-ctf.0x10.info
  • Gain access to member area and admin area through blind sql, or session management.
  • Dump all user account from member area. [SQLi]
  • [Broken Validation] Demonstrate how you can modify the limit in order management.
  • [Open Redirect] Redirect site/page to hackerearth.com
  • List any other common bug came across while on the site
    • After logging into the member area, perform the following functions:
    • Find the master hash & crack it
    • Dump all user’s
    • Find the email ID and password of saved users

Information Gathering:

In order to find the services running on the server, the first thing we had to do was find the IP/hostname of the actual server hosting the site which was a bit tricky because the URL provided is protected by CloudFlare. So, any scans of socgen-ctf.0x10.info took us to the CloudFlare proxy server instead of the actual server which was a problem.

We figured this out by trying to access the IP address that socgen-ctf.0x10.info translated to in the browser.

suramya@gallifrey:~$ host socgen-ctf.0x10.info 
socgen-ctf.0x10.info has address 104.28.15.64 

Since the site homepage didn’t do anything except display text that refreshed every 15 seconds we needed to find other pages in the site to give us an a attack surface. We checked to see if the site had a robots.txt (It tells web crawlers not to index certain directories). These directories are usually ones that have sensitive data and in this case the file existed with the following contents:

# robots.txt
Sitemap: http://socgen-ctf.0x10.info/sitemap.xml
User-agent: *
Disallow: images
Disallow: /common/
Disallow: /cgi-bin/

The images directory didn’t have any interesting files in it but the /common/ directory on the other hand had a file named embed.php in it which basically ran a PHP Info dump. This dump has a lot of information that can be used to attack the site but the main item we found here was the IP address of the actual server where the services were running (38.109.218.93).

Using this information we were able to initiate a nmap scan to get the services running on the site. The nmap command that gave us all the information we needed was:

nmap -sV -O -sS -T4 -p 1-65535 -v 38.109.218.93

This gave us the following result set after a really really long run time:

PORT     STATE    SERVICE       VERSION
23/tcp   filtered telnet
25/tcp   open     smtp?
80/tcp   open     http          This is not* a web server, look for ssh banner
81/tcp   open     http          nginx 1.4.6 (Ubuntu)
82/tcp   open     http          nginx 1.4.6 (Ubuntu)
137/tcp  filtered netbios-ns
138/tcp  filtered netbios-dgm
139/tcp  filtered netbios-ssn
445/tcp  filtered microsoft-ds
497/tcp  filtered retrospect
1024/tcp open     kdm?
1720/tcp open     h323q931?
2220/tcp open     ssh           OpenSSH 6.6.1p1 Ubuntu 2ubuntu2.8 (Ubuntu Linux; protocol 2.0)
2376/tcp open     ssl/docker?
3380/tcp open     sns-channels?
3389/tcp open     ms-wbt-server xrdp
5060/tcp filtered sip
5554/tcp filtered sgi-esphttp
8000/tcp open     http          nginx 1.4.6 (Ubuntu)
8080/tcp open     http          Jetty 9.4.z-SNAPSHOT
8086/tcp open     http          nginx 1.10.3 (Ubuntu)
9090/tcp open     http          Transmission BitTorrent management httpd (unauthorized)
9996/tcp filtered palace-5
19733/tcp filtered unknown
25222/tcp filtered unknown
30316/tcp filtered unknown
33389/tcp open     ms-wbt-server xrdp
33465/tcp filtered unknown
34532/tcp filtered unknown
35761/tcp filtered unknown
35812/tcp filtered unknown
35951/tcp filtered unknown
37679/tcp filtered unknown
38289/tcp filtered unknown
38405/tcp filtered unknown
38995/tcp filtered unknown
40314/tcp filtered unknown
44194/tcp filtered unknown
47808/tcp filtered bacnet

For some reason the results from the nmap scan varied so we had to run the scan multiple times to get all the services on the host. This was possibility because the server was setup to make automated scanning more difficult.

Once we identified the port where the SSH server was running on (2220) we were able to connect to the port and that gave us the exact OS Details of the server. We did already know that the server was running Ubuntu along with the kernel version from the PHP Info dump but this gave us the exact version.

Discovering Site architecture:

Since we had to discover the URL to the members & admin area before we could attack it, we used dirb which is a Web Content Scanner to get the list ofall the public directories/files on the site. This gave us the URL’s to several interesting files and directories. One of the files identified by dirb was https://socgen-ctf.0x10.info/sitemap.xml. When we visited the link it gave us a list of other URL’s on the site of interest (we had to replace the hostname to socgen-ctf.0x10.info) including the members area (http://socgen-ctf.0x10.info/members.php?p=login) and siteadmin (http://socgen-ctf.0x10.info/siteadmin).

After a long and fruitless effort to use SQL Injection on the siteadmin area we started to explore the other files/URL’s identified by dirb. This gave us a whole bunch of files/data that seem to be left over from other hackathons so we ignored them.

SQL Injection

The main site https://socgen-ctf.0x10.info/index.php?p=. appeared to be vulnerable to SQL at the first glance because when we visit https://socgen-ctf.0x10.info/index.php?p=.’ (note the trailing single quote) it reloads the page. This meant that we could write queries to it however since it didn’t display a true or false on the page a SQL injection wasn’t easily possible. (We could have tried a blind injection but that would require a lot of effort for a non-guaranteed result.

As we explored the remaining URL’s in sitemap.xml one of the links (https://socgen-ctf.0x10.info/embedframe.php) was interesting as it appeared to give a dump of data being read from the site DB. Opening the site while watching the Developer Toolbar for network traffic identified a URL that appeared to be vulnerable to SQL injection (https://socgen-ctf.0x10.info/ajax.php?cid=&p=view_channel&id=28) and once we tested the url we found that the variable id was indeed vulnerable to injection.

We used blind sql to gain access by executing true and false statements and see that it returns different results for true(displays ‘1’ on the webpage) and false (displays 0) . We checked whether a UNION query runs on the site which it did and using other queries we identified the DB backend to be a mysql database (5.xx.xxx version). Then we found out the table name (members) which was an easy guess since the website had an add customer field. After identifying the number of columns in the table we got stuck because any statements to list the available tables or extract data were failing with an error about inconsistent column numbers.

Finally, we ran sqlmap which is an open source tool for automating SQL injection. It took us a few tries to get the software running because initially any attempt to scan the site was rejected with a 403 error message. Turns out that the connections were being rejected because the site didn’t like the useragent the software was sending by default and adding a flag to randomize the useragent resolved the permission denied issue.

Once the scan ran successfully we tried to get access to the MySQL usertable but that failed because the user we were authenticating as to the MySQL server didn’t have access to the table required.

sqlmap -u 'https://socgen-ctf.0x10.info/ajax.php?cid=&p=view_channel&id=28' --random-agent -p id --passwords

So, then we tried getting an interactive shell and an OOB shell both of which failed. We finally ran the command to do a full dump of everything that the system allowed us to export using SQL injection via SQLMap. This included the DB schema, table schema’s and a dump of every table on the database server which the mysql user had access to. The command we used is the following:

sqlmap -u 'https://socgen-ctf.0x10.info/ajax.php?cid=&p=view_channel&id=28' --random-agent -p id  --all --threads 3

This gave us a full dump of all the tables and the software was helpful enough to identify password hashes when they existed in the table and offered to attempt decryption as well. In this case the password was encrypted with a basic unsalted MD5 hash which was cracked quite easily. Giving us the password for the first two accounts in the database (admin & demo).

Looking at the rest of the entries in the users table we noticed that they all had funny values in the email address field, instead of a regular email address we had entries that looked like the following:

,,,"0000-00-00 00:00:[email protected]509a6f75849b",1
,1,RU,

As we had no clue what this was about the first thing we attempted was to access the
https://socgen-ctf.0x10.info/cdn-cgi/l/email-protection URL. This URL gave us a message that told us that the email addresses in the DB were obfuscated by CloudFlare to protect them from Bots. A quick Google search gave us a 21 line python script which we tweaked to convert all the hash to email address and passwords. (The code is listed below for reference)

#! /usr/bin/env python 
# -*- coding: utf-8 -*- 
# vim:fenc=utf-8 
# 
# Copyright © 2016 xl7dev  
# Distributed under terms of the MIT license. 

""" 

""" 
import sys 
import re 
fp = sys.argv[1] 
def deCFEmail(): 
   r = int(fp[:2],16) 
   email = ''.join([chr(int(fp[i:i+2], 16) ^ r) for i in range(2, len(fp), 2)]) 
   print email 
if __name__ == "__main__":                                                                                                                                                                       
   deCFEmail() 

This gave us the email addresses and passwords for all the users on the site. Since the accounts appeared to be created by SQL injection a bunch of them didn’t have any passwords but the remaining were valid accounts for the most part and we verified a couple by logging in manually with the credentials.

OWASP TOP 10 Vulnerability

To find the vulnerabilities in the home page we tried various manual techniques at first but drew a blank so we decided to use the owasp-zap. This tool allows you to automatically scan for vulnerabilities in a given URL along with a whole other stuff.

At first the scan failed because of the same issue as earlier with the user-agent. This time we took a different approach to resolve the issue by configuring owasp-zap as a proxy server and configuring Firefox traffic to use this proxy server for all traffic. This gave us the site in the software and we were then able to trigger both an active scan and spider scan of the site.

This gave us detailed reports that highlighted various issues in the site which we submitted.

Redirecting HomePage

The redirection of the home page was quite simple. We tried inserting a customer name with javascript tags in it and were able to do so successfully. So we inserted the following into the DB and the system automatically redirected the page when the Customer list section was accessed.

Other Interesting Finds

The nmap scan told us that in addition to port 80 a web server was listening on ports 81, 82, 8000, 8080 and 8086.

Ports 82, 8000 and 8086 were running standard installs of nginx and we didn’t find much of interest at these ports even after we ran dirb on all of them. Port 8080 appeared to be running a proxy or a Jenkins instance.

Port 81 was the most interesting because it was running a nginx server that responded to any queries with a 403 error. When we tried accessing the site via the browser we got an error about corrupted content.

We were unable to identify what the purpose of this site was but it was interesting.

SSH Banner / PHP Shell

The webserver instance running on port 80 had the version set to the following text “This is not* a web server, look for ssh banner Server at private-tunel.wehostservers.ru Port 80” so we went back and investigated the SSH Banner from the ssh server on port 2220. The banner was encrypted and to decrypt the SSH banner, we continuously converted the cipherText from its hex value to ASCII value . It gave us the following results on each conversion

3333333733333333333333373333333333333336333333383333333233333330333333363333333233333336333333313333333633363335333333363336333533333336333333353
3333337333333323333333233333330333333363333333633333336333633363333333733333332333333373333333733333336333333313333333733333332333333363333333433333332333333303333
3337333333333333333633363333333333363333333133333337333333333333333633333338333333323333333033333336333333333333333633363336333333373333333533333336333633333333333
63333333433333332333333303333333633363333333333363333333533333336333333313333333633333334333733393336363633373335373436663230363132307368336c6c2e706870

3337333333373333333633383332333033363332333633313336363533363635333633353337333233323330333633363336363633373332333733373336333133373332333633343332333033373333333
636333336333133373333333633383332333033363333333636363337333533363633333633343332333033363633333633353336333133363334373936663735746f206120sh3ll.php
 37333733363832303632363136653665363537323230363636663732373736313732363432303733366336313733363832303633366637353663363432303663363536313634796f75to a #

ssh banner forward slash could lead you to a #sh3ll.php

Once we got the full decrypted text we knew that there was a potential webshell on the server but it wasn’t apparent where the shell was located. After hit and try failed we turned back to our old faithful dirb to see if it could find the shell.

dirb allows us to specify a custom word list which is used to iterate through the paths and we can also append an extension to each of the words to search for, so we created a file called test with the following content:

suramya@gallifrey:~$ cat test 
shell
sh3ll
sh311

and then ran the following command:

suramya@gallifrey:~$ dirb https://socgen-ctf.0x10.info/ test  -X '.php'

This gave us the location of the shell.


Accessing the link gave us a page with a message “you found a shell, try pinging google via sh3ll.php?exec=ping 8.8.8.8”

Accessing the URL with the additional parameter gave us a page with the following output:

« Newer PostsOlder Posts »

Powered by WordPress