Suramya's Blog : Welcome to my crazy life…

October 14, 2020

Walking around in a Cell using Virtual Reality

Filed under: Computer Hardware,Emerging Tech,Tech Related — Suramya @ 11:59 PM

It’s hard to view 3D data on a 2D screen efficiently which is why Virtual Reality (VR) & Augmented Reality (AR) have so many fans as they allow us to interact with data in 3D, making it more intuitive and easier to process (for some use cases). Now there is another application for VR that actually makes sense and is not just hype. Researchers at University of Cambridge & Lume VR Ltd have managed to convert super-high resolution microscopy data into a format that can be visualized in VR.

Till 2014 it was assumed that we could never obtain a better resolution than half the wavelength of light. The Nobel Laureates in Chemistry 2014 managed to work around this limitation creating a new field called Super-resolution microscopy that allows us to obtain images at nanoscale. This enables us to see the individual molecules inside cells to track proteins involved in various diseases or watch fertilized eggs as they divide into embryos. Combining this with the technology from Lume VR allows us to visualize and interact with the biological data in real time.

Walking through the cells gives you a different perspective and since the data is near real time it allows us to literally watch the cell’s reaction to a particular stimuli. This will have massive implications for the Biomed/BioTech fields. Maybe we can use it to figure out why organ rejections happen or what causes Alzheimer’s.

“Data generated from super-resolution microscopy is extremely complex,” said Kitching. “For scientists, running analysis on this data can be very time-consuming. With vLUME, we have managed to vastly reduce that wait time allowing for more rapid testing and analysis.”

The team is mostly using vLUME with biological datasets, such as neurons, immune cells or cancer cells. For example, Lee’s group has been studying how antigen cells trigger an immune response in the body. “Through segmenting and viewing the data in vLUME, we’ve quickly been able to rule out certain hypotheses and propose new ones,” said Lee. This software allows researchers to explore, analyse, segment and share their data in new ways. All you need is a VR headset.”

Interestingly vLUME is available for download as an Open Source program from their Git repository. The program is free free-for-academic-use. Check it out if you are interested in how it works.

Source: New virtual reality software allows scientists to ‘walk’ inside cells

– Suramya

September 3, 2018

Software hack to keep my speaker powered on

Filed under: Computer Hardware,Linux/Unix Related,Tech Related,Tutorials — Suramya @ 6:37 PM

A little while ago I bought a new klipsch speaker as my previous one was starting to die and I love it except for a minor irritation. The speaker has builtin power saving tech that powers it off if its not used for a certain period of time and that means that I have to physically power it on every time I wanted to listen to music which was annoying. As I would invariably be comfortably seated and start the music before remembering that I needed to power it on. Also, I could not start the music from my phone whenever I felt like as the speaker was powered off and I would have to walk to the room to power it on.

After living with the irritation for a while I finally decided to do something about it and whipped up a small script that checks if any music/audio is already playing on the system and if not it plays a 1 second mp3 of an ultrasonic beep. This forces the system to keep the speaker on and I love it as now I can start the music first thing in the morning while lazing in bed. 🙂

The script requires the mpg123 to be installed and you can install it on a Debian system by issuing the following command:

apt-get install mpg123

The Script itself is only 4 lines long:

#!/bin/bash

if ! grep RUNNING /proc/asound/card*/pcm*/sub*/status &> /dev/null ; then
    /usr/bin/mpg123 -q /home/suramya/bin/KeepSpeakerOn.mp3 &> /dev/null
fi

What it does is to check if any of the PCM soundcards have a status of RUNNING and if not it plays the mp3. I have a cron job scheduled to run the script every one min:

XDG_RUNTIME_DIR=/run/user/1000

* * * * * /home/suramya/bin/KeepSpeakerOn.sh 

One interesting issue I hit during the initial testing was that the mpg123 application kept segfaulting whenever I initiated it from the Cron but it would work fine if I ran the same command from the command prompt. The error I got in the logs was:

High Performance MPEG 1.0/2.0/2.5 Audio Player for Layers 1, 2 and 3
        version 1.25.10; written and copyright by Michael Hipp and others
        free software (LGPL) without any warranty but with best wishes
Cannot connect to server socket err = No such file or directory
Cannot connect to server request channel
jack server is not running or cannot be started
JackShmReadWritePtr::~JackShmReadWritePtr - Init not done for -1, skipping unlock
/home/suramya/bin/KeepSpeakerOn.sh: line 5: 10993 Segmentation fault      /usr/bin/mpg123 /home/suramya/bin/KeepSpeakerOn.mp3 -v

Spent a while trying to debug and finally figured out that the fix for this issue was to add XDG_RUNTIME_DIR=/run/user/<userid> to the cron where you can get the value of <userid> by running the following command and taking the value of uid:

id <username_the_cronjob_is_running_under> 

e.g.

suramya@StarKnight:~/bin$ id suramya
uid=1000(suramya) gid=1000(suramya) groups=1000(suramya),24(cdrom)....

Putting that line in the cron entry resolved the issue. Not sure why but it works so…

Well this is all for now. Will write more later.

– Suramya
December 14, 2017

My primary desktop is dead

Filed under: Computer Hardware,My Life,Tech Related — Suramya @ 12:00 AM

The fan on my computer was giving me some problem (it sounded like an aircraft taking off) so I thought I’ll replace it with a new one. The new fan/heatsink arrived earlier this week and today I finally had the time to try installing it.

First I had to remove the old fan and heat sink so I looked at the video online on how to remove the fan and followed the instructions exactly. But unfortunately the Glue used to stick the CPU to the heat sink was a little too strong and while I was trying to remove the heat sink I managed to get the top half the CPU separated from the bottom half. So now my computer is a very expensive paper weight still I get a new CPU. 

Looking online I found that the AM3+ socket that my motherboard uses has been phased out and even though there are processors that will work with it for the same cost or slightly cheaper I can get a new more powerful CPU and motherboard. So obviously I am going for the latter option.

I have selected a new board and CPU on Amazon but didn’t order it yet because I want to check the cost at some of the local shops before I order. Plus the Amazon order will take a couple of days to get here and I want to avoid the delay.

Its not that I don’t have a machine right now as I have two laptops but the desktop was my primary machine configured to be exactly the way I like it and it’s annoying to have to use a laptop which is not configured exactly the same as the desktop. 

I am dictating this blog post on my phone using the Google voice type and it’s about 99% accurate which is pretty cool. I still can’t figure out how to put punctuation during the dictation but other than that it works perfectly.

Well this is all for now will write more later hopefully on my new desktop.

– Suramya

December 12, 2014

My new toy: the Moto 360 smart watch

So I have a new toy that I am super excited about and It is a birthday gift from me to myself. 🙂 I have been wanting to get a smartwatch since last year when the Samsung gear came out but when I saw the gear I didn’t like the way it looked so ended up not buying it. Now that I have bought the Moto 360, I am glad I didn’t buy the gear because it beats the Gear hands down, no questions asked. I have been using it for 3 days now and I love it.


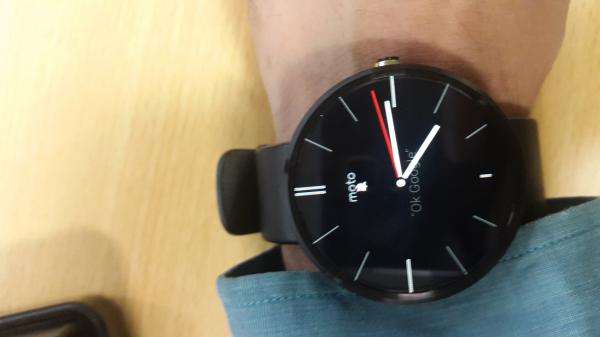
The Moto 360 with the default Face

The initial setup of the watch was easy, I just had to download an app on my phone and follow the prompts, took me about 2 mins (excluding the time to download the app) to complete the pairing and setup. Once the app was installed the watch downloaded the latest firmware and upgraded automatically after I charged the battery which was surprisingly very fast. Once the upgrade completed it was connected to my S5 and has been working like a charm.

The default apps on the 360 are the Fitness apps, ability to receive any notifications on the watch and control the music app and the Google camera app from the watch. It has built in voice recognition which works fantastically great and is integrated with Google Now. Tonight we tried it out in a restaurant where we had gone out for a team outing and it had no trouble with the voice recognition even with the background noise. In addition to the default apps so far I have also installed a flashlight app, a dictation app and another camera app that lets me use the watch as a viewfinder for the camera on my phone. I keep finding cool new apps for the watch every day so will probably be installing a lot more stuff on it in the near future.

As I said earlier Voice recognition works for most of the things I would want to do on the watch, like use to to initiate a call or dictate a reply to an SMS, start an app etc. For the rest the touch screen works fine. Took me a bit of time to figure out how to run the new apps I installed because that isn’t really intuitive initially (or maybe I was just sleep deprived) but once I figured that out I was good to go. I think it would have made sense for them to put this in the help section.

The watch is not bulky at all and is lighter than my other watch. Lots of folks have complained about its size online but I didn’t find that to be an issue. However the battery life could have been better. In my daily use I am down to about 35% charge by the time I am ready to sleep after starting with a full charge in the morning. The charger looks nice and the charging is fast, however since the watch has a custom charger it means that I have to make sure that I carry it with me when I am traveling because none of my other chargers work with it. Sure, I can buy another charger for the office but it’s a pain.

The other issue that I noticed with it is that the heart rate sensor is crap. Every single time I have tried to check my heart rate (using both fit and the Moto software) it has failed with a sensor time out message, although Vinit did manage to get it to work once so I know the sensor works.

For the most part I have been using the watch to read my SMS/Whatsapp/Email messages without having to pull out my phone and monitoring my step count. Apparently I walk around a lot more than I thought which is good. 🙂 Also the ability to decline calls with a message from the watch is very handy when your phone is at your desk and you are at another desk working on something or in a meeting.

I am planning on installing the Analog keyboard for Android that I blogged about earlier but that will be over the weekend when I have some breathing room to experiment. I will share my findings and experiences going forward so if you are interested do keep an eye on the blog for new posts.

Well, this is all for now. It’s time for me to crash for the night. Will post more later.

– Suramya

November 4, 2014

A Cardboard Computer that actually works

Filed under: Computer Hardware,Interesting Sites,Tech Related — Suramya @ 12:31 AM

No, this is not a joke or a toy for a 5 year old. In the 70’s the computers were still not in the affordable range for 99% of the population so a bright chap by the name of David Hagelbarger working at Bell Laboratories designed CARDIAC (CARDboard Illustrative Aid to Computation) as an educational tool to give people without access to computers the ability to learn how computers work. Basically it is a micro-processor made out of cardboard.

The CARDIAC computer is a single-accumulator single-address machine, which means that instructions operate on the accumulator alone, or on the accumulator and a memory location. The machine implements 10 instructions, each of which is assigned a 3-digit decimal opcode. The instruction set architecture includes instructions common to simple Von Neumann processors, such as load, store, add/subtract, and conditional branch.

Operating the computer is fairly simple–the cardboard slides guide you through the operation of the ALU and instruction decoder, and the flow chart shows you which stage to go to next. The program counter is represented by a cardboard ladybug which is manually moved through the program memory after each instruction completes.

Even though the CARDIAC is dated and very simplistic, it is still a useful tool to teach how microprocessors work. Although modern processors include multi-stage pipelines, finely-tuned branch predictors, and numerous other improvements, the basic principles of operation remain the same

You can print your own by visiting Kyle Miller’s Site. More information about CARDIAC and how to use it is available at cs.drexel.edu and on it’s Wikipedia site.

Thanks to Hackaday.com for the story.

– Suramya

October 11, 2014

Microsoft Research releases Android Wear keyboard prototype

Filed under: Computer Hardware,Computer Software,My Thoughts,Tech Related — Suramya @ 5:33 PM

Yes, you read that correctly. Microsoft Research has released the prototype of it’s new keyboard for Android Wear which allows you to input text by drawing letters on the watch face. This is not the first time MS has released stuff of android and I am quite happy with this trend.

The idea of inputting text by drawing characters is not new. If you remember the Palm OS devices they had a keyboard call Graffiti which used a sort of shorthand of letting you input text. I used to love it and had it installed it on my Galaxy Nexus and used it quite often till it got replaced by the voice typing option on the Google Keyboard.

As touch screens are getting smaller, soft keyboards are getting harder to use. For example, on a 1.6” smart watch, a soft keyboard with 10 keys across has keys less than 1/8” (3mm) wide. Speech recognition can be a viable alternative, but unfortunately, speaking into your watch is not always appropriate or even possible (noisy environments).

With the Analog Keyboard Project we are exploring handwriting recognition for text input on small touch screens. Handwriting, unlike speech, is discreet and not prone to background noise. And unlike soft keyboards, where many keys have to share the small touch surface, handwriting methods can offer the entire screen (or most of it) for each symbol. This allows each letter to be entered rather comfortably, even on small devices. In fact, it has been shown that some handwriting systems can be used without even looking at the screen . Finally, handwriting interfaces require very little design changes to run on round displays, which are becoming increasingly popular.

Interestingly the developers decided to support lower-case alphabets instead of upper-case in this first release. I would have thought they would go the other way as it is easier to identify upper case letters for the most part than lower-case.

Please keep in mind that this is a prototype (Alpha) release so it possibly has a lot of bugs and is not production ready. Plus it can’t be installed on the watch from Google Play, it has to be side loaded and the process is a bit complicated so might not be the best option for non-tech savvy folks right now.

Source: androidcentral.com
Project Page: The Analog Keyboard Project
Download: Analog Keyboard for Android Wear

– Suramya

July 8, 2014

World’s smallest 3D-printer pen allows you to create 3d art in air

Filed under: Computer Hardware,Tech Related — Suramya @ 6:10 PM

I have been meaning to blog about this for a bit now, but better late than never… Lix, a UK based company has unveiled the world’s smallest 3D-printing pen. To give you an idea of how small, it is about the size of a regular fountain pen and weighs about 40g. It is supposed to go on sale with the final production model by Sept and price is not that bad either (~$180)

Basically, Lix is a professional tool that enables you to sketch in the air without using paper.

Lix 3D pen is a dream coming true. With Lix 3D Pen you can create anything from small to big, from details to prototypes. It allows you to express your creativity on a whole new level. We are changing the world’s view on 2D as we are now giving the possibility to make your creations in 3D in an never-been-so-easy way!

I am eagerly waiting for it, not because I am an Artist (god no) but Anjali is and she could create some cool art with it. Plus it is a cool toy to have to play with. 🙂

Source: The Register
More details: Lix Kickstarter

– Suramya

July 24, 2013

My RaspberryPi Camera module finally arrived and it works great!

Filed under: Computer Hardware,Linux/Unix Related,My Thoughts,Tech Related — Suramya @ 2:06 AM

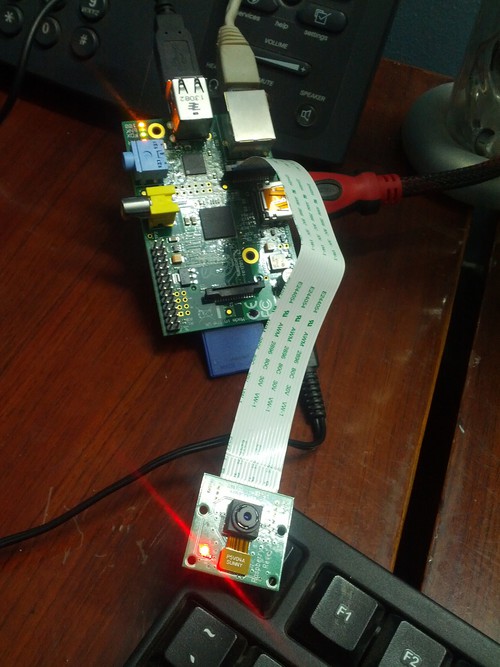
After months of waiting (about 2 to be exact) my RaspberryPi Camera module finally arrived today and I took it for a brief spin. Setting it up was really easy, I just installed the Rasbian image I have, updated the install to the latest version and then enabled the camera. Once that was done and I rebooted the Pi, the camera started working without any issues. The instructions I followed are at: RaspberryPi Camera.

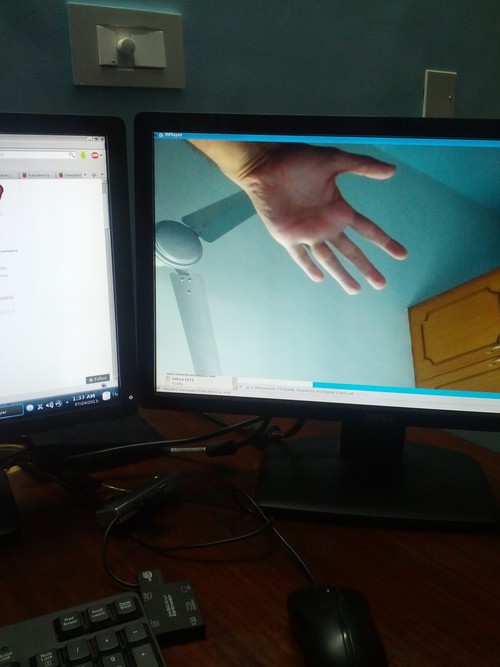
As part of the test I got the pi to transmit the images to my desktop and the clarity was pretty good, there was a slight lag in the display of about 1/2 a second but at 1080p I don’t think I can complain. Below are some pics I took of the setup and of the image being streamed to my desktop.


The Camera module next to my keyboard for a size comparison


Photo of my hand being streamed live to my desktop from the Pi.

I do plan to take pics using the camera module itself, but there is nothing interesting on my desk that I wanted to take photos of so you will have to wait for a day or two and I will take pics of the view from my window and post.

Well this is all for now, I should go get some sleep now considering I have an early start tomorrow.

– Suramya

April 16, 2013

Adafruit launches educational show aimed at kids

Filed under: Computer Hardware,My Thoughts,Tech Related — Suramya @ 4:11 PM

If you are like me you love tinkering with technology and honestly speaking there is no age too early to start teaching kids about electronics and how they work. Adafruit has launched an educational show aimed at kids which is going to be a episode based series and their first episode is titled “A is for Ampere” and teaches the basic theory behind electrical current.

If you have young kids in the family, you should definitely check it out. I am going to try get Vir hooked on to it once he reaches the age where he doesn’t try to eat everything that is given to him. Don’t think Surabhi and Vinit will be happy with me if he manages to swallow a diode or a capacitor. 🙂

Source: Adafruit Launches educational show for Kids

– Suramya

June 27, 2012

Installing Citrix on the RaspberryPi + Other Pi related stuff

One of the use cases I had for the Pi was to use it as a portable thin client that could connect to a Windows server using Citrix. After a little experimentation I managed to get Citrix installed on the Pi and was able to connect to a Windows server successfully and work. I documented the steps I followed to get this to work on the RaspberryPi forum, check out the Tutorial (How to get Citrix working on a RaspberryPi) if you are interested.

Getting Citrix working was a positive thing, other than that I spent some time trying to install my Wireless network dongle (3Com OfficeConnect Wireless. Model # 3CRUSB10075) on the Pi and hit some hurdles in the process. If you remember the last time when I tried this I thought the problem was caused because the card was pulling more power than the Pi could provide. So I went and got a Belkin powered USB hub (I needed it anyways as I need to connect more than 2 USB devices to the Pi).

When I initially plugged in the hub everything seemed to work without issues and the keyboard + mouse I had connected to the hub worked without issues. So I plugged in the wireless dongle, as soon as I plugged it in my mouse and keyboard both stopped working. I then unplugged the dongle and both the mouse & keyboard started working again. I then plugged the keyboard directly on the Pi and the dongle on the hub, now the keyboard worked but the mouse had issues. Looking at the /var/messages log I saw a ton of error messages like the following:

Jun 21 18:10:46 raspberrypi kernel: DEBUG:handle_hc_chhltd_intr_dma:: XactErr without NYET/NAK/ACK
Jun 21 18:10:46 raspberrypi kernel:
Jun 21 18:10:46 raspberrypi kernel: DEBUG:handle_hc_chhltd_intr_dma:: XactErr without NYET/NAK/ACK
Jun 21 18:10:46 raspberrypi kernel:
Jun 21 18:10:46 raspberrypi kernel: DEBUG:handle_hc_chhltd_intr_dma:: XactErr without NYET/NAK/ACK
Jun 21 18:10:46 raspberrypi kernel:
Jun 21 18:10:46 raspberrypi kernel: DEBUG:handle_hc_chhltd_intr_dma:: XactErr without NYET/NAK/ACK

Tried a few things but nothing worked and since it was 3:30 in the morning I gave up and crashed for the day. Will try again when I have had some sleep and get some dedicated time to play with the Pi.

– Suramya

« Newer PostsOlder Posts »

Powered by WordPress