Graphics Muse
More...

|

Printer Info
My old Epson 3250 printer served me well for the 2 years I used it. It
still works, but the graphics capabilities are limited and the printer only
supports black and white printing. I'll probably give it to my nephews
when they get a computer next month. I packed it up in December and set
out to find a color printer. Why? Because I didn't have one. I wasn't sure
what I'd do with it, but I wanted one.
The first step was to start looking for what the current state of the art
was - what kind of printers are available now. Ink Jet printers are all
the rage for desktop users, apparently, due to their low cost and high quality
color output. I asked around on a few mailing lists and got a pointer to
some
reviews of printers in PC Magazine Online. I scanned these looking
for basic information on what features each supported and the price ranges
I would be looking at when I went shopping. However, before I could
choose a particular printer I had to know what printers Linux could support.
And printer support on Linux is primarily supported through the use of
Ghostscript.
Printers all speak a language of some sort for determining how to print the
data that is sent to them. Some printers, mainly laser printers, can speak
Postscript directly. Most inkjet printers have their own specialized
languages, such as the ESC/P2 language that EPSON printers use.
Ghostscript is a package that provides drivers that speak the printer
language for a large number of printers. It takes a Postscript file as
input and outputs it in a format
suitable for the display device (which can be a printer or even an X display).
This means you have to turn your images into Postscript before feeding them
to Ghostscript. This can be done using the ppmtops tool from the NetPBM
package.
I found the
Ghostscript Web site
by searching the Yahoo GNU Software section. This site provided me with
information on the latest version of the package, the
Aladdin Ghostscript 4.03
package. The Aladdin version of Ghostscript is freely available for
private use but cannot be distributed commercially. There is a GNU version
as well, but the fonts delivered with the Aladdin version are much better.
This is a rather large software package, but it builds fairly easily. What
was most important to me was finding out which devices are supported.
Fortunately, these are listed in a file called devices.txt
in the source distribution.
Some of the devices supported include:
- SPARCprinter
- HP DeskJet 520, 540, and 560C
- HP DeskJet 500C & 550C
- HP PaintJet, XL, and XL300
- DEC LJ250
- Apple Dot Matrix Printer (and Imagewriter)
- Epson Stylus Color Printer
- Canon BJC-600/BJC-4000/BJC-70 and BJC-800 BubbleJet Color Printers
(and Apple StyleWriter 2x00)
With this file in hand I returned to the PC
Magazine printer review and scanned the list of printers.
Some things I noted while researching printers in the review:
- You want to get a printer that supports CMYK and not just CMY.
CMYK means "Cyan, Magenta, Yellow, and Black" (K for black so it
doesn't get confused with blue). CMYK printers have three color
cartridges (or one cartridge with three color inks in it) plus
a cartridge for black ink. CMY printers only have the three color
inks and use all three combined to simulate black. What this means
is that these printers cannot handle black text at the same time
it is printing a color image. Also, the combination of the three
colors does not always get a reasonable black - sometimes you get
an ugly dark brown instead. CMYK printers are better.
Note that CMYK are substractive colors - by adding more ink you
subtract from the light that is reflected so the result is a darker
image. Additive colors are the opposite. Generally you'll find
printers use subtractive (CMY or CMYK) colors and computer monitors
and TV sets use additive (RBG, aka Red, Gree, and Blue) colors.
-
The Epson Stylus Color 500 printer
runs about $279US. I saw ads in Computer Shopper
that ran as
low as $235 plus shipping. But $35 for shipping seems about
right so its not much of a savings. Computer City, CompUSA,
and Best Buy all had this printer for $279, but the stock
tended to be low at most of the places I went to. Apparently
this is a popular printer (at least at Christmas time when I
bought mine). The Stylus Color Pro version runs a bit higher,
at around $380.
- Epson printers are reported to have problems with their inkjet
nozzles becoming plugged. The Stylus Color 500 has a self-cleaning
mechanism that appears to clear the problem. My old Action Printer
3250 seemed to have this problem, but it didn't have any buttons
for automatically clearing the inkjet heads.
- Most printers can
print on plain paper, but best results are obtained on either
"coated" inkjet paper, glossy inkjet paper, or transparencies.
Many printer manufacturers also
sell paper specifically designed for use with their printers.
Note that very dark sections of an image printed on even the coated
paper can make the paper shrivel a bit (like when you spill coffee
on a piece of paper). I suspect the glossy paper might not have
the problem so bad, and cards for special occasions should be ok
too. Just try to keep the image light (which means less ink is
used).
-
HP printers are quite popular and there are a couple of models
in a comparable price range to the Epson Stylus Color 500:
- HP682c
This printer was also rated fairly good in the PCMag review.
and runs for about $370US. It is
supported by Ghostscript in versions as old as 2.6.2, which
is probably the version available with many of the older
distributions of Linux which came with a 1.2.13 Linux kernel such
as Slackware 3.0.
- HP DeskJet 600c
This printer runs about $200 and includes a
color conversion kit (I think), although I don't know what
that is.
-
HP DeskJet 1600c
A higher end printer running about $900, plus $100-$200 for the
JetDirect network package (I have no idea what that package
does), this printer understands Postscript,
appears to be a CMYK printer, and
prints fine on normal (photocopier/typing) paper.
I decided on the
Epson Stylus Color 500 due in part to its rather glowing review and the
fact that it was listed under $300. It was not specifically listed by the
devices.txt file in the Ghostscript package, but I found a
Espon Stylus Color 500 Web site
hosted by
Alan Williams
which provided a wealth of information regarding this particular printer.
I stumbled upon this page from the Printer Compatibility page of the
Ghostscript Web site. The Printer Compatibility page does specifically
list the Epson Stylus Color 500 as a supported device.
If anyone is interested, the printer specifications are availabe from
www.epson.com
under the Corporate Products page.
I purchased the printer, took it home and immediately unpacked it (I was
trying to get it set up prior to a two week Christmas/New Year's vacation).
Printer setup is pretty simple. Don't bother with the MSWindows
configuration stuff. Just follow the printed steps for unpacking
the printer, installing the ink cartridges, and running the self test.
I had to do a bit of tweaking of the stcolor.ps file (a Postscript file
that must be printed first to set up the printer prior to each of your
files) to fit an image on a greeting card, but in general this should be
necessary. In fact, my solution (tweaking stcolor.ps) doesn't work quite
right. If anyone figures out how to print offcenter using the stcolor.ps
configuration please let me know.
Alan has some scripts for printing in various modes (low quality draft
to high quality) but neither he nor I use printer filters. These are
scripts or other programs which read from standard input and determine how
to process the file. If you don't use any filters then you can use lpr to
print an output file produced from gs (Ghostscript) directly to the
printer. On my system I still just redirect the output to /dev/lp, but I'm
the only person using my Linux system. In fact, I spent most of my time
working on a script that would print TGA and GIF images by converting them
to Postscript and passing them to gs to be printed directly to /dev/lp. If
anyone is interested in this script I can send it to you, but its a hack at
best. A printer filter would probably be better.
If you are interested in adding
filters you can try either apsfilter or magicfilter, both of
which are buried in the Sunsite archives and probably the tsx-11 archive
as well. Red Hat 4.0 doesn't use these due to packaging considerations.
Apparently at least one of them requires that you install the C compiler in
order to print. Not very useful to non-developers who simply want
to print graphics or text (ie just use Linux, not develop on it).
If its true one (or both) of these packages has this requirement then
I whole heartedly agree with Red Hat's decision.
Red Hat 4.0 has its own printer facility but I've heard its not all that
spectacular. I've been told by folks at Red Hat that the next version
(which I believe is currently being used in-house) will be much better.
The Epson Stylus Color 500 is the printer to get if you just want to
create some nifty labels, Christmas cards, or menus for a restaurant and
have a limited budget for printer hardware. Its support of transparencies
makes it nice for some of the X Windows development I'm doing at work where
I need to write a specification and provide a simple class on the design of
the application I'm building. However, this printer
is not quite good enough for high quality prints of photos or 3D
renderings. These might come out fairly well on the glossy inket paper, but
normal inkjet paper wrinkles with high-color images and the image comes out
rather grainy. Even so, for simple home or small office use, the Epson
Stylus Color 500 is a good printer that is supported through Ghostscript
that is reasonably price.
|
|
tkPOV V2.0
The Persistance of Vision Ray Tracer, more commonly known as POV-Ray, is a
tool for creating photorealistic images. The Unix versions, including the
Linux port, provide for interactive display of the image being rendered in
an X window, but there is not graphics interface built into the program.
It is started with a command line that supports a large number of options.
Although the tool is quite powerful in its ability to render complex
scenes, the lack of a graphical front end means that many of the more
useful features are seldom used by the casual user. Graphical front ends
to POV-Ray are available on the MS Windows port, however.
Recognizing the limitations of a command-line oriented interface, a group
of students at the University of Minnesota decided to make create a
graphical front end to POV-Ray as a class project in User Interface
Design. The result is
tkPOV,
a Tcl/Tk/Tix program that allows users to select and set
various options to POV-Ray. The current version of tkPOV is 2.0 beta1
which reportedly supports versions 1.x, 2.x, and 3.0 of POV-Ray. I don't
have the older versions so I examined the application using POV-Ray 3.0.
tkPOV requires Tk 4.0 or later, Tcl 7.4 or later and Tix 4.0 or later and
is covered by the Artistic copyright. I'm not familiar with copyright
laws, but this appears to be a fairly permissive copyright. There is no
charge for personal or other use as long as the rules of the copyright are
followed.
The installation of the source is very straight forward. There is a
Makefile that requires a change to one variable when installing from the
source distribution. I changed DEST_DIR to
/usr/local/bin. I also had to make some minor
changes to the rules for making tkpov-src, which is the rule to use when
installing from the source distribution. Rather than explain them, since
the rules are fairly simple, I'll just provide my version:
tkpov-src: tkpov.test Makefile
   rm -f tkpov
   echo "#!/bin/sh" > tkpov
   echo "# -*- tcl -*- \\" >> tkpov
   echo exec ${WISH} \"\$$0\" \"\$$@\" >> tkpov
   cat tkpov.tcl >> tkpov
   chmod 755 tkpov
The changes were required since a newline was not being printed by the
echo command in the original version. After you've made the changes
you simply run
make tkpov-src
and the package should be installed in whatever directory you specified in
the DEST_DIR variable. Note that if, like me, you used
/usr/local/bin as
the destination directory you'll probably have to run the make
command as the root user.
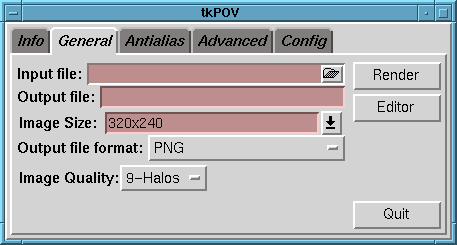
Figure 1: Main Window, with General tab displayed
Once the application has been installed you can begin exploring. Type
tkpov
and a rectangular window opens up with a series of 5 folder tabs (see
Figure 1). The
first tab, labeled Info is the obligatory credits and contact
information. The second tab, labeled General, provides a set of
input fields for specifying input and output files. There are a number of
pull down menus as well which allow the user to select image size, output
file format (PNG, PPM, TGA, and Compressed TGA), and image quality. The
pull down menu for image quality is nice in that it not only shows the
numeric levels that can be used but also gives a short (one or two word)
description of what you'll get using that level. Note that lower levels of
quality render faster and can be used to test object positions or other
features of your scenes without having to wait for POV-Ray to calculate textures
or halos. Textures and halo calculations can be very time consuming.
The Input File field is accompanied by a file folder button
which brings up
a file selection window. The user can also simply type in the path to a
file in the input if so desired. Once an input file is selected a default
output file name is displayed in the Output File window which is
based on the input file's name and path along with the output file type.
The General Tab window is the main window for starting a render. A button
is provided that, when clicked on, will attempt to start the POV-Ray
renderer using options specified in the other tab windows, which we will
examine in a moment. Also, an editor button is provided that allows the
user to call the editor of their choice (configured under the Config
tab) to make updates to the selected input file. Unfortunately the stock
code for this feature appears broke since no matter how I configure the
editor it always complains it can't find emacs (even if I tell it to use vi
or xedit).
Lastly, this window provides a button for exiting tkPOV, labeled
Quit.
Ok, so now you have a selected an input and output file and decided that it
will be a PNG output file rendered at 640x480 using the highest quality
setting. Before we render we'll want to configure some of the command line
options for POV-Ray. Lets take a look at the next tab, Antialias. Again,
the Render, Editor, and Quit buttons are available.
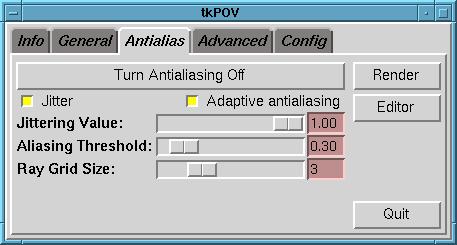
Figure 2: Antialiasing options
New to this window is the button which defines whether Antialiasing is turned
on or off. By default it is off and the button displays a message stating
what will happen if it is pressed (not the current state, which can be a
little confusing at first). Pressing the button causes a number of new
fields to be displayed. The levels of Jitter, Alias Threshold, and Ray
Grid Size can be set by typing in a value or using the slider bars
provided. Jitter is turned on by default and can be turned off by clicking
on its toggle button. On the other hand, Adaptive Antialiasing is off by
default and must be toggled on if needed. For our little example lets say
we want a high quality image. We'll turn on Antialiasing, which
allows the smoothing of the jagged, "stair step" look of diagonal lines in
computer generated images. The aliasing threshold we set, somewhat
randomly, to 0.35. We'd also like to reduce the amount of time it takes to
render our image. The Jitter option, which allows POV-Ray some
randomization while doing its antialiasing in order to smooth jagged edges
even further, can add to the compute time of a rendering. We'll leave that
value turned off.
Since I've not really examined all the options available with POV-Ray 3.0
I can't comment on the usefulness of the advanced options. Interested
readers should consider examining the POV-Ray 3.0 documentation at the
POV-Ray web site.
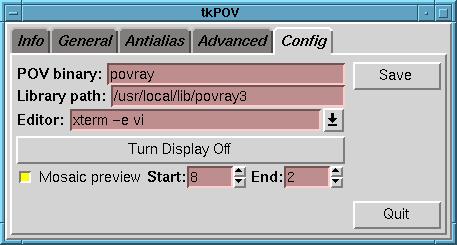
Figure 3: Configurable Parameters to tkPOV
Now you're ready to render your image - except that you haven't told tkPOV
where to find the POV-Ray binary! Under the Config tab are fields
for specifying the name of the binary (which has changed from version to
version), the path to the directory that contains the various POV-Ray
include files and the editor of choice. There is also the ability to turn
the interactive display of the rendering on or off. I like to leave this
on while testing. You can save these settings with the Save button.
The saved values are placed is a dot file named ".tkpov2rc" in the users
HOME directory.
Now you're ready to return to the General tab and start the render.
With luck, after a reasonable time you'll have a beautiful new image.
tkPOV won't help you create better scenes, but it will give you a little
more control over the rendering process using POV-Ray. Its been awhile
since I last used the 3.0 release of POV-Ray and I seem to remember there
being many more options. I could be wrong, and since I was crunched for
time to get this months column out I wasn't able to spend as much time
researching such issues. But I can say tkPOV's interface appears
to be easy to use and a convenient way to run my test renderings. I can
throw away my old bash scripts now and just leave tkPOV up in one of the
many pages I keep in my fvwm desktop.