
Piercing Firewalls with OpenSSH
By Mike Chirico
Even if the system administrator deliberately filters out all traffic except port 22 (ssh) to a single server on a site, it is very likely that you can still gain access to the other computers behind the firewall. This article shows how remote Linux and Windows users can gain access to firewalled Samba, mail, and Web servers. In essence, it shows how openSSH and PuTTY can be used as a VPN solution for your home or workplace without monkeying with the firewall. This article is NOT suggesting you close port 22; these steps are only possible given valid accounts on all servers. But read on; you may be surprised at what you can do without punching additional holes through the firewall - and punching more holes is always a bad idea.
OpenSSH and Linux
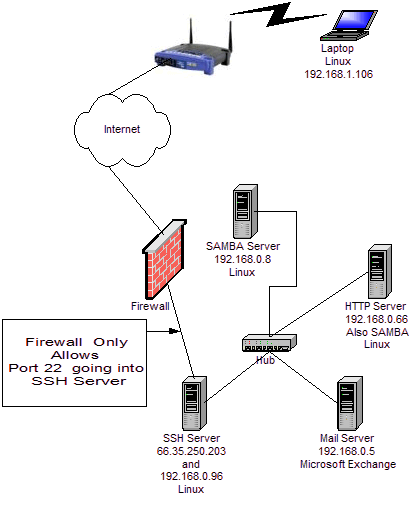
From the Linux laptop (whose address we'll assume to be 192.168.1.106), it is possible to get access to the resources behind the firewall directly, including Samba server, Web server, and mail server which are blocked from the outside by the firewall. The firewall only permits access to the SSH Server via port 22; yet the laptop can still access the other servers.
The SSH Server is seen as 66.35.250.203 from the outside. To
tunnel traffic through the SSH Server from the Linux laptop to
192.168.0.6, create the following ~/.ssh/config file,
on the Linux laptop:
## Linux Laptop .ssh/config ##
Host work
HostName 66.35.250.203
        User sporkey
        LocalForward 20000 192.168.0.66:80
        LocalForward 22000 192.168.0.66:22
        LocalForward 22139 192.168.0.8:139
        LocalForward 22110 192.168.0.5:110

Host http
HostName localhost
        User donkey
        Port 22000
This file must have its rights set appropriately:
$ chmod 600 ~/.ssh/config
Take a look again at the file above. Note the entry for
"LocalForward 22000 192.168.0.66:22", and compare this
to the network diagram. The connection to the SSH Server is made by
running the following command from the Linux laptop
(192.168.1.106):
$ ssh -l sporkey 66.35.250.203Quick hint: the above command can be shortened, since the user name "sporkey" and the "HostName" are already specified in the
config file. Therefore, you can use ssh
work as shown below.
$ ssh work
After this connection is made, it is possible to access the HTTP Server directly, assuming the account 'donkey' has access to this server. The following command below is executed on the Linux laptop (192.168.1.106). Yes, that is on the Linux laptop in a new window. Again, this will be executed from 192.168.1.106 in a new session. So note here the Linux laptop is getting direct access to (192.168.0.66). Reference the diagram above. This is the "localhost" of the Linux laptop -- you got this, right? The SSH sessions are initiated from the Linux laptop.
$ ssh -l donkey localhost -p 22000Since the
config file maps "http" to localhost port
2200, the above command can be shortened to the following:
$ ssh httpWait, there is a better way. Instead of creating two terminal sessions - one for
ssh work, then another one for
ssh http - why not put it all together in one command?
$ ssh -N -f -q work; ssh httpThe above command will establish the connection to work, forwarding the necessary ports to the other servers. The "-N" is for "Do not execute remote command", the "-f" requests SSH to go to the background, and "-q" is to suppress all warnings and diagnostic messages. So, still not short enough for you? Then create an alias,
alias http='ssh -N -f -q work; ssh http' and put that
in your ~.bashrc file, which is about as short as you
can get, since typing http on the command line would
get you to the HTTP server.
To copy files to this server, the command below is used (note
that uppercase "-P" follows scp.) If you are in the
.ssh directory you will see an
authorized_keys2 and maybe an
authorized_keys, which you may want to append to the
like files on the destination server. These files are only listed
as an example. Any file could be copied; but, if you copy these
files to the remote server and append the contents to the remote
server's authorized_key* files, then, you will not be
prompted for a password the next time you make a connection. See
Tip 12 in
150+ Linux Tips.
$ scp -P 22000 authorized_keys* donkey@localhost:.But, because you have everything in the
config file,
you can shorten the above command to the following:
$ scp authorized_keys* http:.
[ To enable the key-based access mentioned above, you'll still need to append the key files to the ones in ~/.ssh on 'http'; this can now be accomplished by, e.g., running ssh http 'for a in authorized_keys*; do cat $a >> ssh/$a; rm $a; done', which will also delete the now-useless key files in your home directory on 'http'. -- Ben ]
The following command, executed from the Linux laptop, will download the index web page from the remote server (192.168.0.66):
$ wget http://localhost:20000/
Linux Laptop becomes Company Web Server -- Power of RemoteForward
Suppose the Linux laptop is running a web server — Is it
possible for the people in the company to view the web server on
the laptop (192.168.1.106), when they attach to the normal company
HTTP Server (192.168.0.66)? Absolutely. Think about this because
what is being suggested here is that a laptop, with no direct
access to the HTTP server, is actually going to take over as the
company web server. Yes, that is exactly what will be shown here;
although, instead of completely taking over the company web server,
which is running on port 80 of (192.168.0.66), we will add an
additional web server on port 20080. If you are intent upon taking
over the company web server, you would have to perform similar
steps as root, since only root has the ability to take over the
privileged ports. Let us start with this example first, and then
you'll know how to do this on port 80. To perform this magic,
/etc/ssh/sshd_config on the company web server
(192.168.0.66) must have the variable "GatewayPorts" set to "yes";
otherwise, only the users logged into the HTTP server will be able
to see the laptop's web page. Instead, we want everyone in the
company to have direct access to the added port.
GatewayPorts yesAfter making the change, you will need to restart the SSH daemon:
$ /etc/init.d/sshd restartIn the Linux laptop's
~/.ssh/config add the following
entry:
RemoteForward 20080 localhost:80The complete
~/.ssh/config is shown below.
## Updated Linux Laptop .ssh/config  ##
Host work
HostName 66.35.250.203
        User sporkey
        LocalForward 20000 192.168.0.66:80
        LocalForward 22000 192.168.0.66:22
        LocalForward 22139 192.168.0.8:139
        LocalForward 22110 192.168.0.5:110

Host http
HostName localhost
        User donkey
        Port 22000
        RemoteForward 20080 localhost:80
If you perform a netstat -l from 192.168.0.66, the
remote company web server, you should see the following:
tcp 0 0 *:20080 *:* LISTENThis means that anyone in the company can view this webpage (http://192.168.0.66:20080/) on port 20080. If you wanted to make it available on port 80, the default HTTP port, the connected user would have to have root privileges.
If you did not change the /etc/ssh/sshd_config
file, the gateway functionality is disabled since "GatewayPorts"
defaults to "no". And executing a netstat -l (that's a
lowercase 'L', not the number '1'), would return the following:
tcp 0 0 ::1:20080 *:* LISTENWith the above restrictions, only users on the computer 192.168.0.66 would see the webpage on 192.168.1.106 from port 20080.
For references on generating ssh key pairs, securing an ssh server from remote root access, and Samba mounts through an SSH tunnel, see TIP 12, TIP 13, and TIP 138 in 150+ Linux Tips listed at the end of this article. In addition,if you are a system administrator, may want to take note of TIP 14 (keeping yearly logs) and TIP 26, which shows how to kill a user and all their running processes. In addition, TIP 10, TIP 11, TIP 15, TIP 24, TIP 47, TIP 52, TIP 89, TIP 104, TIP 148, and TIP 150 may help with system security.
(For more tutorials by this author, please see his Soup to Nuts site.)
![[BIO]](../gx/authors/chirico.jpg) Mike Chirico, a father of triplets (all girls) lives outside of
Philadelphia, PA, USA. He has worked with Linux since 1996, has a Masters
in Computer Science and Mathematics from Villanova University, and has
worked in computer-related jobs from Wall Street to the University of
Pennsylvania. His hero is Paul Erdos, a brilliant number theorist who was
known for his open collaboration with others.
Mike Chirico, a father of triplets (all girls) lives outside of
Philadelphia, PA, USA. He has worked with Linux since 1996, has a Masters
in Computer Science and Mathematics from Villanova University, and has
worked in computer-related jobs from Wall Street to the University of
Pennsylvania. His hero is Paul Erdos, a brilliant number theorist who was
known for his open collaboration with others.
Mike's notes page is souptonuts.
