Suramya's Blog : Welcome to my crazy life…

March 7, 2021

Syncing data between my machines and phones using syncthing

I have talked about how my Backup strategy has evolved over the years. I am quite happy with the setup I explained in my previous post except for one minor point. I still had to manually sync the data from my laptop, Jani’s laptop and my phone to my desktop manually. Once it is there on the desktop the various backup processes make sure that it is backed up and secure. The issue is that I still had to manually sync the data between the devices.

For my laptop, I used Unison to manually check for changes and then sync them over which works great but I had to ensure that the sync happened in the correct direction. For Jani’s laptop I mounted my drive on her computer over ssh using these steps and then running robocopy to copy the files over. This worked intermittently well. For some reason the system would refuse to overwrite changed files randomly with permission denied errors even when the permission was set to 777. The only way to fix was to delete all the files on my computer and then do a fresh sync. This worked, but was not userfriendly and required me to manually kick off a backup which I did infrequently. My phone on the other hand was backed up manually to my computer using sftp. This was very crumbersome and I really disliked having to do it.

I have in the past looked into various technologies that allow multiple devices to sync data with each other. Unfortunately, all of them required an external connection with a copy of the data being stored in the cloud. Since that was a show-stopper for me, I never got around to setting up my systems to automatically sync with each other. Then a few weeks ago, I came across this great article on how to create A Simple, Delay-Tolerant, Offline-Capable Mesh Network with Syncthing (+ optional NNCP). In the article John talked about Syncthing, which allowed him to create a local serverless, peer-to-peer, open source alternative to Dropbox that allowed his machines sync directly with each other without a server. In other words a perfect fit for what I wanted and needed to do. So I spent a little bit of time researching syncthing and then decided to take the plunge and setup my laptop and desktop to sync with each other. Before starting the setup I backed up all my data so that in case something went wrong I still had a backup. Thankfully nothing did, but it is always good to have a backup.

Syncthing’s installation is pretty simple for all major operating systems, except for iPhones which are not supported. In Debian, installation just required the following steps

  • Run the following commands to add the “stable” channel to your APT sources:
  • echo "deb https://apt.syncthing.net/ syncthing stable" | sudo tee /etc/apt/sources.list.d/syncthing.list
    curl -s https://syncthing.net/release-key.txt | sudo apt-key add -
  • Once you have added it, run the following command to install syncthing
  • sudo apt-get update
    sudo apt-get install syncthing

    Once the software is installed execute the syncthing binary. On my computer it is installed in /usr/bin/syncthing. Once the software starts, it will start the web interface automatically. There is also a Desktop application, but I prefer the web-ui. Instructions on how to configure the folders and nodes are available at the Getting Started Guide over on the project website so I am not going to repeat them here. Basically, you need to define the nodes and connect them to each other, if the devices are not added on both sites then the folders will not sync.

    The software has a cool feature of discovery, which makes it easy to add devices on a given node. As soon as you connect to the same network they detect each other and give you the option of connecting both. After the devices are connected, you configure the folder you want to sync and select the devices you want it synced with. The best part is as soon as you configure one node, the other nodes will get a message stating that Node 1 is attempting to share a folder with them. Clicking on accept, allows you to configure the folder path etc on the node and that’s it. The system will detect the files which need to get synced over and will copy them quickly. You can configure the sync to be bi-directional or one way. Most of the folders in my setup are set as that, the only exception are Jani’s files which is a one-way sync because I know that I am not going to modify the files on the server.

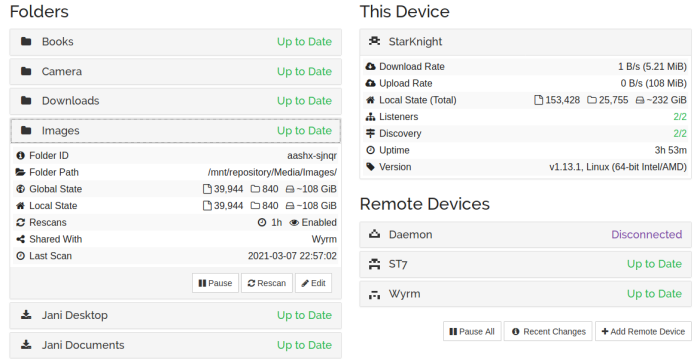
    Below is what the setup looks on my desktop, as you can see I am syncing data from 3 different computers/phones to it and the sync’s are really fast. I have copied files over to the folder on one computer and within minutes (depending on the size) they were replicated on the other computers/phone.


    My Syncthing setup

    I have the android client running on my phone as well, and it instantly syncs any new photos etc from my phone to the desktop. All I need to do is connect to the same LAN network (can be over wired or wireless) and the devices connect and sync automagically. There is an option to do so even over the WAN using relay server but since I didn’t want that I disabled it in the setup.

    Now all my data is synced to the desktop machine without me having to worry about anything or manually copying files around. Check it out if you want to sync your devices without using an external server.

    – Suramya

February 20, 2021

Fixing boinc (code=exited, status=108) error

Filed under: Computer Tips,Knowledgebase,Linux/Unix Related,Tech Related — Suramya @ 2:01 AM

Earlier today I noticed that my CPU was not as active as usual and the boinc (World Community Grid) processes were no longer active on my computer. This has happened in the past when the client crashed so I restarted the client using the following command as usual:

/etc/init.d/boinc-client restart

Unfortunately, that didn’t resolve the problem and I thought that it could be because of the recent OS update that I did to my Debian system. In the past there have been rare cases when libraries were updated that some programs act strangely till the computer is rebooted, so I restarted the machine expecting to see the process start up without issues. Sadly, that didn’t happen so I had to debug the problem and I tried all sorts of things to resolve.

First, I tried starting the program manually as the root user and that worked. So I knew it was something to do with the startup script. Then I searched for and removed all the lock files in the boinc and the boinc-client directory. That should have resolved the problem but it didn’t and then I tried running the status command which gave the following output:

root@StarKnight:/var/lib/boinc-client# /etc/init.d/boinc-client status
boinc-client.service – Berkeley Open Infrastructure Network Computing Client
Loaded: loaded (/lib/systemd/system/boinc-client.service; enabled; vendor preset: enabled)
Active: failed (Result: exit-code) since Sat 2021-02-20 01:26:50 IST; 9s ago
Docs: man:boinc(1)
Process: 7420 ExecStart=/usr/bin/boinc (code=exited, status=108)
Process: 7455 ExecStopPost=/bin/rm -f lockfile (code=exited, status=0/SUCCESS)
Main PID: 7420 (code=exited, status=108)
CPU: 19ms

Feb 20 01:26:40 StarKnight systemd[1]: Started Berkeley Open Infrastructure Network Computing Client.
Feb 20 01:26:50 StarKnight boinc[7420]: 20-Feb-2021 01:26:50 Another instance of BOINC is running.
Feb 20 01:26:50 StarKnight systemd[1]: boinc-client.service: Main process exited, code=exited, status=108/n/a
Feb 20 01:26:50 StarKnight systemd[1]: boinc-client.service: Failed with result ‘exit-code’.

This meant that the system thought that another instance of the software was running but that wasn’t the case as I verified it using ps. A search for the status=108 code on the internet returned a few results but nothing that resolved my problem. One user who faced this issue resolved it by uninstalling everything and installing back but that wasn’t a step I wanted to take without trying everything else first so I kept researching. Then I saw a post where a user was facing the same issue after they had moved the data directory to another partition and symlinked it to the original location. I had done the same thing a few weeks ago so I moved the directory back to it’s original location but that didn’t resolve anything either.

Then I thought about checking the file ownerships of the directory and they were owned by my user (suramya) and a post on the internet said that they should be owned by root. I checked on my laptop as I have the same setup there and found that the directories were owned by the ‘boinc‘ on the laptop. Then I remembered changing the ownership of all files in one of my drive partitions last night to suramya. What I didn’t realize at that time was that the boinc-client directory was also located on that partition (after I had moved it there to recover space on my root partition).

I immediately changed the ownership of both directories back to boinc:boinc using the following command

chown boinc:boinc /var/lib/boinc* -R

Then I restarted the daemon and that fixed the problem. I then moved the directory back to it’s original location (on the other partition), symlinked it to the original location and the software still worked after I restarted the process.

I am documenting this in case others hit the same issue.

– Suramya

November 28, 2020

My Backup strategy and how it has evolved over the years

I am a firm believer in backing up my data, some people say that I am paranoid about backing up data and I do not dispute it. All my data is backed up on multiple drives and locations and still I feel that I need additional backup. This is because I read the news and there have been multiple cases where people lost their data because they hadn’t backed it up. Initially I wasn’t that serious about it but when I was in college and working at the helpdesk, a phd student came in crying because her entire PHD thesis was on a Zip Drive and it wasn’t working anymore. She didn’t have a backup and was basically screwed. We tried a bunch of stuff to recover the data but didn’t manage to recover anything. That made me realize that I needed a better backup procedure so started my journey in creating recoverable backups.

My first backup system was a partition on my drive called backup where I created a copy of all my important data (This is back in 2000/2001). Then I realized that if the drive died then I would loose access to the backup partition as well, and I started looking for alternatives. This is around the time when I had bought a CD Writer so all my important data was backed up to CD’s and I was confident that I could recover any lost data. Shortly afterwards I moved to DVD’s for easier storage. However, I didn’t realize till a lot later that CD’s & DVD’s start becoming unreadable quite easily. Thankfully I didn’t loose any data but it was a rude awakening to find that the disks I had expected to keep my data safe were starting to become unreadable within a few years.

I then did a bunch of research online and found that the best medium for storing data long term is still Hard Drives. I didn’t want to store anything online because I want my data to be in my control so any online backup system was out of the question. I added multiple drives to my desktop and started syncing the data from the desktop & laptop to the backup drive using rync. This ensured that the important data was in three locations at any given time: My Desktop, My Laptop and the Backup drive. (Plus a DVD copy that I made of all my data every year)

I continued with this backup strategy for a few years but then realized that I had no way to go back to a previous version of any given document, if I deleted a file or wanted to go back to an older version of a file I only had 24 hours before the changes were synced to the backup drive before it was unrecoverable. There was a case where I ended up having to dig through my DVD backups to find the original version of a file that I had changed. So I did a bit of research and found rdiff-backup. It allows a user to back up one directory to another and generates an incremental backup. So we can recover/restore files based on date range. The best part is that the software is highly efficient, once the initial backup is done it only transmits the changes to the files in subsequent runs. Now that I have been using it I can restore a snapshot of my data going back to 2012 quite easily.

I was quite happy with this setup for a while, but while reading an article on best backup practices I realized that I was still depending only on 1 location for the backup data (the rdiff-data snapshots) and the best practices stated that you should also store it in an external drive or offsite location to prevent viruses/ransomware from deleting backups. So I bought a 5TB external drive and created an encrypted partition on the same to store all my important data. But I was still unhappy because all of this was still stored at my home so if I had a fire or something I would still end up loosing the data even though my external drive was kept in a safe. I still didn’t want to store data online but that was still the best way to ensure I had offsite backup. I initially thought about setting a server at my parents place in Delhi and backup there but that didn’t work out for various reasons. Plus I didn’t want to have to call them and troubleshoot backup issues over the phone.

Around this time I was reading about encrypted partitions and came up with the idea of creating an encrypted container file to store my data and then backup the container file online. I followed the steps I outlined in my post How to encrypt your Hard-drive in Linux and created the encrypted container. Once I finished that I had to upload the container to my webhost since I had unlimited storage space as per my contract. Initially I wasn’t able to because they had restricted my account’s quota but a call to their customer support sorted it out after a bit of argument and explaining what I was doing. The next hurdle I faced was uploading the file to the server because of the ridiculously low upload speed I was getting from Airtel. I had a 40 mbps connection at the time but the upload speed was restricted to 1 mbps because of ‘reasons’. After arguing with their support for a while, I was complaining about it at work and one of the folks suggest I check out ACT Internet. I checked out their plans and was quite impressed with the offerings so I switched over to ACT and was able to upload the container file quickly and painlessly.

Once the container was uploaded, I had to tackle the next problem in the process which was on how to update the files in the container without having to upload the entire container to the host. I experimented with a few solutions and then came up with the following solution:

1. Mount the remote partition as a local mount using sshfs. I mounted the partition locally using the following command: (please replace with the correct hostname and username before using)

/usr/sbin/runuser -l suramya -c "sshfs -o allow_other @hostname.com:. /mnt/offsite/"

2. Once the remote partition was mounted locally, I was able to use the usual commands to mount the encrypted partition to another location using the following command:

/usr/sbin/cryptsetup luksOpen /mnt/offsite/container/Enc_vol1.img enc --key-file /root/UserKey.dat
mount /dev/mapper/enc /mnt/stash/

In an earlier iteration of the code I wasn’t using the keyfile so had to manually enter the password everytime I wanted to backup to the offsite location. This meant that the backup was done randomly as and when I remembered to run the command manually. A few days ago I finally configured it to run automatically after adding the keyfile as a decryption key. (Obviously the keyfile should be protected and not be accessible to others because it allows users to decrypt the data without entering a password.) Now the offsite backup runs once a week while the local backup runs daily and I still backup the Backup partition to the external drive as well manually as and when I remember to do so.

In all I was quite happy with my setup but then I was updating the encrypted container and a network issue made be believe that my remote container had become corrupted (it wasn’t but I thought it was). At the same time I was fooling around with Microsoft One Drive and saw that I had 1TB of storage available over there since I was a Office 365 subscriber. This gave me the idea of backing up the Container to OneDrive as well as my site hosting.

I first tried copying the entire container to the drive and hit a limit because the file was too large. So I thought I would split the file into 5GB parts and then sync them to OneDrive using rclone. After installing rclone. I configured it to connect to OneDrive by issuing the following command and following the onscreen prompts:

rclone config

I then created a folder on OnDrive called container to store the split files and then tried uploading a test file using the command:

rclone copy $file OneDrive:container

Where OneDrive is the name of my provider that I configured in the previous step. This was successful so I just needed to create a script that did the following:

1. Update the Container file with the latest backup
2. Split the Container file into 5GB pieces using the following command:

split --verbose -d -b5GB /mnt/repository/Container/Enc_vol1.img /mnt/repository/Container/Enc_vol_

3. Upload the pieces to Ondrive.

for file in `ls /mnt/repository/Container/Enc_vol_* |sort`; do  echo "$file";  /usr/bin/rclone copy $file OneDrive:container -v &> /tmp/oneDriveSync.log; done

This command uploads the pieces to the drive one at a time and is a bit slow because it maxes out the upload speed to ~2mbps. If you split the uploads and run the command in parallel then you get a lot faster speed. Keep in mind that if you are uploading more than 10 files at a time you will start getting errors about too many open connections and then you have to wait for a few hours before you can upload again. It took a while to upload the chunks but now my files are stored in yet another location and the system is configured to sync to Onedrive once a month.

So, as of now my files are backed up as following:

  • /mnt/Backup: Local Drive. All changes are backed up daily using rdiff-backup
  • /mnt/offsite: Encrypted Container stored online. All changes are backed up weekly using rsync
  • OneDrive: Encrypted Container stored at Microsoft OneDrive. All changes are backed up monthly using rsync
  • External Drive: Encrypted backup stored in an External Hard-drive using rsync. Changes are backed up infrequently manually.
  • Laptop: All Important files are copied over to the laptop using Unison/rsync manually so that I can access my data while traveling

Finally, I am also considering backing up the snapshot data to BlueRay disks but it will take time so haven’t gotten around to it yet.

Since I have this elaborate backup procedure I wasn’t worried much when one of my disks died last week and was able to continue work without issues or worries about loosing data. I still think I can enhance the backups I take but for now I am good. If you are interested in my backup script an extract of the code is listed below:

function check_failure ()
{
	if [ $? == 0 ]; then
		logger "INFO: $1 Succeeded"
	else
		logger "FATAL: Execution of $1 failed"
		wall "FATAL: Execution of $1 failed"
		exit 1
	fi
}

###
# Syncing to internal Backup Drive
###

function local_backup ()
{
	export BACKUP_ROOT=/mnt/Backup/Snapshots
	export PARENT_ROOT=/mnt/repository

	logger "INFO: Starting System Backup"

	rdiff-backup -v 5 /mnt/data/Documents/ $BACKUP_ROOT/Documents/
	check_failure "Backing up Documents"

	rdiff-backup -v 5 /mnt/repository/Documents/Jani/ $BACKUP_ROOT/Jani_Documents/
	check_failure "Backing up Jani Documents"

	rdiff-backup -v 5 $PARENT_ROOT/Programs/ $BACKUP_ROOT/Programs/
	check_failure "Backing up Programs"

	..
	..

	logger "INFO: All Backups Completed Successfully."
}

### 
# Syncing to Off-Site Backup location
###

function offsite_backup
{
	export PARENT_ROOT=/mnt/repository

	# First we mount the remote directory to local
	logger "INFO: Mounting External Drive"
	/usr/sbin/runuser -l suramya -c "sshfs -o allow_other username@remotehost:. /mnt/offsite/"
	check_failure "Mounting External Drive"

	# Open the Encrypted Partition
	logger "INFO: Opening Encrypted Partition. Please provide password."
	/usr/sbin/cryptsetup luksOpen /mnt/offsite/container/Enc_vol1.img enc --key-file /root/keyfile1
	check_failure "Mounting Encrypted Partition Part 1"

	# Mount the device
	logger "INFO: Mounting the drive"
	mount /dev/mapper/enc /mnt/stash/
	check_failure "Mounting Encrypted Partition Part 2"

	logger "INFO: Starting System Backup"
	rsync -avz --delete  /mnt/data/Documents /mnt/stash/
	check_failure "Backing up Documents offsite"
	rsync -avz --delete /mnt/repository/Documents/Jani/ /mnt/stash/Jani_Documents/
	check_failure "Backing up Jani Documents offsite"
	..
	..
	..

	umount /mnt/stash/
	/usr/sbin/cryptsetup luksClose enc
	umount /mnt/offsite/

	logger "INFO: Offsite Backup Completed"
}

This is how I make sure my data is backed up. All of Jani’s data is also backed up to my system using robocopy as she is running Windows and then the data gets backed up by the scripts I explained above as usual. I also have scripts to backup my website/blog/databases but that’s done using a simple script. Let me know if you are interested and I will share them as well.

This is all for now. Let me know if you have any questions about the backup strategy or if you want to make fun of me. 🙂 This is all for now. Will write more later.

– Suramya
September 30, 2020

How to fix vlc’s Core dumping issue while playing some videos

Over the past 2 days I found that the VLC install on my computer was suddenly having issues playing some of the video files on my computer. Initially I thought that it was a problem with the video file, then I realized that this was also happening with videos that had be playing fine earlier. When I ran vlc from the command line to play the problem video it gave the following output on screen when it crashed:

[00005587b42751b0] dummy interface: using the dummy interface module…
[00007f00c4004980] egl_x11 gl error: cannot select OpenGL API
[00007f00c4004980] gl gl: Initialized libplacebo v2.72.0 (API v72)
[00007f00c402a310] postproc filter error: Unsupported input chroma (VAOP)
[00007f00bd986e50] chain filter error: Too high level of recursion (3)
[00007f00c4028d40] main filter error: Failed to create video converter
[00007f00bd986e50] chain filter error: Too high level of recursion (3)
[00007f00c4028d40] main filter error: Failed to create video converter
[00007f00bd986e50] chain filter error: Too high level of recursion (3)
[00007f00c4028d40] main filter error: Failed to create video converter
[00007f00bd986e50] chain filter error: Too high level of recursion (3)


[00007f00c44265c0] chain filter error: Too high level of recursion (3)
[00007f00c4414240] main filter error: Failed to create video converter
[00007f00bd9020d0] main filter error: Failed to create video converter
[00007f00cc047d70] main video output error: Failed to create video converter
[00007f00cc047d70] main video output error: Failed to compensate for the format changes, removing all filters
[00007f00c4004980] gl gl: Initialized libplacebo v2.72.0 (API v72)

A google search told me that a possible solution was to disable hardware acceleration in the Video settings but that didn’t fix my problem. So I took a look at the kernel.log file in /var/log and I got the following error when the program crashed:

Sep 30 21:11:44 StarKnight kernel: [173399.132554] vlc[91472]: segfault at 28000000204 ip 00007f2d8916c1d8 sp 00007f2d8aa69db0 error 4 in libpostproc.so.55.7.100[7f2d8915c000+1d000]
Sep 30 21:11:44 StarKnight kernel: [173399.132568] Code: 98 48 8d 44 07 20 0f 18 08 8b 44 24 08 4d 8d 0c 1a 4d 8d 04 2b 85 c0 0f 85 cb fd ff ff 4c 8b 6c 24 28 4b 8d 04 29 4b 8d 14 20 <41> 0f 6f 01 43 0f 6f 0c 29 41 0f 7f 00 43 0f 7f 0c 20 43 0f 6f 04

Spent about an hour searching for the solution using the details from the kernel.log but got nowhere. Finally I found a forum post where one of the solutions offered was to remove the vlc configuration files, since I didn’t have any other bright idea’s I renamed the vlc config folder by issuing the following command:

mv ~/.config/vlc ~/.config/vlc_09302020

Then I started vlc and just like that everything started working again. 🙂 Not sure what caused the settings to get borked in the first place but the issue is fixed now so all is well.

– Suramya

September 29, 2020

Mounting a Network drive over ssh in Windows using WinFsp & SSHFS-Win

I have computers running both Windows & Linux and at times I need to share files between them and I have been looking for a convenient way to access the files from my Linux machine from my Windows machine without having to run SAMBA on the Linux. This is because historically SAMBA has been a security nightmare and I don’t want to run extra services on the computer if I can avoid it. Earlier this week I finally found a way to mount my Linux directories on Windows as a network mount over SSH using WinFsp & SSHFS-Win and I have been running it for a couple of days so far without any issues. (So far)

Follow these steps to enable SSHFS-Win on your windows machine:

Install WinFsp (Windows File System Proxy)

WinFsp is a set of software components for Windows computers that allows the creation of user mode file systems similar to FUSE (Filesystem in Userspace) in the Unix/Linux world. You can download it from the project’s GIT repository. The Installation file is available by clicking on the download link under ‘Releases’ near the top right corner of the page. The latest version is WinFsp 2020.1 at the time of this writing.

You install the software by running the MSI file you downloaded and the default options worked for me without modification.

Install SSHFS For Windows

SSHFS-Win is a minimal port of SSHFS to Windows. It is available for download from the project’s Git repository. You can compile from source or download the installation file by clicking on the download link under ‘Releases’ near the top right corner of the page. The latest version is SSHFS-Win 2020 at the time of this writing.

Please note that you will need to have WinFsp installed already before you can install SSHFS-Win successfully.

Usage:

Once you have installed both the software you can start using them and map a network drive to a directory using Windows Explorer or the net use command. Instructions for use are as below (Taken from the project Documentation):

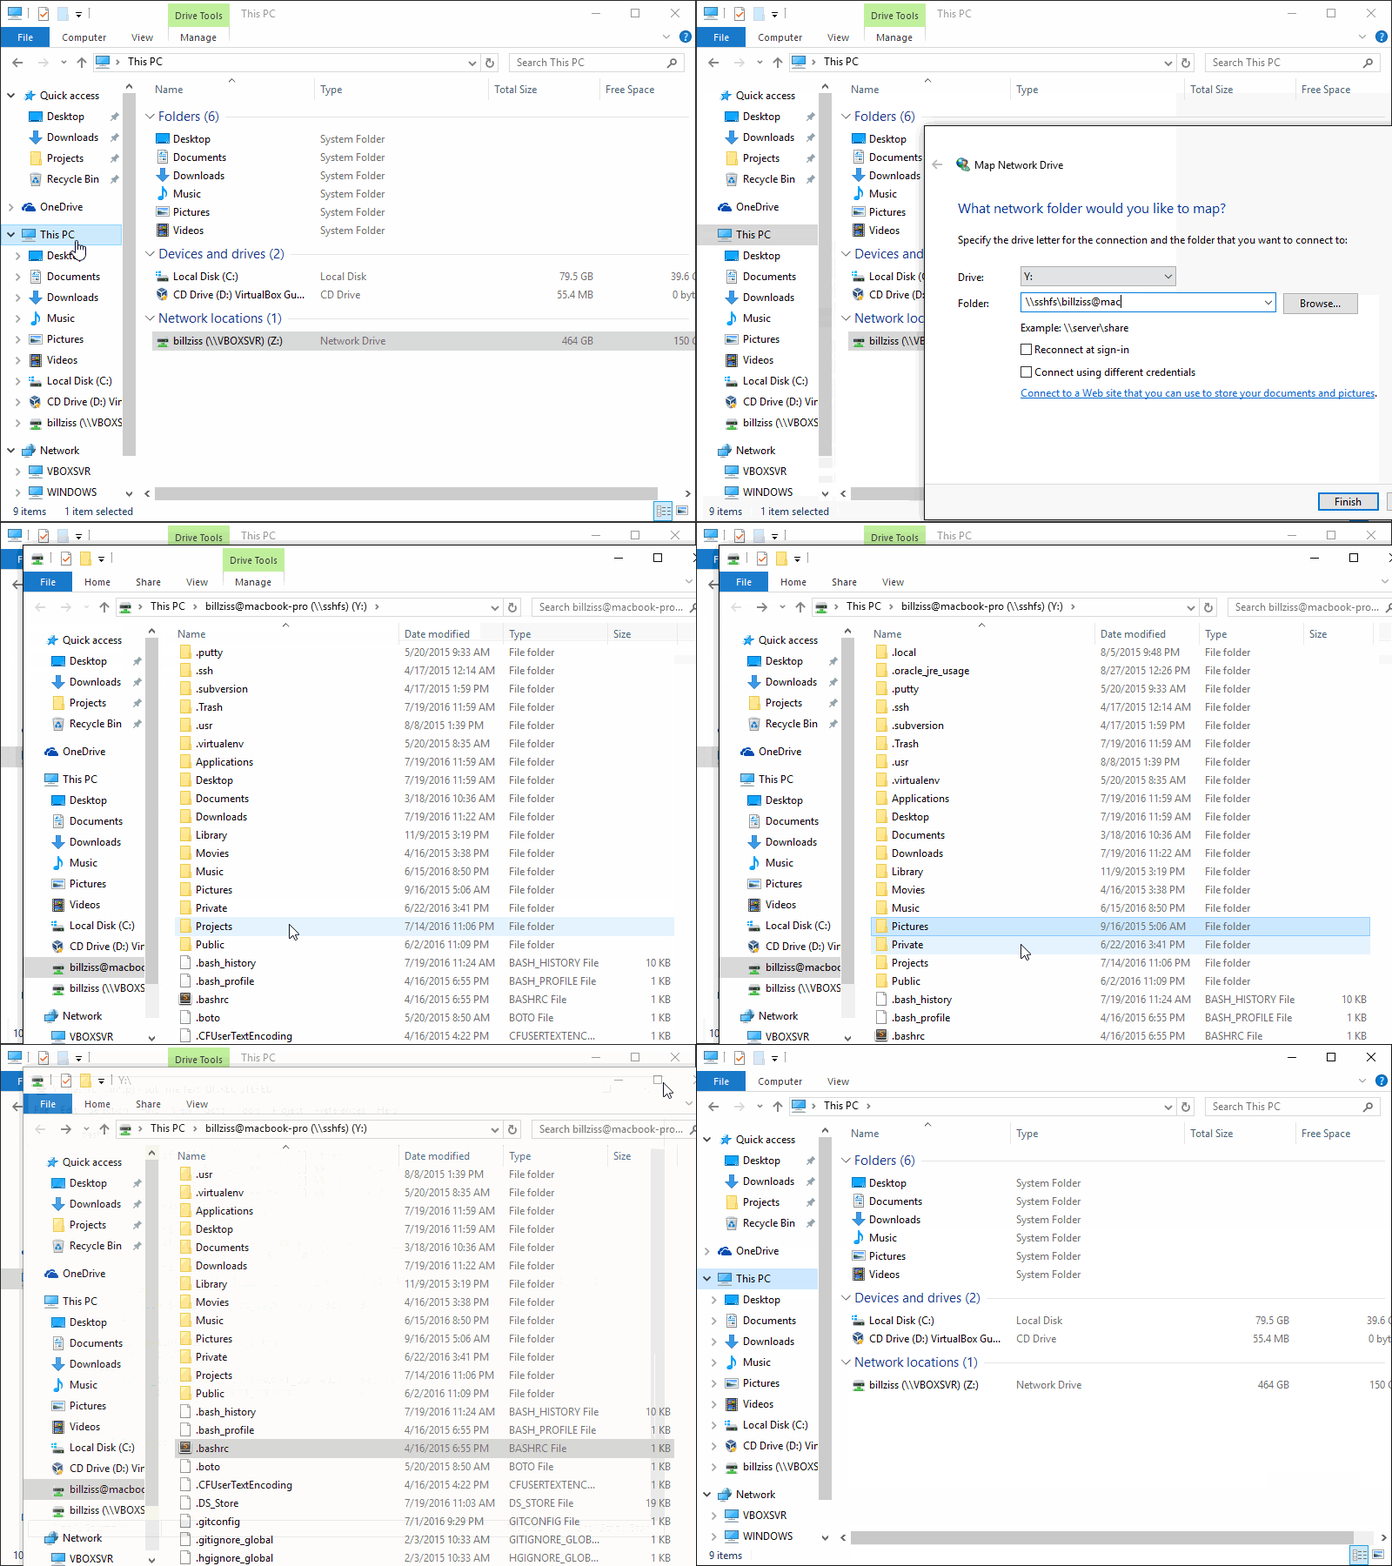
In Windows Explorer select This PC > Map Network Drive and enter the desired drive letter and SSHFS path using the following UNC syntax:

\\sshfs\REMUSER@HOST[\PATH]

The first time you map a particular SSHFS path you will be prompted for the SSH username and password which can be saved using the Windows Credential Manager so that you don’t get prompted for it again. In order to unmap the drive, right-click on the drive icon in Windows Explorer and select Disconnect.


Visual demo of how to Map a Network drive using SSHFS-Win

You can map a network drive from the command line as well using the net use command:

net use X: \\sshfs\suramya@StarKnight

You will then be prompted for the password and once you authenticate you can use the new drive as usual. You can unmap the drive as follows:

net use X: /delete

I find this quite useful and hope you do as well.

Thanks to MakerLab, Department of Computer Science, HKU for pointing me in the correct direction

– Suramya

September 27, 2020

Using ncdu to Check Disk Space Usage In Linux

One of the common tasks I face on my Linux system is to identify what files/directories are using the most space. The traditional way to find out is to go to the top level directory and run a ‘du -hs *’ (without the quotes) on the directory and then cd into each directory, rinse and repeat. The other option available is to right click on the folder in Dolphin or any other file manager and select Properties. With the same process as before when you go into each directory individually, right click and get the properties. This is very tedious and time consuming.

Instead you can use ncdu (NCurses Disk Usage) for looking at the storage space utilization on your computer as it has a lot of advantages. It is designed to find space hogs on a remote server where you don’t have an entire graphical setup available. It is fast, simple and very easy to use. I have been using it for a while now and absolutely love it.

To Install ncdu on a Debian system, you can issue the following command:

apt-get install ncdu

Once you have it installed, the usage it very simple. Simply open a command prompt and issue the following command:

ncdu

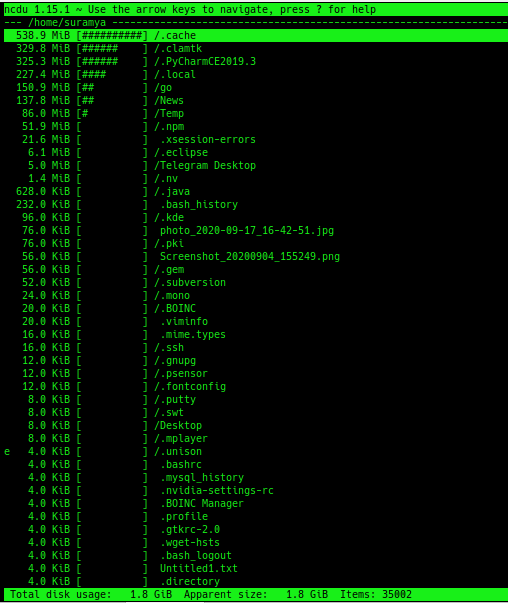
It will start in the current directory and index all the sub-directories under it. The initial scan can take a while depending on the size of the directories under the current directory. But its comparable to the time taken when running du -hs on the directory. Once the program completes its scan, you get a simple ncurses based interface that you can navigate using the keyboard.


ncdu display for my home directory

All directories & are listed with their sizes in human readable format sorted by size with the largest files & directories at the top (in the default view). You can go into a directory by selecting it and hitting enter. The sizes for the subdirectory are immediately shown without having to run additional commands. You can also delete directories & files from within ncdu by hitting the delete key which is a huge timesaver.

If you haven’t tried it out do check it out. You will love it.

– Suramya

August 18, 2020

Finally moved the Website & Blog to https

Filed under: Computer Tips,Tech Related,Website Updates — Suramya @ 12:02 PM

After spending way too much time avoiding the work due I finally configured both suramya.com & the Blog to be https by default. The setup was fairly simple, I added the certificate on the 1and1.com portal, then after a few mins I was able to access the site over https. In order to redirect http to https automatically I followed the following steps:

Auto Redirect to https in Apache

Configure .htaccess to force a redirect, you can also configure it in the Apache main configuration (under the virtualhosts directive) but since I don’t have root access and can’t modify it I updated the .htaccess config to do the same thing. Basically you need to add the following lines to .htaccess :

RewriteEngine On
RewriteCond %{SERVER_PORT} 80
RewriteRule ^(.*)$ https://www.suramya.com/$1 [R,L]

Change www.suramya.com to your domain, else every visitor to your site will be sent to my site. Not that I will mind that, but you might. 🙂

Then I did the same thing for the blog with a small change, The .htaccess for the blog reads as the following:


RewriteEngine On
RewriteCond %{SERVER_PORT} 80
RewriteRule ^(.*)$ https://www.suramya.com/blog/$1 [R,L]

When updating the file, you need to ensure you put the changes outside the # BEGIN WordPress & # END WordPress as the content is dynamically generated and would be overwritten.

Updating all the urls in WordPress

After I made the changes above, I found that the site was being redirected to https but I was getting errors about mixed content on the page because all the URL’s/Images that I had uploaded to WP till now were saved as http and not https. So I had to change every URL in the blog from http to https and to be honest I wasn’t looking forward to doing this manually. I searched the web and found this site that had instructions on how to update the url’s using the WordPress commandline interface. From the blog directory you need to issue the following command:

wp search-replace http://www.suramya.com/blog/ https://www.suramya.com/blog/ --dry-run

This command does a dry run and tells you what all changes will be made and if everything looks ok, then you can run the above command again without the ‘dry-run’ call.

wp search-replace http://www.suramya.com/blog/ https://www.suramya.com/blog/

If all goes well you will get an output similar to the following:

(uiserver):~/public_html/suramya.com/blog$ wp search-replace http://www.suramya.com/blog/ https://www.suramya.com/blog/ 
+------------------+-----------------------+--------------+------+
| Table            | Column                | Replacements | Type |
+------------------+-----------------------+--------------+------+
| wp_commentmeta   | meta_key              | 0            | SQL  |
| wp_commentmeta   | meta_value            | 572          | PHP  |
| wp_comments      | comment_author        | 0            | SQL  |
| wp_comments      | comment_author_email  | 0            | SQL  |
| wp_comments      | comment_author_url    | 29           | SQL  |
| wp_comments      | comment_author_IP     | 0            | SQL  |
| wp_comments      | comment_content       | 2            | SQL  |
| wp_comments      | comment_approved      | 0            | SQL  |
| wp_comments      | comment_agent         | 0            | SQL  |
| wp_comments      | comment_type          | 0            | SQL  |
| wp_links         | link_url              | 0            | SQL  |
| wp_links         | link_name             | 0            | SQL  |
| wp_links         | link_image            | 0            | SQL  |
| wp_links         | link_target           | 0            | SQL  |
| wp_links         | link_description      | 0            | SQL  |
| wp_links         | link_visible          | 0            | SQL  |
| wp_links         | link_rel              | 0            | SQL  |
| wp_links         | link_notes            | 0            | SQL  |
| wp_links         | link_rss              | 0            | SQL  |
| wp_options       | option_name           | 0            | SQL  |
| wp_options       | option_value          | 3            | PHP  |
| wp_options       | autoload              | 0            | SQL  |
| wp_postmeta      | meta_key              | 0            | SQL  |
| wp_postmeta      | meta_value            | 0            | PHP  |
| wp_posts         | post_content          | 591          | SQL  |
| wp_posts         | post_title            | 0            | SQL  |
| wp_posts         | post_excerpt          | 0            | SQL  |
| wp_posts         | post_status           | 0            | SQL  |
| wp_posts         | comment_status        | 0            | SQL  |
| wp_posts         | ping_status           | 0            | SQL  |
| wp_posts         | post_password         | 0            | SQL  |
| wp_posts         | post_name             | 0            | SQL  |
| wp_posts         | to_ping               | 0            | SQL  |
| wp_posts         | pinged                | 20           | SQL  |
| wp_posts         | post_content_filtered | 0            | SQL  |
| wp_posts         | guid                  | 2775         | SQL  |
| wp_posts         | post_type             | 0            | SQL  |
| wp_posts         | post_mime_type        | 0            | SQL  |
| wp_term_taxonomy | taxonomy              | 0            | SQL  |
| wp_term_taxonomy | description           | 0            | SQL  |
| wp_termmeta      | meta_key              | 0            | SQL  |
| wp_termmeta      | meta_value            | 0            | SQL  |
| wp_terms         | name                  | 0            | SQL  |
| wp_terms         | slug                  | 0            | SQL  |
| wp_usermeta      | meta_key              | 0            | SQL  |
| wp_usermeta      | meta_value            | 0            | PHP  |
| wp_users         | user_login            | 0            | SQL  |
| wp_users         | user_nicename         | 0            | SQL  |
| wp_users         | user_email            | 0            | SQL  |
| wp_users         | user_url              | 0            | SQL  |
| wp_users         | user_activation_key   | 0            | SQL  |
| wp_users         | display_name          | 0            | SQL  |
+------------------+-----------------------+--------------+------+
Success: Made 3992 replacements.

That’s it. After running the command, the blog is completely on https and the security gods are happy :). Now I need to update all the URL’s on the main site to reference https instead of http and that is going to be painful. It will require a whole lot of script-fu to do it automatically as it will have to be a regex/awk or something similar. Maybe someone already did the work and posted the solution online. Alas that was not the case. I ended up manually updating the files since there were only about 20-25 of them. Opened all of them in the editor one-shot and then did a search & replace. Now both sites are coming up properly in https.

– Suramya

April 17, 2015

How to find information when Google can’t find it

Filed under: Computer Tips,Interesting Sites,Knowledgebase,Tech Related — Suramya @ 10:36 PM

For most people if you can’t find something on Google then it’s not there on the internet. However that is not true and there are other ways to find the information you are looking for even if Google can’t find it. Now some of you might be wondering, how can something be online without Google knowing about it because don’t they index everything? Unfortunately, that is not true. According to studies there are a lot of sites out there that are not indexed by any search engine. This part of the internet is called the Deep Web. Deep web is not to be confused with Dark Net which contains sites that can’t be reached via the regular internet. Deep Web sites are accessible via the regular internet and it is a lot bigger than the visible internet. In-fact some estimates suggest that the deep web is 400 to 550 times larger than the surface web.

So how do you find something that is in the Deep web or just not indexed by Google? Well, you can always try one of the following options depending on what you are looking for.

Wolfram Alpha

For example, if you are making factual queries about data (e.g. facts, figures, etc) then you should take a look at Wolfram Alpha. Their Wikipedia page explains how the engine works:

Users submit queries and computation requests via a text field. Wolfram Alpha then computes answers and relevant visualizations from a knowledge base of curated, structured data that come from other sites. The curated data makes Alpha different from semantic search engines, which index a large number of answers and then try to match the question to one.

Using the Mathematica toolkit, Wolfram Alpha can respond to natural language questions and generate a human-readable answer.

Topsy

Topsy maintains a comprehensive index of tweets and since Twitter is the best place for real-time sharing of thoughts/news then it is a good place to search for current events/trending topics. I just tried it out and it looks to be pretty effective and efficient.

Image Search

If you are trying to identify an image, or find more information about a particular Image then you can always try Google image search. However if that doesn’t return any relevant results then you should try out specialized Image search engines like Tin Eye or yandex.ru. I use a Firefox Extension called Who Stole my Pictures that lets you search across multiple engines in one shot from your context menu. Side note: This also search on Bing but 99.99% of the time Bing doesn’t return any results no matter what you search for.

On the other hand if you are just searching for images you should try PicSearch.com which is a image search service allowing a user to search across over 3 billion pictures (as per the site).

WebForums and Discussion boards

Another great way to find answers is to search on enthusiast forums and discussion boards. These forums have a whole community of folks who are passionate about that particular topic and would love you to point you in the right direction or walk you through figuring out the solution. Just ensure that you are asking Questions The Smart Way.

BoardReader.com allows you to search across multiple discussion boards and forums available on the net. StackExchange.com has multiple sub sections on hundreds of topics, Reditt.com has subreddits that focus on thousands of topics and most of them have actual relevant information as not all of the site is dedicated to cat video’s.

IRC

IRC stands for Internet Relay Chat and is designed to facilitate group communication in discussion forums, called channels hosted on IRC servers. There are channels dedicated to pretty much any topic you can think of on some IRC server somewhere and you can get answers to questions or help with a problem in real time.

The difficult part is finding the appropriate channel to ask your question.

I have used IRC Search in the past to find channels with a good success rate. Another option is ixirc.com/.

In addition to the options listed above, you should also check out the following resources for additional information and search options/methods that you can try out when searching for data:

That pretty much covers what I wanted to talk about in this post so this is all for now. Will post more later.

– Suramya

October 7, 2014

Find Recent Files in Windows with the Run Dialog

Filed under: Computer Tips,Knowledgebase,Tech Related — Suramya @ 5:40 AM

Tip for all you windows 8 users out there, If you want to see a history log of every file that you have touched on your computer, there is a easy built-in way of getting that information without installing any special software on Windows 8 by following these steps:

  • Open the run dialog box by pressing Win + R
  • Type in “recent” (without the quotes)
  • Click ‘OK’

This will display any file you’ve touched, as well as the last time it was modified all in one place. You can also access this data by browsing to the following location using ‘Windows Explorer’:

C:/users/username/recent

Source: lifehacker.com

– Suramya

April 20, 2014

Facebook Stat generation followup

Filed under: Computer Tips,Linux/Unix Related,My Thoughts,Tech Related — Suramya @ 2:16 AM

In my previous post I had talked about some of the stats I pulled from Facebook about it’s usage by my friends. This was an ad-hoc number crunching done just because I was bored and got curious. After the post went live a friend of mine, Ankush asked for more details on how I generated the numbers so in this post I am going to go over my process and how I got the numbers I shared.

Before we start, keep in mind that this is all data that is publicly available on FB, or at least shared with me. If you don’t want others to generate data about your activity on FB, you should change your privacy settings on FB and restrict access. Please don’t try to use this information to try to get access to data you are not supposed to. You will get in trouble and I will not take responsibility for it. Now that all that is out of the way, lets get to the details of the process.

The first thing you need is to have the Facebook Command Line client installed. Instructions on how to install are here so I am not going to repost them here. Make sure you authenticate the install and follow the steps in ‘Obtain Additional Authorization’ section of the installation guide otherwise the rest of the guide won’t be of much use to you.

Once you have FBCMD installed and configured, you can start playing with the options. Check out fbcmd Commands for the list of available options. You can also run the script with –help for the same.

/usr/bin/php /var/www/fbcmd/lib/fbcmd/fbcmd.php --help

Since I was interested in the photos uploaded the first command I ran was:

/usr/bin/php /var/www/fbcmd/lib/fbcmd/fbcmd.php OPICS =all FB_Pics

This command gets all the photos uploaded by folks in my friend list and downloaded them to the FB_Pics folder. As I mentioned in the previous post, this downloaded over 58k photos to my system. So be careful when you run it. You can also restrict it to a particular user by passing their name as a parameter.

To get the wall post count’s of all my friends, I ran the following command:

/usr/bin/php /var/www/fbcmd/lib/fbcmd/fbcmd.php FINFO wall_count =all

This gave me a output similar to the following:


NAME WALL_COUNT
Suramya Tomar 247
ABC 1405

I took this output, put it in an Excel file and did some analysis on it to get the max post count, least post count, Total count and top 10 user post counts. I could have done this using shell commands as well, but since this was a one time task I didn’t see the point. Maybe in the future I could set up a job that would do this periodically and do trending on the data but lets see. I don’t see much use for this data except for the coolness factor and to satisfy my curiosity.

Getting the birthday count was as easy as running the following command:

/usr/bin/php /var/www/fbcmd/lib/fbcmd/fbcmd.php FINFO birthday_date =all |wc -l

This returned the number of folks who had shared their birthday’s on FB and then I got the current location count using the following command:

/usr/bin/php /var/www/fbcmd/lib/fbcmd/fbcmd.php FINFO current_location =all |wc -l

So there you have it. This is how I generated the numbers I had posted earlier. As you can see there is nothing too complicated about it, so if you want you can generate similar stats for your friends as well.

Let me know if you have any questions and I will do my best to answer.

Well this is all for now. I should go and get some sleep now.

– Suramya

« Newer PostsOlder Posts »

Powered by WordPress